Lab 5B: Comparing Plant Cells
Learning Objectives
After completing the lab, the student will be able to:
- Make wet mounts of bacteria, plant and animal cells and view them under the microscope;
- Observe and identify differences between cells and cell structures under low and high magnification and record your observations;
- Explain how and why microscope stains are used when viewing cells under the microscope.
Lab 5B: Comparing Plant Cells
Introduction
Sometimes cellular features are easy to view because of their natural color making them visible, but often this is not the case. Many features of cells are hard to see because they are transparent. Sometimes they can be made more visible using stains, which are selective- they usually color some features of the cell but not others.
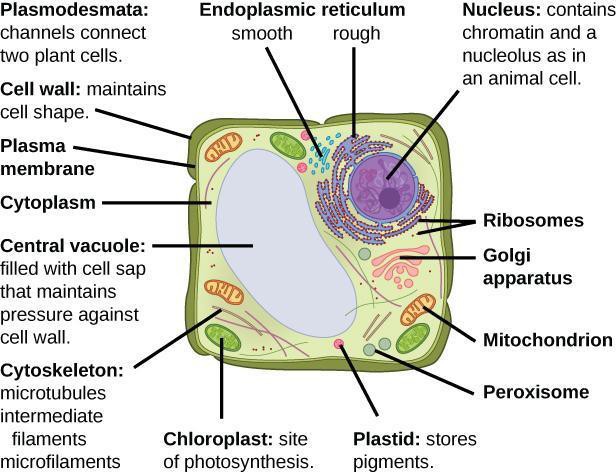
Plant cells are eukaryotic; they are larger than prokaryotic cells (like the Anabaena you just observed) and have subcellular organelles. Like bacteria, they have a cell wall to help keep the cell rigid—in plants, the cell wall is composed of a complex carbohydrate called cellulose. Plant cells, like that shown in Figure 4.4, also have a nucleus with DNA. Many plant cells also have chloroplasts with chlorophyll where photosynthesis occurs and/or other membrane-bound plastids, such as amyloplasts that store starch. The diagram below shows you the major components of a plant cell, including those visible with our laboratory microscope and others that are not.
Safety Precautions
- Wear gloves and a lab coat when handling stains.
- Be careful when handling glass slides; the edges may be sharp.
- Dispose of used cover slips in a glass disposal box.
- Observe proper use of the microscope; avoid handling the electric cord with wet hands.
- Do not use the coarse adjustment knob of the microscope at high and oil immersion objectives.
- Inform your teacher immediately of any broken glassware as it could cause injuries.
- Wash your hands with soap and water after handling live organisms.
Materials
- Live specimen of water weed in the genus Elodea
- Light compound microscope
- Clean microscope slides and cover slips
- Lens paper
- Water and dropper
- Yellow or white onion
- White Potato
- Tweezers
- Gram iodine solution
For this activity, you will work in pairs.
Procedure
ONION
Step 1: View the stage micrometer slide through the microscope. Estimate the field of view (full diameter across) using the 4x, 10x, 40x objective lenses. You will use these measurements to estimate the sizes of cells going forward. Diagram what each view of the stage micrometer looks like, showing the full field as a circular boundary.
Step 2: Obtain a fleshy white layer from the outer portions of a white onion, and use tweezers to remove a thin transparent membranous layer from its surface. Tear off a small piece, place it on a microscope slide. Place 1-2 drops of gram iodine solution on it, and a cover slip. Touch a piece of paper towel to the edge of the cover slip to wick out excess stain; dispose of the paper towel in the iodine waste bin.
Step 3: View the slide under 4x, 10x, and 40x objective lenses. Given your knowledge of the width of the field of view present when viewing using the 10x or 40x lenses, devise a method to estimate the average length of the onion cells. Did you think the 10x or 40x will give you a more accurate estimate of their average length? Why? Give instructions for your method, step by step, in your lab notebook. Carry out your method, and record your estimate of cell length, including giving calculations. Then use the same procedure to estimate average cell width (instead of length). What is the ratio of the cells’ length to width (length / width)?
Step 4: The small brown circular features, one per cell, are the cell nuclei. They can occur in the interior or along the edge. Draw the images in the microscope at 4x, 10x, and 40x. Draw the whole field of view including the circular perimeter for each, providing coarse details for the whole field but instead depict fine details for the central 10% or so of the image. On the 40x view, use arrows to label a cell wall, and a nucleus.
POTATO
Step 1: Use a razor blade to shave or scrape a thin layer of moist cells off a fresh cut in a white potato. Stain with iodine as with the onion sample.
Repeat steps 2 and 3 above. The cell walls will be visible (though transparent and clear), and the purple ovals are starch grains, which are used by the potato to store energy. Label the cell walls and starch grains. It is hard to distinguish the long vs. wide dimensions in these cells, they are not clearly elongate; simply do one estimate of size, whichever direction you wish.
ELODEA (WATER WEED)
Step 1: Use tweezers to obtain a single Elodea leaf; take a wet leaf, not one in the air. Make sure it is a single leaf, not two stuck together. You can drop the cover slip straight onto it, you do not need to add moisture. Explore the whole leaf and determine where you think the cells are best viewed; diagram this position on the leaf, in your lab notebook (draw the leaf, and put a circle around the spot you are viewing).
Repeat steps 2 and 3 from above. In this plant, you will be able to see the cell walls, and small green oval features within the cells called chloroplasts- label those in your 40x drawing (not the nuclei). These are visible without staining because they are pigmented, making them visible. Their pigment has a specific purpose. Chloroplasts are the organelles where photosynthesis occurs; the green color is a pigment called chlorophyll that absorbs sunlight, the energy from which is converted into carbohydrate molecules. We (and many other animals) eat plants to obtain that energy.
