Macromolecules in Common Food
Learning Objectives
After completing the lab, the student will be able to:
- Detect the presence of macromolecules: simple sugars, starch, proteins, and lipids.
- Explain the concepts of positive and negative controls in testing hypotheses.
Introduction
While a great many molecules play a role in the functioning of living organisms, several types are especially important. In particular, carbohydrates, proteins, nucleic acids, and lipids are notably important groups of molecules, each of which includes some molecules that are very large (macromolecules, aka polymers) which have identifiable smaller components that are repeated units within their makeups (aka monomers). Several simple chemical tests provide means of detecting some of these molecules in specimens, such as of food items.
Such testing procedures often involve a compound turning colors in the presence of the molecule or macromolecule being tested for. For instance, iodine-potassium iodide turns blue-black in the presence of starch. In order to perform such tests effectively, it is useful to have some prior knowledge of what a positive test result will look like, and what a negative test result will look like. An example of a positive test result that can be compared to your own test result, is called a positive control. An example of a negative test result to be similarly compared to your own test results, is called a negative control.
In this lab exercise we will use a simple brown paper spotting test to test for the presence of lipids, the Benedict’s test to test for simple sugars (small carbohydrates), iodine-potassium iodide to test for starch, and the Biuret test to test for proteins. In each case we will test known samples to establish a positive control, apply the test to distilled water to establish a negative control, and finally apply the test common foods (milk, potato, and flour) to determine their makeup. The known samples used to formulate our positive controls will be vegetable oil (lipids), glucose (aka dextrose, a simple sugar), corn starch (starch), and albumin from egg whites (protein).
For this activity, you will work in pairs.
To expedite the lab activity, one team member should carry out the carbohydrates (glucose and starch) activities while the other team member does the tests on the lipids and the proteins.
Safety Precautions
- Safety goggles must be used throughout the duration of the laboratory activity.
- It is highly recommended that you wear rubber gloves and a lab apron when handling any of the chemicals.
- Immediately inform your teacher of spills containing the test solutions. The acids and bases in the solutions can harm your skin.
- Immediately inform your teacher of any broken glassware, as it could cause injuries.
- Clean up any spilled water or other fluids to prevent other people from slipping.
- Immediately wash your hands if they directly come in contact with the test solutions. It is important to wash your hands after the laboratory activity to avoid any possible contamination of other surfaces with chemical residues that might be on your hands.
Materials
- Eight test tubes (one test tube per sample being tested)
- 10 ml graduated cylinder
- Grease pencil or washable marker
- One test tube rack
- One test tube holder
- Eight sample droppers or pipettes (do not mix pipettes from one solution to another)
- One thermometer
- Hot plate or microwave
- 250 ml beaker
- Brown paper bag
- Scissors
- Small ruler
- Hair dryer or lamp
- Distilled water
- Benedict’s solution
- 1 percent copper sulfate solution or Biuret reagent
- 10 percent sodium hydroxide
- Lugol’s solution or iodine-potassium iodide solution
- 5 percent glucose solution weigh 0.5g of dextrose powder onto scale, add 10ml of tap water, swirl
- 2 percent starch solution
- 1 percent albumin solution or raw liquid egg white
- Vegetable oil
- A selection of common foods (contrasting in their reputation of healthiness)
Procedure 1
Lipids
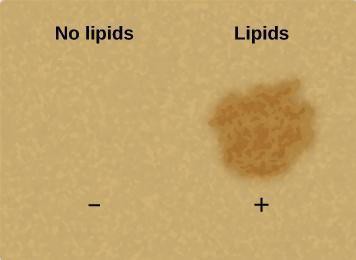
As discussed in the introduction, you will use a strip of brown paper to indicate the presence of lipids in a solution.
In this investigation, explain which samples are the negative controls and which are the positive controls. Why is it important to perform a negative control and a positive control before using these tests to analyze foods for lipids? Write your answers in your laboratory notebook.
Use the following steps to test for the presence of lipids.
Step 1: Cut a piece of brown paper large enough to have room for 6 liquid spots to be placed on it and labelled (each spot c. 1 cm diameter).
Step 2: Pour a small amount of distilled water in a beaker, and use a pipette or similar device to transfer a small amount (enough to make a dot c. 1 cm in diameter) to the paper. Label itWater.
Step 3: Pour a small amount of vegetable oil into another beaker (or the cap of its bottle), and use another dry pipette to place a 1cm spot of it on the paper. Label it Oil.
Step 4: Heat two small beakers with 30 ml each of distilled water on the hot plate until they begin to steam. Pour a small quantity of instant potato flakes into one, and of flour into the other. Swirl these until the potato and flour are as uniformly dissolved (or suspended) as possible. Be careful when touching the hot beaker.
Step 5: Use a pipette to form a 1cm spot of milk on the brown paper. Do the same with the potato and flour slurries, using different pipettes. Label each spot.
Step 6: When the spots have dried (it may take a while- move onto the next test below while waiting), describe in your lab notebook the appearance of the positive and negative controls, and of the milk, potato, and flour spots. For the last three, state whether the test was positive or negative. You may want to take photographs.
Cleanup: Set aside your samples of milk, potato slurry, and flour slurry for use in subsequent sections of the lab. Clean up your glassware for re-use in the other tests. Use soap, and distilled water for the final rinse.
Procedure 2
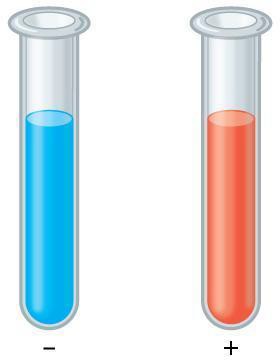
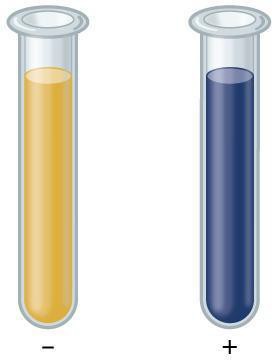
Carbohydrates (Glucose and Starch)
Place four clean test tubes in the test tube rack and use the grease pencil or marker to number each test tube as shown here.
|
Test tube number |
1 |
2 |
3 |
4 |
|
Test solution |
Distilled water |
Glucose test solution |
Distilled water |
Starch test solution |
Table 3.2
Which tubes represent the positive and negative controls for this experiment? Explain why in your notebook.
Step 1: Add approximately 150 ml of water into the 250 ml beaker. Stick a thermometer in the water and use the hot plate to heat the water to about 80oC.
Step 2: Use a small graduated cylinder to add 1 ml of distilled water to test tube 1 and test tube 3. We are using test tube 1 for the present test, and test tube 3 for the next test.
Step 3: Weigh 0.5g of dextrose powder in a small beaker, and add distilled water up to 10 ml. This makes a 5% glucose (dextrose) solution.
Step 4: Add 1 ml of the 5 percent glucose solution to test tube 2.
Step 5: Pour c. 5 ml of Benedict’s solution into a small beaker, and use a graduated cylinder to add 2 ml to test tube 1 and to test tube 2.
Step 6: Place test tubes 1 and 2 in the beaker of heated water for 5 minutes.
Step 7: Use a test tube holder to remove test tubes 1 and 2 and allow them to cool in the test tube rack. Turn off the heat after removing the test tubes. Observe the color of each solution and record your observations in your data table. State which is the positive, and which is the negative control, and the name of the test.
Step 8: Perform the same test on the milk, and potato and flour slurries prepared for first part of the lab, using test tubes. Use 1 ml of each of these, and 2 ml of the Benedict’s solution. Describe the appearance of each at the conclusion of each test, and whether you conclude each test to be positive or negative.
Step 9: Tube 3 (distilled water) will be your negative control standard for the starch test.
Step 10: Make an approximately 2% starch solution in a way analogous to the procedure for making the 5% glucose solution above. How many grams of starch should you use? How many ml of distilled water? Record these amounts in your lab notebook.
Step 11: Add 1 ml of the 2 percent starch solution to test tube 4. This will be your positive control standard.
Step 12: Use a pipette to add 8 drops of the iodine-potassium iodide solution to test tube 3 and to test tube 4. Observe the color of each solution and record your observations in your data table. It may be useful to take photographs of your results.
Step 13: Perform the same test on your milk, and potato and flour slurries. In your notebook describe the appearance of each test, and state your conclusions from each test.
Cleanup: Keep the milk and the potato and flour slurries for further use. Clean up in preparation for the next test.
Procedure 3
Proteins
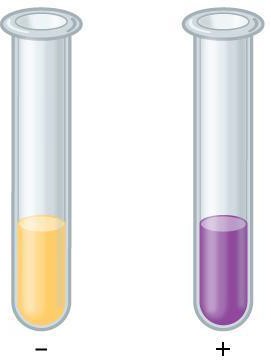
Step 1: Place three clean test tubes in the test tube rack and use the grease pencil or marker to number each test tube as shown here.
|
Test tube number |
1 |
2 |
3 |
|
Test solution |
Distilled water |
Dilute protein solution |
Concentrated protein solution |
Table 3.2
Step 2: Label the positive and negative controls in the table.
Step 3: Mix up some 1% albumin solution. Based upon the measurements used to make the 5% glucose and 2% starch solutions above, how many grams of albumin powder, and ml of water, should you mix?
Step 3: Add the following to each test tube:
– 2 ml of distilled water to test tube 1.
– 1 ml of distilled water and 1 ml of the 1 percent albumin solution to test tube 2.
– 2 ml of 1 percent albumin solution to test tube 3.
Step 4: Mix up a 10% solution of sodium hydroxide, being careful of heat release during mixing. Record your grams of sodium hydroxide and ml of water, in your notebook.
Step 5: Add 2 ml of the 10% sodium hydroxide to each test tube and carefully swirl the tubes to mix the solution.
Step 6: Add five drops of the Biuret reagent to each test tube. Carefully swirl the tubes to mix the solution.
Step 7: Observe the color of each solution and record your observations in your data table, together with your conclusions from the tests. It may be useful to take photographs of your results. How did the two albumin samples differ in appearance after the test was run? Try to explain any difference, in your lab notebook.
Cleanup: Discard the remaining milk and potato and flour slurries. Clean glassware and set to dry. Put away goggles and coat, discard gloves. Wipe counter.
Discussion
Discuss the limitations of these tests. Are there any types of foods to which any of these tests could not be applied? Why or why not?
