Lab 5C: Observe Animal Cells
Learning Objectives
After completing the lab, the student will be able to:
- Make wet mounts of bacteria, plant and animal cells and view them under the microscope;
- Observe and identify differences between cells and cell structures under low and high magnification and record your observations;
- Explain how and why microscope stains are used when viewing cells under the microscope.
Lab 5C: Observing animal cells.
Introduction
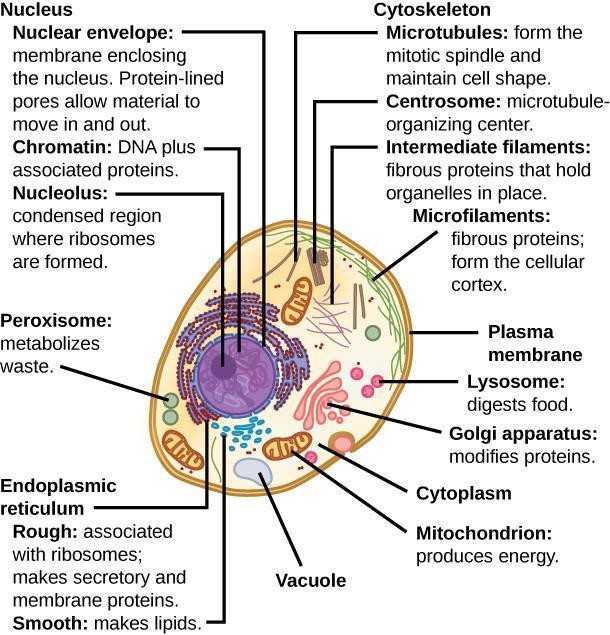
Animal cells are eukaryotic and possess subcellular components in common with the plant cells you observed in Activity 2. Organelles that plant and animal cells share in common include the nucleus, Golgi apparatus, mitochondria, ribosomes, and the endoplasmic reticulum. These are all participants in protein synthesis. An illustration of an animal cell is shown in Figure 4.5. There are some exceptions to these general components. For example, mature red blood cells (RBC) which have ejected their nuclei to have more room for hemoglobin, the protein that carries oxygen around the body. One of the easiest eukaryotic cells to obtain in the lab is the squamous epithelial cell found in the tissue lining the internal surface of your cheek. These cells are arranged in a flat layer and are easy to remove and observe.
Safety Precautions
- Wear gloves and lab coat to avoid spilling stain on yourself.
- Be careful when handling glass slides; the edges may be sharp.
- Dispose of used cover slips in a glass disposal box.
- Observe proper use of the microscope; avoid handling the electric cord with wet hands.
- Do not use the coarse adjustment knob of the microscope at 40x.
- Inform your teacher immediately of any broken glassware as it could cause injuries.
- Used cotton swabs are considered biohazard; dispose of swabs in the biohazard trash container as soon as you have used them.
- Methylene blue is a dye; be cautious not to ingest methylene blue.
Materials:
- Prepared slide of red blood cells
- Light compound microscope
- Clean microscope slide, cover slip
- Clean cotton swab or toothpick
- 0.5–1 percent methylene blue solution
- Dropper or pipette
- paper towels
For this activity, you will work in pairs.
Procedure
RED BLOOD CELLS (PREPARED SLIDE)
Step 1: Examine the prepared slide labeled “Human Blood Smear.” The red blood cells are the small circles that dominate the slide. Their central pale areas (when present) are called their central pallor. If you search you will find widely scattered, larger cells with multiple darker purplish internal features; these are white blood cells.
Step 2: Estimate the average size of the red blood cells. Will the technique(s) you used in the previous section for Elodea, Onion, and Potato cells work for these cells? Why or why not? Describe a procedure for use with the red blood cells.
Step 3: Draw this slide at 4x, 10x, and 40x, including at least one white blood cell in the 40x. Use arrows to label a red blood cell, a central pallor, and a white blood cell.
HUMAN MOUTH LINING (INSIDE CHEEK) CELLS
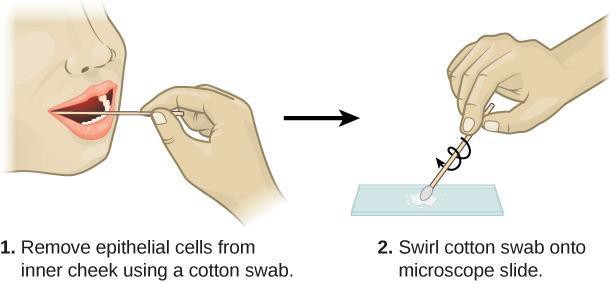
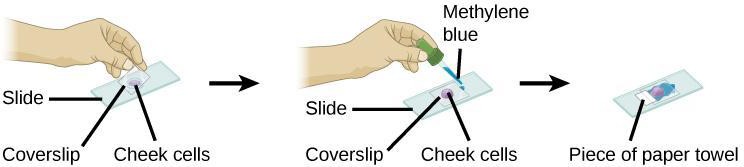
Step 1: Prepare your cheek cell slides as shown in Figure 4.6 and Figure 4.7 and outlined below.
- Take a clean cotton swab and gently scrape the inside of your mouth with a single stroke.
- Smear the cotton swab or toothpick on the center of the microscope slide for 2 to 3 seconds.
- Add a small drop of distilled water onto the smear, place your cover slip (not shown in drawing).
- Place a small drop of methylene blue solution (a dye) on the edge of the cover slip, and wick it onto the smear by placing a dry paper towel on the opposite side, and drawing the water into it (which will pull in the stain from the other side). Try to get as much of the stain to be dilute (vs. intense) blue as possible.
- Remove any excess solution below or around the cover slip using a paper towel.
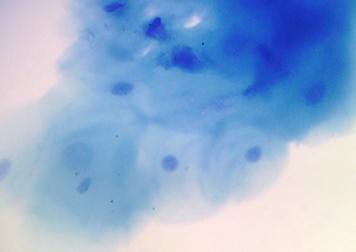
Step 2: Hunt through the slide to find the “best” example of a cheek cell that you can (pale blue blob with a dark blue nucleus near the center). How do you propose to estimate its size? Describe a method.
Step 3: Draw the view at 4x, 10x, and 40x, with your focal cell in the middle. Label its outer cell membrane, cytoplasm, and nucleus.
Discussion
- Identify whether the following images (Figure 4.9a, Figure 4.9b, and Figure 4.9c) show an animal cell, a plant cell, or a prokaryote cell. Explain how you know the difference.
-
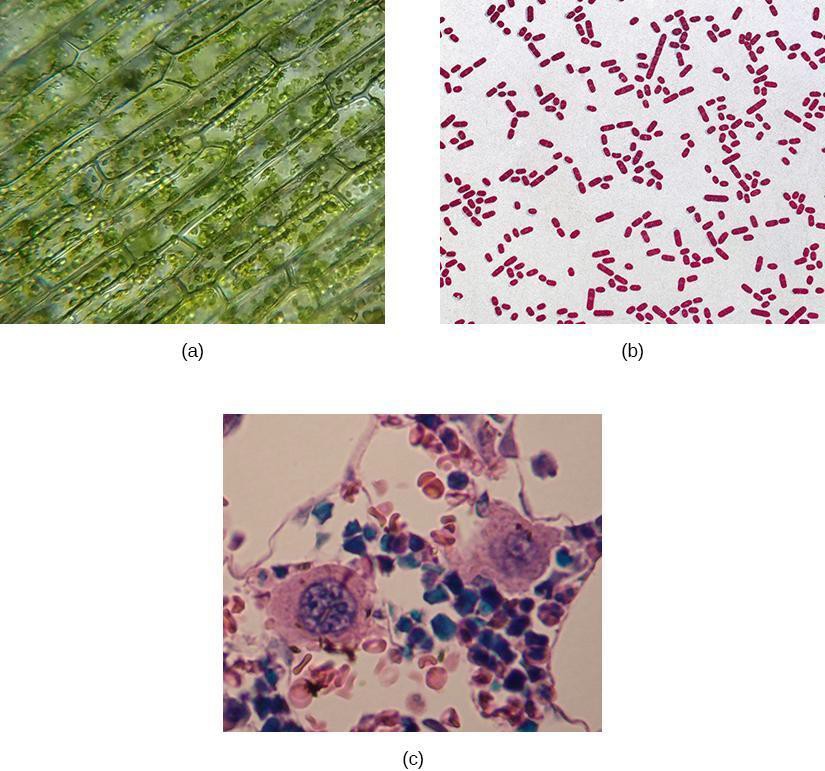
Figure 4.9: This figure shows three photos of different cell types. The photo in part (a) shows green cells with smaller organelles within. The photo in part (b) shows numerous tiny oval-shaped cells. The photo in part (c) shows a complex arrangement of different types of cells, some with a nucleus.
