Lab 2a Parts of a Microscope
Learning Objectives
After completing the lab, the student will be able to:
- Explain or describe the parts of a light compound microscope;
- Determine the total magnification of each objective lens.
Introduction
Microscopes are one of the most powerful tools of the biologist. The hidden world becomes visible with the aid of a microscope. A microscope is used to see items and structures that the human eye cannot visualize. Microbes, cell structures, and minute particulate materials are examples of such objects. The microscopic examination of one-celled organisms as well as the cell and tissues of multicellular organisms, are all part of biological research. To properly utilize the microscope, you must first learn the operational modes of each part. In this laboratory exercise, you will learn to use and identify the parts of a compound light microscope.
Safety Precautions
- Handle microscopes and lenses with care. Grasp it by placing one hand underneath the base, and one on the handle in back.
- Do not unscrew the top eyepiece housing to rotate the eyepieces when sharing (it may fall off, or gradually strip the screw); instead, rotate the whole microscope or have the observer switch positions.
- Do not drop or crush slides (including by lowering the microscope lens onto a slide). Alert your teacher immediately to any broken glass so it can be properly disposed.
Materials
- Compound microscope
- Slide with newsprint.
For this activity, you will work in pairs.
Procedure 1
A microscope magnifies the image of an object through a series of lenses. The condenser lens focuses the light from the microscope’s lamp onto the specimen. The light then passes through the object and is refracted by the objective lens. The objective lens is the more powerful lens of a microscope and is closest to the object. The light then travels to the ocular lens, which focuses the image onto the user’s eye. Usually, the power of the ocular lens is fixed for a given microscope.
Different microscopes can magnify objects hundreds, thousands, or even millions of times. Magnification refers to how much larger the image is compared to the original object. As magnification increases, the image becomes larger. The total magnification is the power of the objective multiplied by the power of the ocular lenses. Resolution refers to the ability of a microscope to distinguish two points on the image. As resolution increases, objects that are closer together appear as separate points. Contrast refers to the ability of a microscope to distinguish an object from its background. The higher the contrast, the greater the difference in intensity between an object and the background.
Step 1: When moving a microscope, grasp the neck firmly with one hand using the handle on its rear face, and place your other hand under the microscope’s base. Do not bang the microscope on the desk. Once you have set down your microscope, turn the revolving nose piece so that the lowest power objective is pointed at the stage.
Step 2: Throughout this lab, handle slides by their edges and do not touch the specimen area to avoid smudges. Lens paper is available in the front of the room if needed to clean the slide. Place the slide with newsprint on the stage. Make sure it is oriented so that you can read the letters correctly (not upside down etc.) with the naked eye while sitting at the microscope.
Step 3: You will now observe the newsprint slide. Turn on the microscope lamp (you will see it shine up through the hole in the stage), adjusting its brightness as needed. Failure to illuminate is usually traceable to a plug that is not securely pressed into the back of the scope. Enter the specimen on the stage and look through the ocular lens. Start with the stage all the way down, and while looking through the oculars, use the coarse focus knob to slowly move it upwards until the slide comes into focus. Adjust the fine focus knob for maximum clarity. Be careful while focusing so that the slide does not touch the lenses. On 4x, draw one letter in your lab notebook.
Step 4: Draw a diagram of your microscope in your lab notebook. You may manipulate the microscope to figure out what part does what. Label the following:
Ocular lenses (eyepieces)
Objective lenses (list their 4 powers)
Stage
Stage manipulator knobs
Lamp
Light switch
Brightness adjustment knob
Coarse focus
Fine focus
Step 5: Microscope Care and Maintenance: When you are finished using a microscope, make sure the lowest power objective is in place and take the slide off the stage. Use only lens paper to wipe the lenses if they are dirty. Support the microscope by the base when carrying it as described in Step 1. If you are continuing with the other activities in this lab, keep the microscope out.
Procedure 2
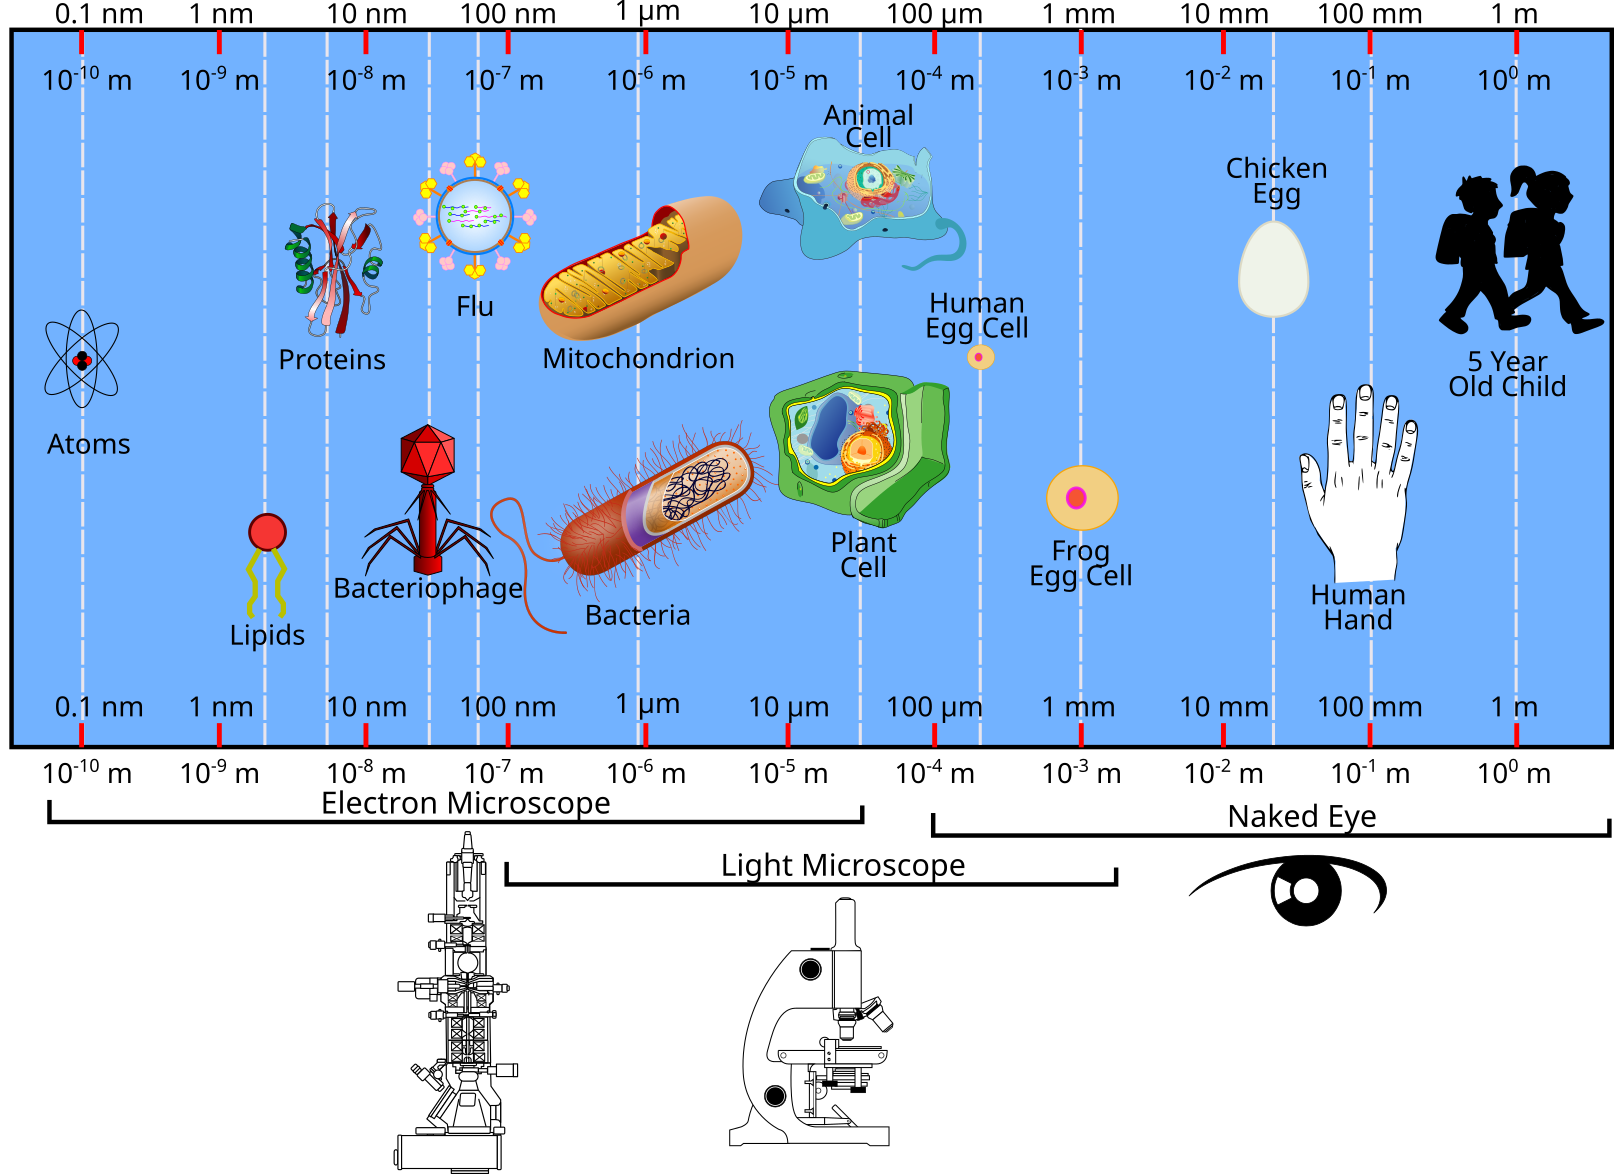
Step 1: Using the chart below, answer these questions in your lab notebook.
- How many nanometers are in one meter? Answer using the English word for the number, not the power of ten.
- Can a light microscope be used to view an individual protein?
- Can the human eye view a human egg cell?
Step 2: Magnification is the process of enlarging the appearance of an object. We calculate the magnification of an object by indicating the multiplicative change in size. So if something appears to be double the size of the real item, then it is magnified 2X. Because there is a magnification by the eye-piece (ocular lens), as well as the objective lenses, our final magnification of an item is the product of those two lenses.
The lowest magnification objective lens (usually 4X or 5X) is referred to as a scanning lens. There is also usually a low power objective lens at 10X and a higher magnification one at 40X. There may be a higher magnification objective lens at 100X but these usually require oil to function properly and are often reserved for microbiology labs.
Our microscopes’ ocular lenses are 10x.
We can calculate that as:
Magnificationtotal = Magnificationobjective X Magnificationocular
With this in mind, compose a table in your lab notebook that lists each of the four powers of objective lenses on different rows, and has a second column showing what the total magnification is that is achieved by using that objective lens and the 10x ocular lens.
Discussion
- What are three precautions you must take to prevent damage to the microscope?
- A scientist uses a 40× objective to observe his specimen. He has a 10× ocular lens. What is the total magnification of the object?
- A magnifying glass is also used to magnify objects. How is a compound microscope different from a magnifying glass?
- Based on how the newsprint looks on the stage and through the microscope, in what ways does an object viewed in an microscope change its orientation?
Magnification[1]
- The Magnification activity is adapted from Microscopy in Biology OER, a site sponsored by the Ursula Schwerin Library to select and curate resources for use in General Biology 1 and originally authored and curated by Jeremy Seto, Department of Biological Sciences – New York City College of Technology. It is licensed CC-BY-NC-SA. ↵
