5 Chapter Five: Initiating Intravenous Therapy
Learning Objectives
- Discuss the assessment of the patient prior to insertion of a peripheral intravenous (IV) catheter
- Explain the equipment and the process of site selection for a peripheral intravenous (IV) catheter
- Summarize the techniques, rationale, and procedure used in initiating intravenous (IV) therapy
- Discuss the rationale and procedures for dressing and documentation of an intravenous (IV) line
- Discuss additional considerations associated with central intravenous therapy
- Discuss considerations for the older adult when initiating intravenous therapy
Nursing in Louisiana
It is early morning in the preoperative area. The scent of chicory coffee lingers faintly from the waiting room. A nurse, clipboard in hand, approaches Ms. Delphine Boudreaux, a 76-year-old woman from Opelousas with salt-and-pepper hair and a colorful housecoat folded neatly over her lap. She’s sitting upright in the bed, her good-humored eyes watching the bustle around her.
“Good morning, Ms. Boudreaux. I’m Nurse Martin. I’ll be starting your IV this morning before we get you down to the OR. How are you feeling?”
“Well, sugar, I’d be lying’ if I said I wasn’t nervous. I’ve had more IVs than I can count and let me tell you—my veins don’t like to cooperate. Last time, a young nurse poked me three times before she gave up and called the charge nurse.”
“I hear you. Some folks have what we call ‘rolly’ veins. I’ll take a good look before I make any decisions. And I’ll only try once—if I don’t get it, I’ll bring in someone else. Fair enough?”
“That’s fair. Just don’t go poking this left arm. I had a mastectomy ten years ago. Doctor told me never to let anybody take blood or put a needle in it again. I even got a little card in my purse, somewhere.”
“You’re absolutely right, ma’am. No sticks or blood pressure on the side of a mastectomy—especially if lymph nodes were removed. We’ll use the right arm only. Thank you for letting me know.”
“You sound like you know what you’re doing. That makes me feel better. My daughter’s a nurse too—works down in Lafayette. Always says, ‘Mama, speak up if something don’t feel right.’”
“She raised you right. You’re your own best advocate.”
Even in a high-tech healthcare world, patients bring their lived experiences—and their concerns—into every procedure. Family ties, generational wisdom, and local culture shape how people view medical care. As nurses, it’s our job not just to perform IV therapy correctly, but to listen, respect patient preferences, and apply clinical judgment. In this chapter, you’ll learn the technical skills of IV insertion alongside the critical thinking needed to care for patients like Ms. Boudreaux—with compassion, confidence, and cultural awareness.
In this chapter, the critical components of initiating peripheral intravenous (IV) therapy will be explored. The objectives of this chapter include discussing the assessment of the patient prior to insertion of a peripheral IV catheter, explaining the equipment and the process of site selection, summarizing the techniques and rationale for IV initiation, and addressing the procedures for dressing and documentation. Additionally, specific aspects of central intravenous therapy and the unique needs of older adults will be considered.
Assessment of the Patient Prior to Insertion of a Peripheral IV Catheter
Before proceeding with the insertion of a peripheral IV catheter, a comprehensive assessment of the patient is essential. This initial evaluation is conducted to ensure patient safety and to enhance the likelihood of successful venous access. A medical history, as well as a physical assessment, should be completed.
Medical History
A thorough review of the patient’s medical history is the first step in this assessment. Important factors to be considered include the patient’s previous experiences with IV access, as these can reveal potential complications such as phlebitis or difficult venous access. For example, if multiple unsuccessful IV attempts have been made in the past, a more cautious approach may be indicated.
In the assessment process allergies should also be explored. Any allergies, particularly to antiseptics, latex, tape, or specific medications that may be administered via IV, must be identified. The patient’s allergies should be confirmed to ensure that appropriate precautions are taken.
Chronic conditions such as diabetes, hypertension, pulmonary disease, cardiovascular disease, renal impairment, or coagulation disorders can influence the choice of IV site and catheter size. For instance, compromised circulation in diabetic patients may affect the quality of their veins and complicate the insertion process. In patients with a history of cardiovascular disease, IV fluid therapy must be closely monitored to avoid fluid overload or other complications. Increased risks of bleeding or hematoma formation may be present in patients with coagulation disorders.
A history of mastectomy (particularly with axillary lymph node removal), a history of lymphedema, or dialysis access should also be noted. The affected extremity should be avoided.
Physical Assessment
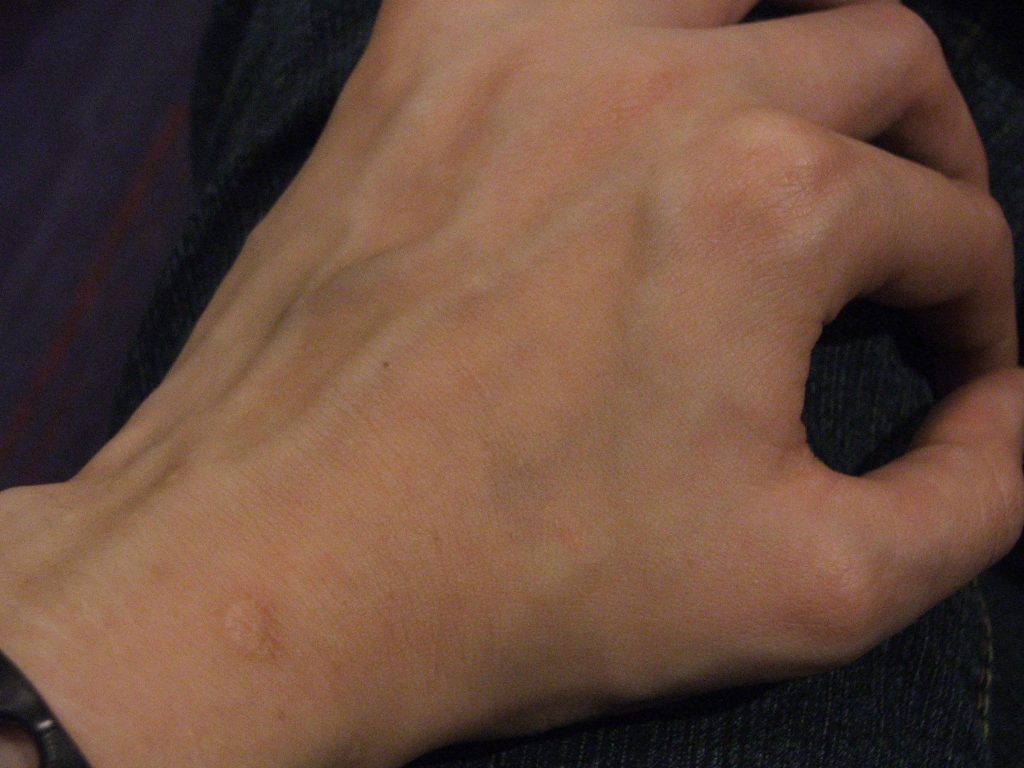
Following the medical history, a focused physical assessment is crucial. The arms and hands should be inspected for suitable veins. Ideally, the selected veins should be visible, palpable, and free from inflammation or edema. Commonly chosen sites include the forearm or the dorsal veins of the hand.
The condition of the skin at the proposed insertion site must also be assessed. Signs of infection, irritation, or dermatological conditions that could impact the procedure should be looked for. Areas with bruising, lesions, or dermatitis should be avoided for catheter insertion.
Patient Preferences and Comfort
Engaging the patient in conversation is essential for building rapport and ensuring a smooth procedure. Previous experiences with IV therapy should be discussed, as this information can help tailor the approach to the patient’s specific needs and preferences. Any concerns or anxieties the patient may have should be addressed to improve cooperation and comfort. Techniques such as deep breathing exercises or providing reassurance may be beneficial in alleviating patient anxiety.
Equipment and Process of Site Selection for a Peripheral IV Catheter
The successful initiation of IV therapy relies on the use of appropriate equipment and the careful selection of the insertion site.
Equipment Needed
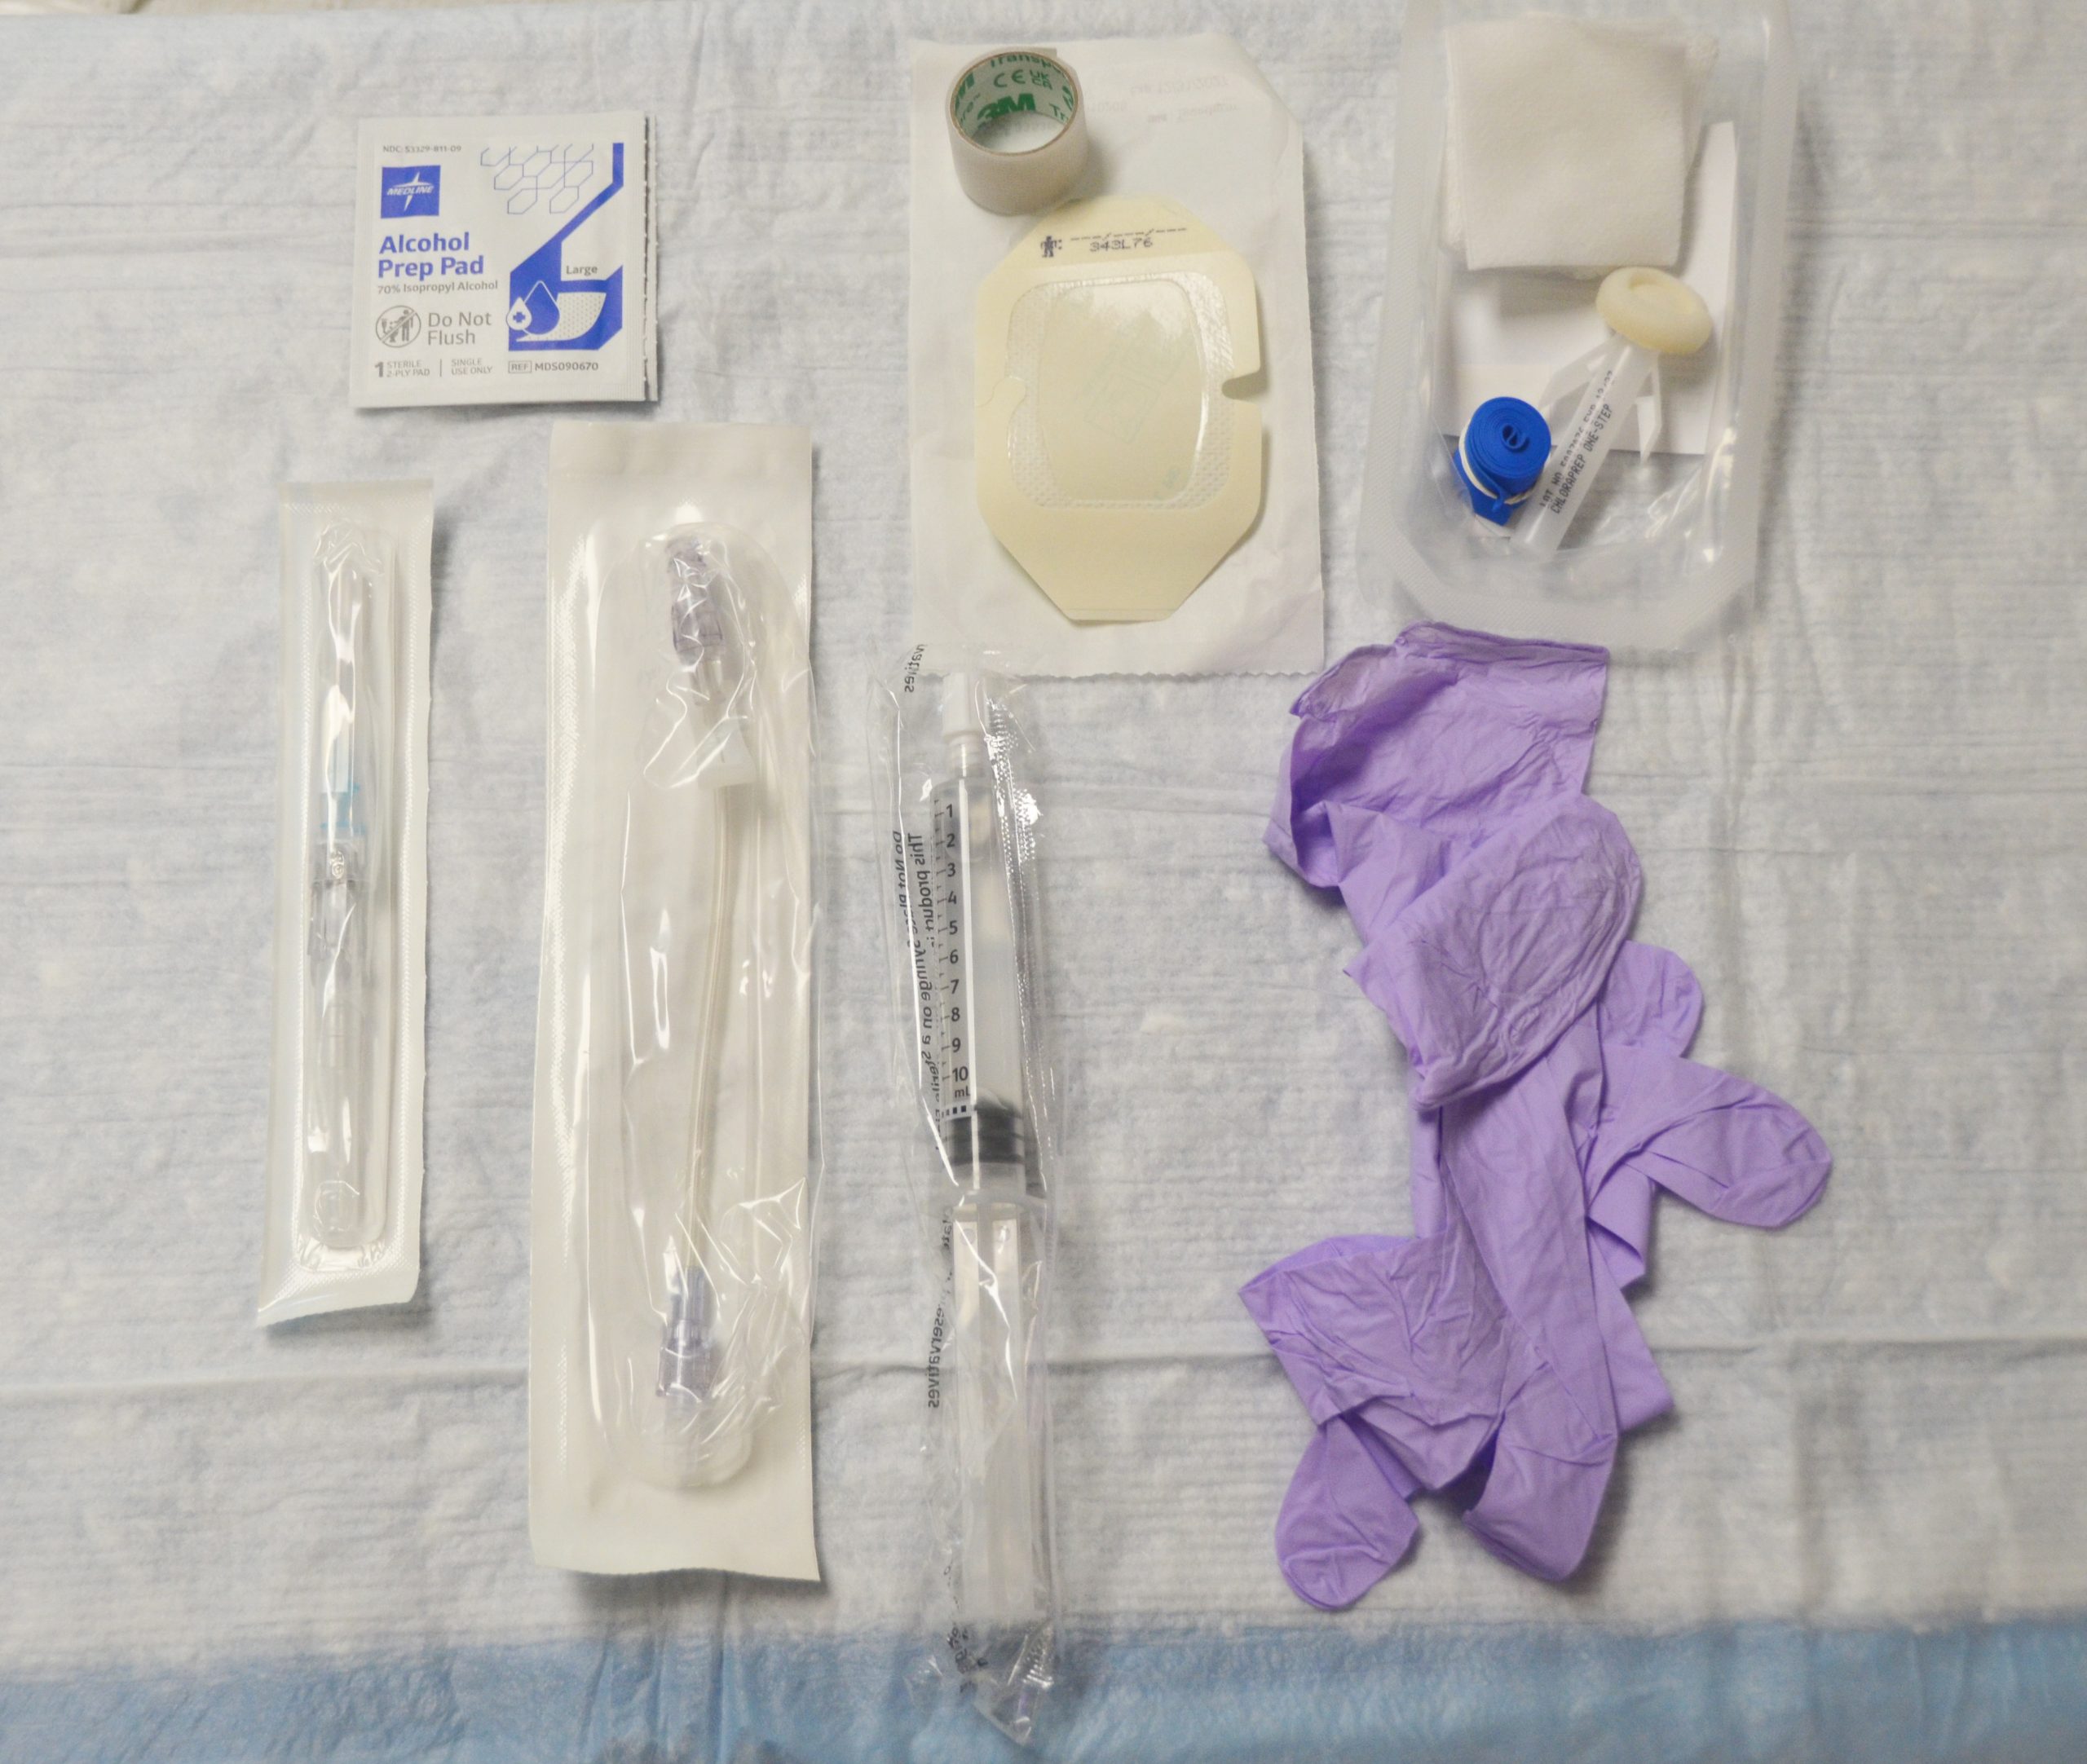
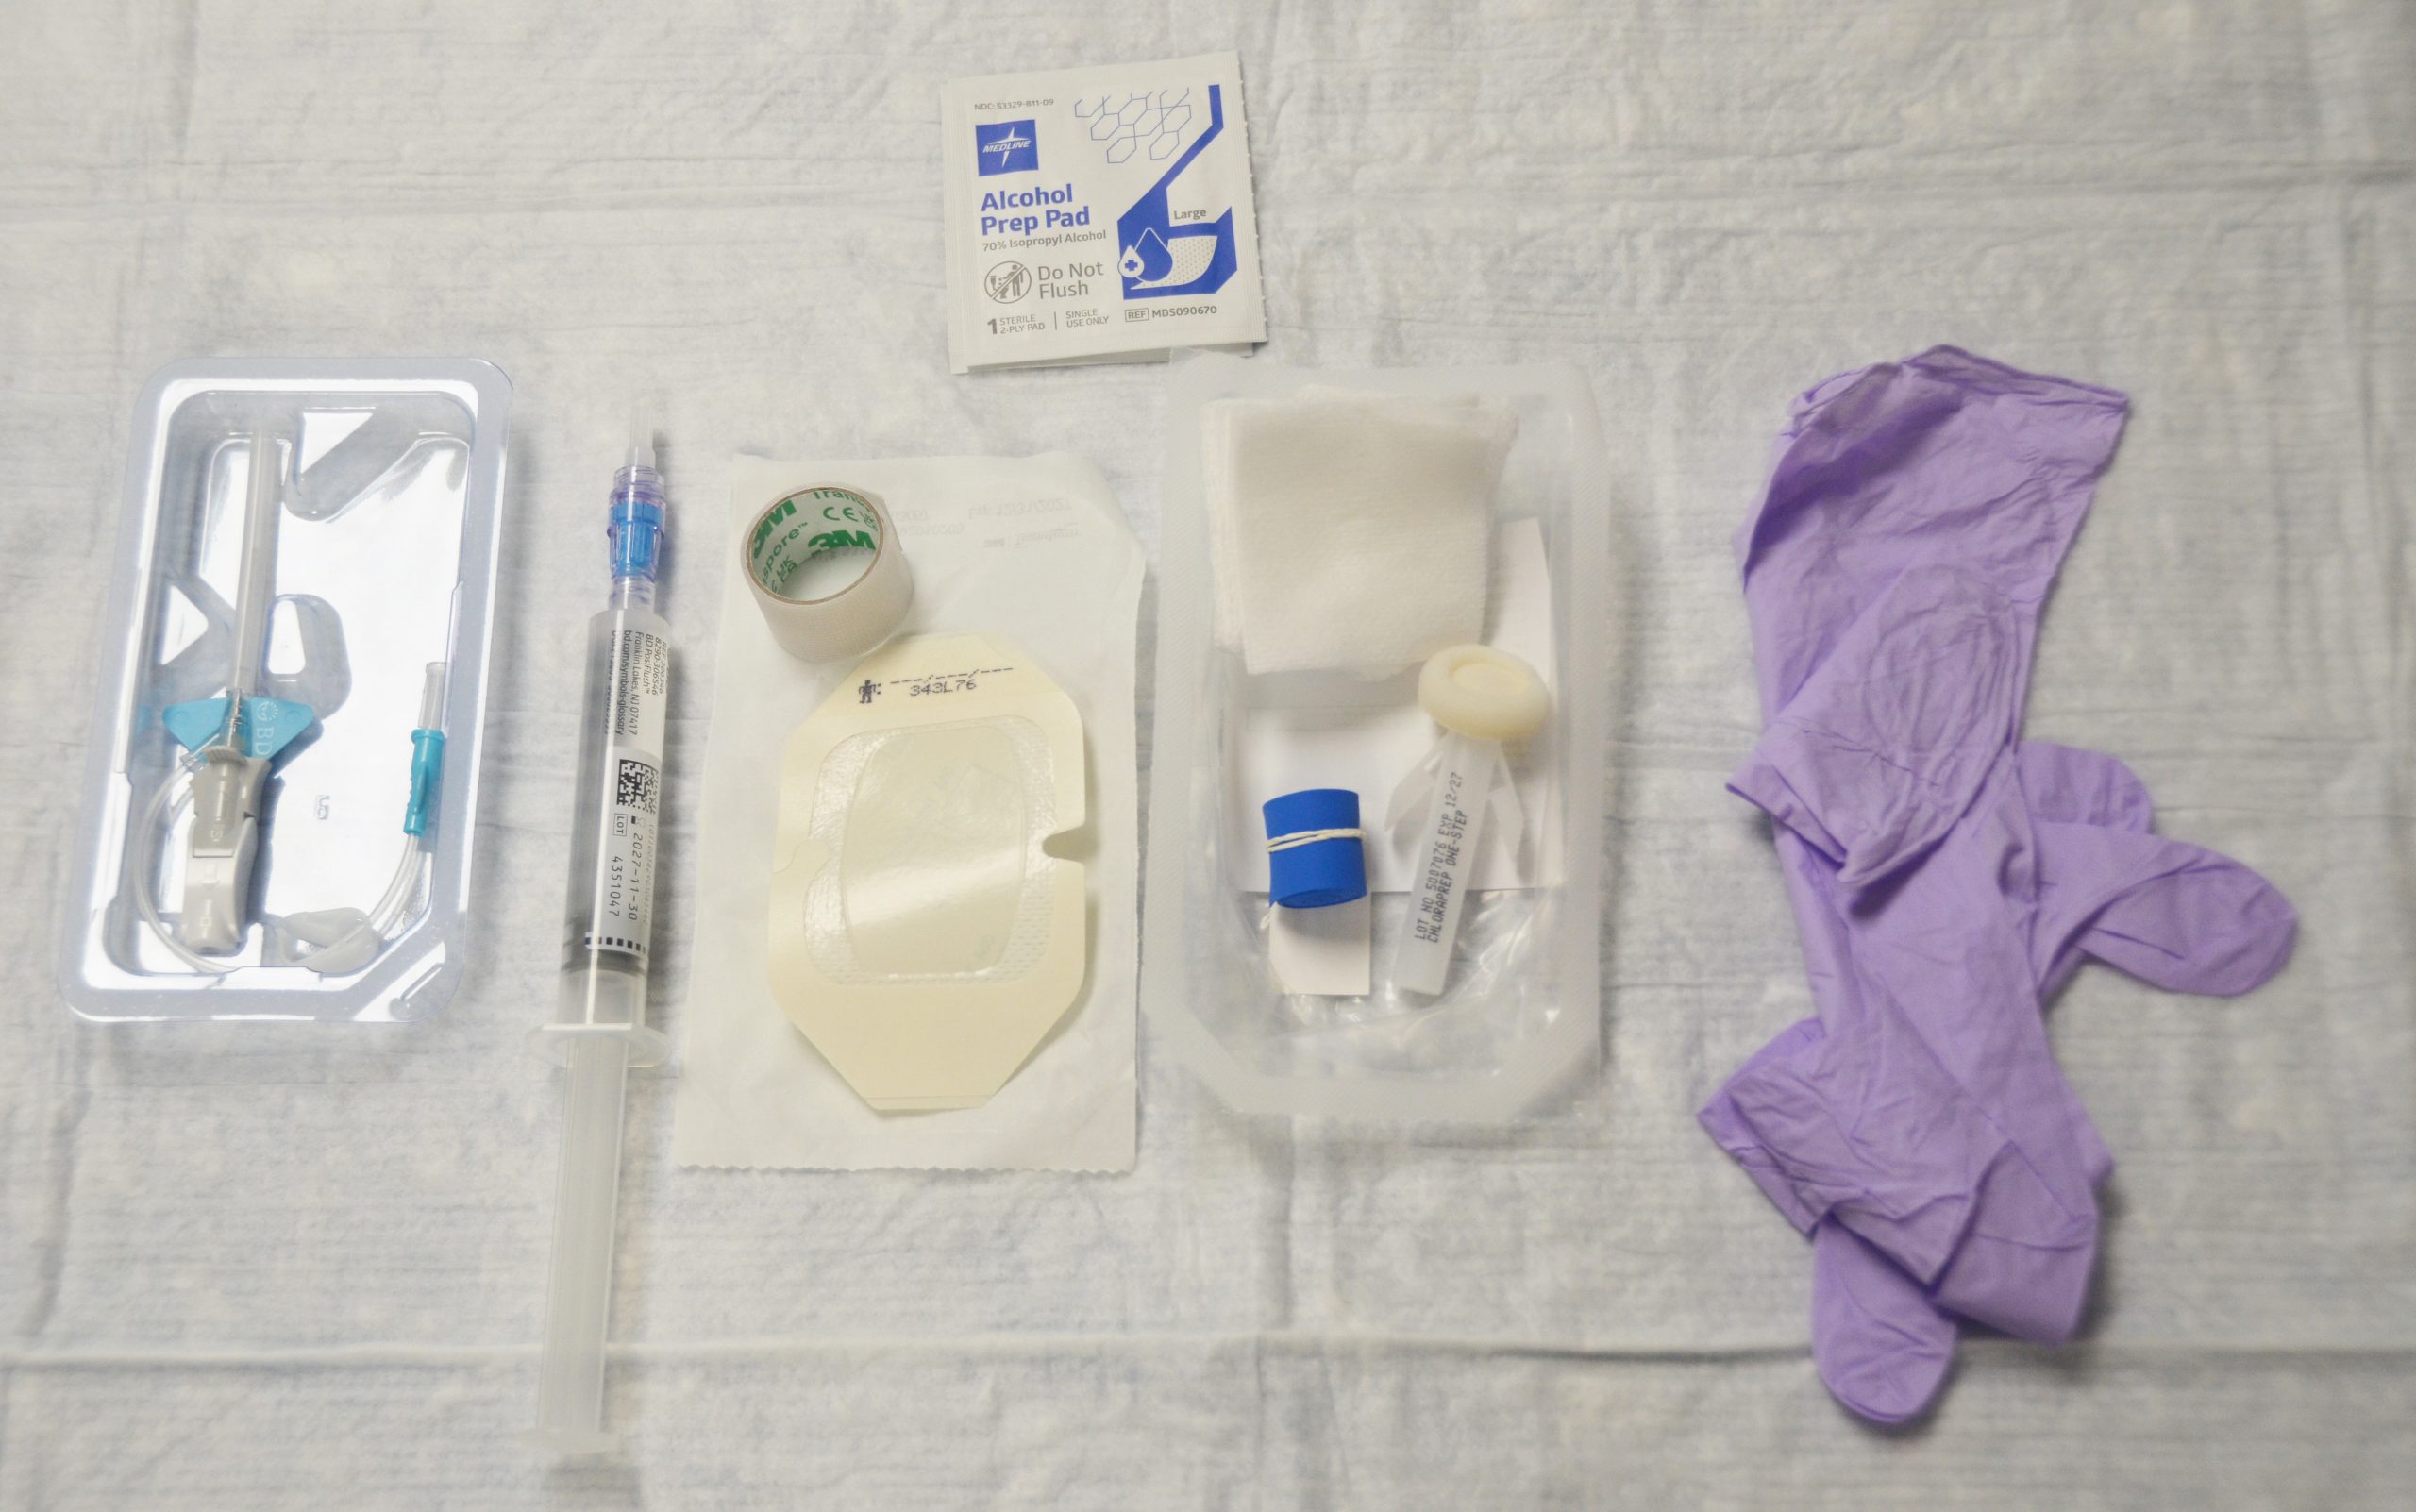
Many facilities have IV start kits available which typically include many of the needed supplies. They normally include gauze, tape, tourniquet, transparent dressing, antiseptic wipe, and a label.
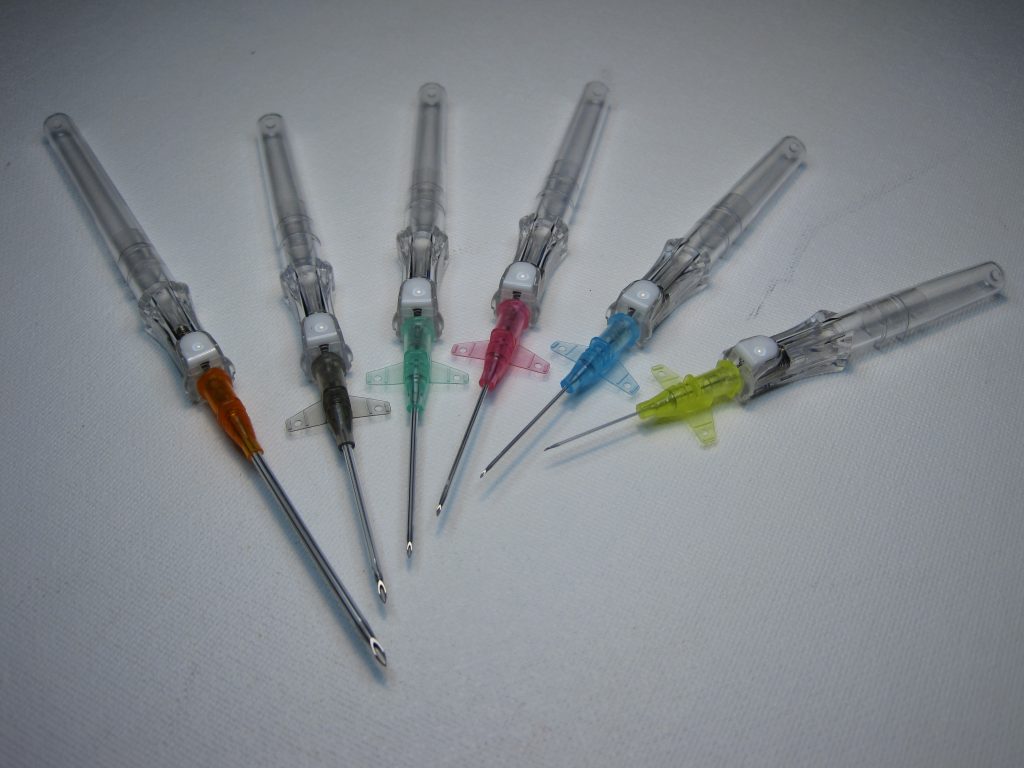
Several essential items are required for the initiation of peripheral IV therapy. IV catheters are available in various sizes, typically ranging from 18G to 26G. The catheter gauge is selected based on the patient’s age, size, and the type of fluid being administered. Smaller gauges (22G or 26G) are often preferred for pediatric or older adult patients to minimize trauma to fragile veins.
.JPG)

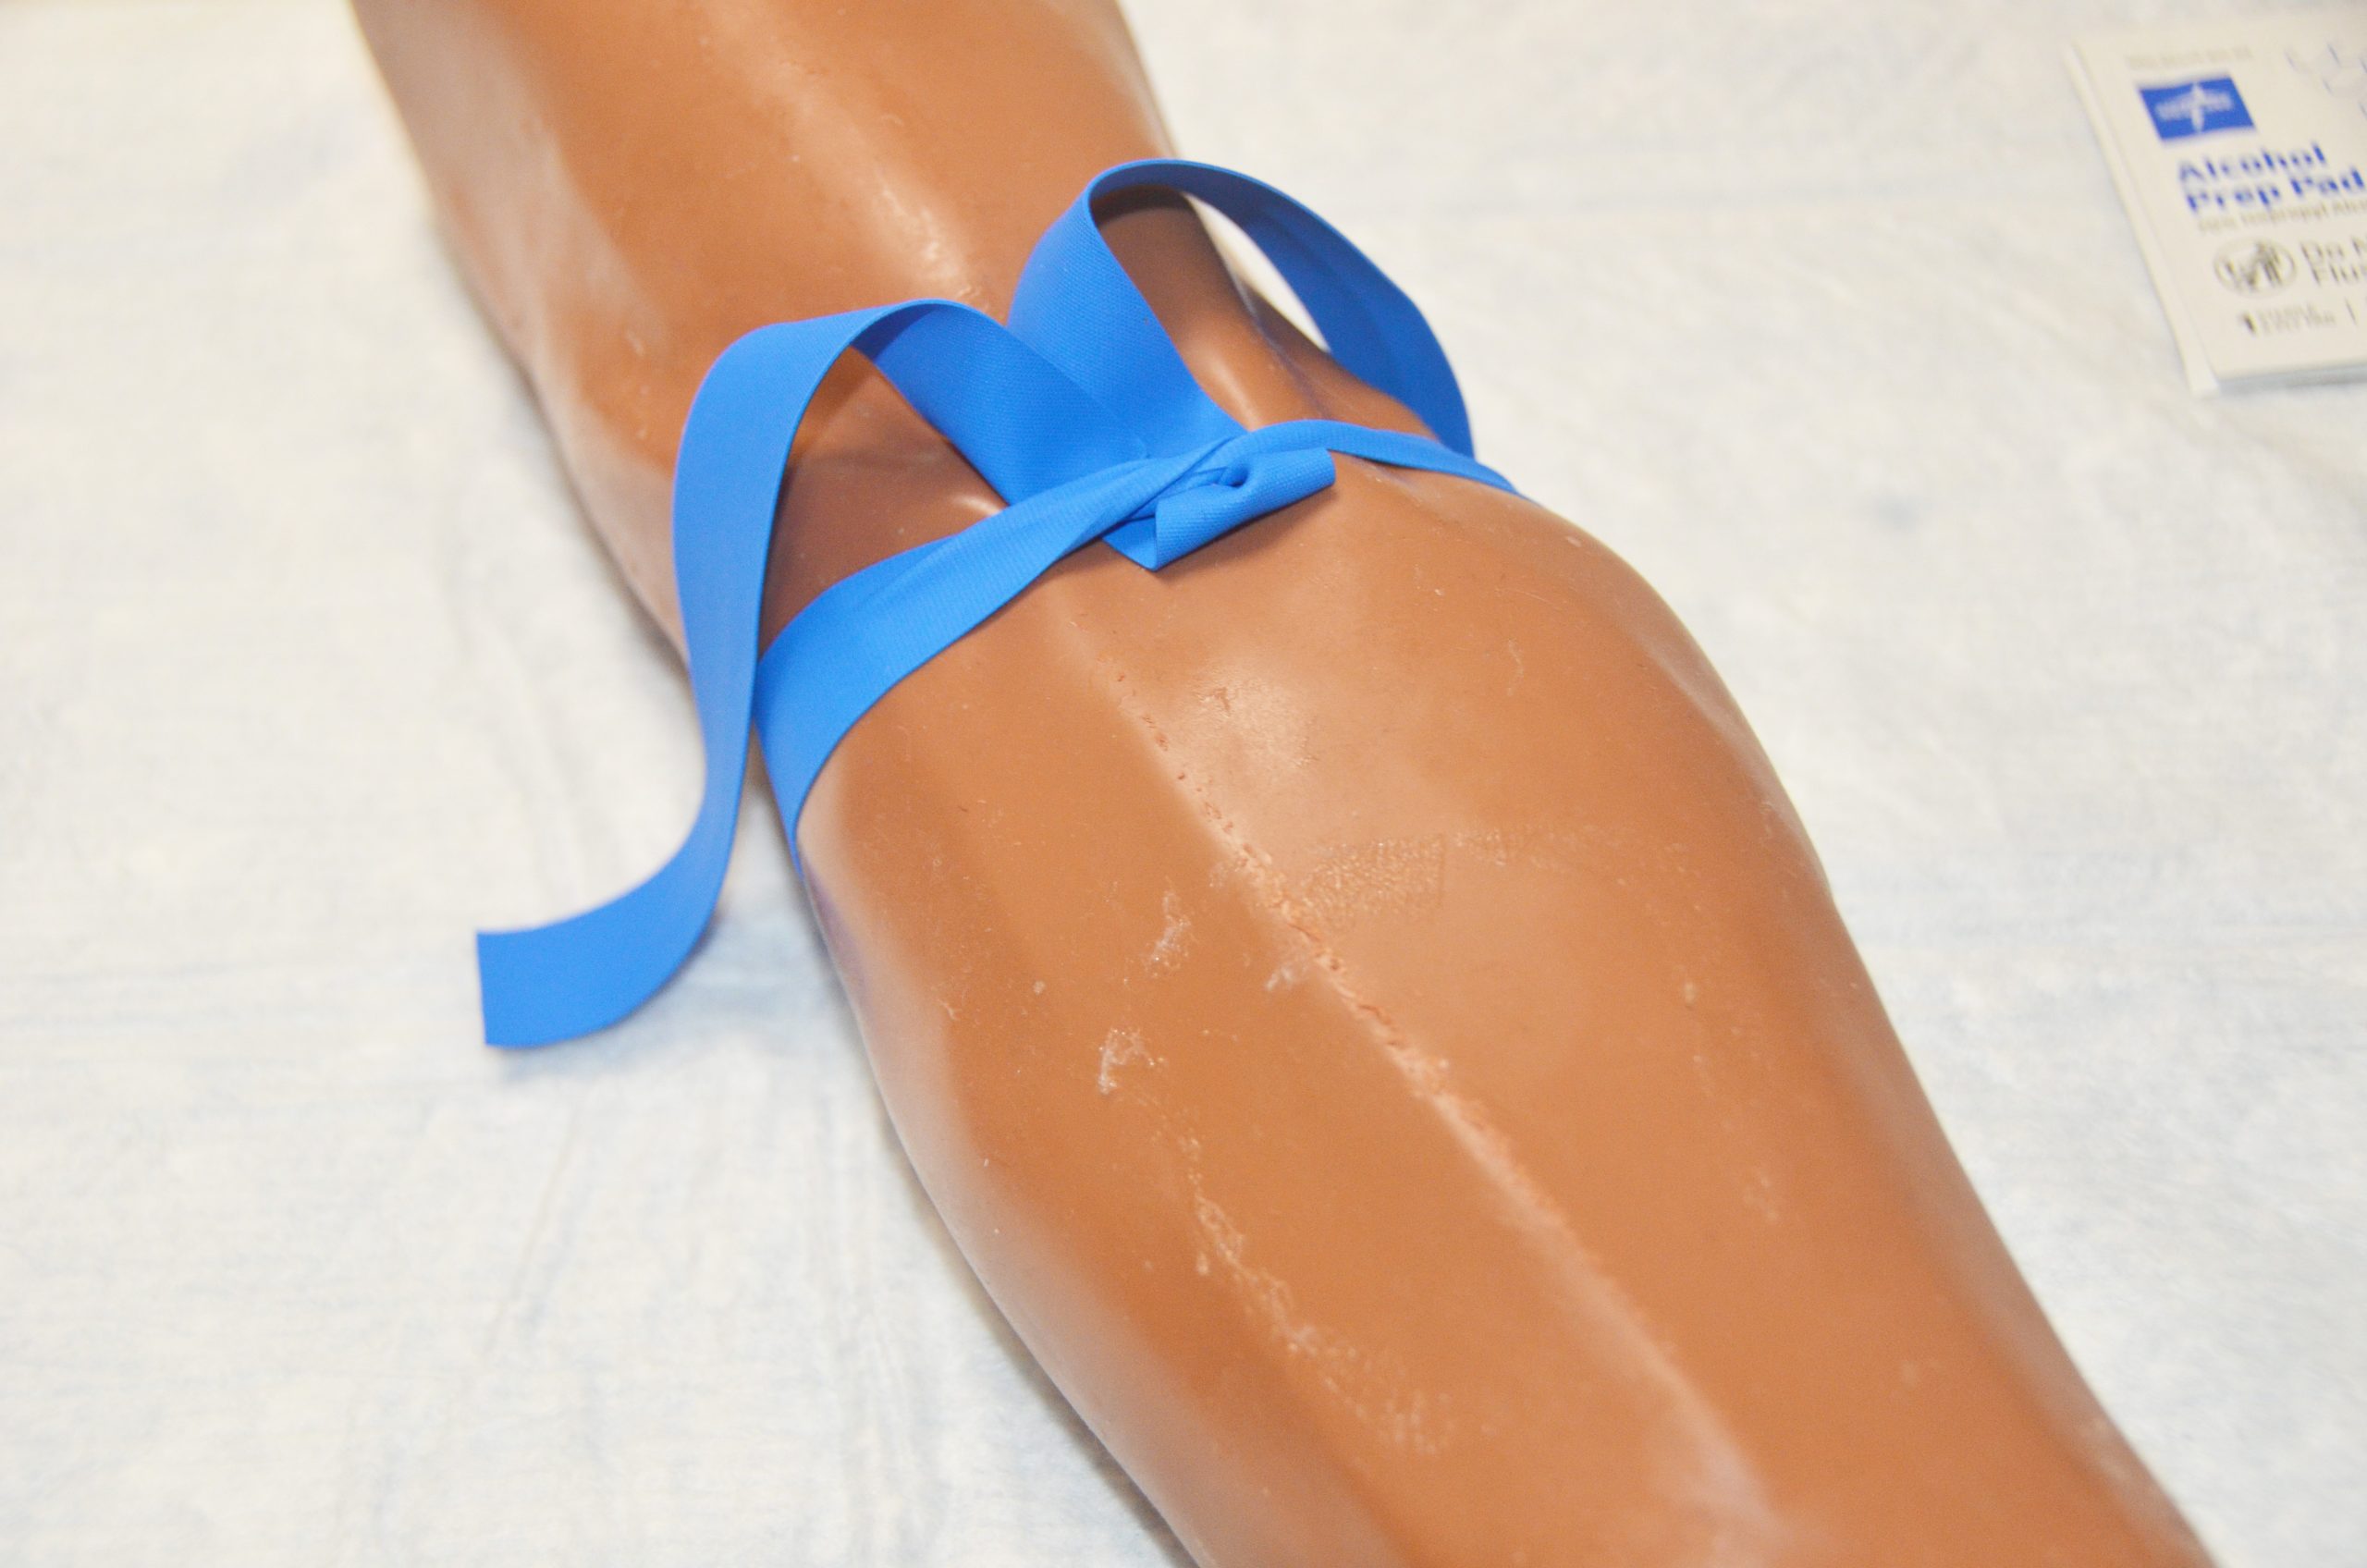
A tourniquet is used to distend the veins and facilitate access. It should be applied about 4-6 inches above the intended insertion site, ensuring that it is tight enough to engorge the veins but not so tight as to cause discomfort.
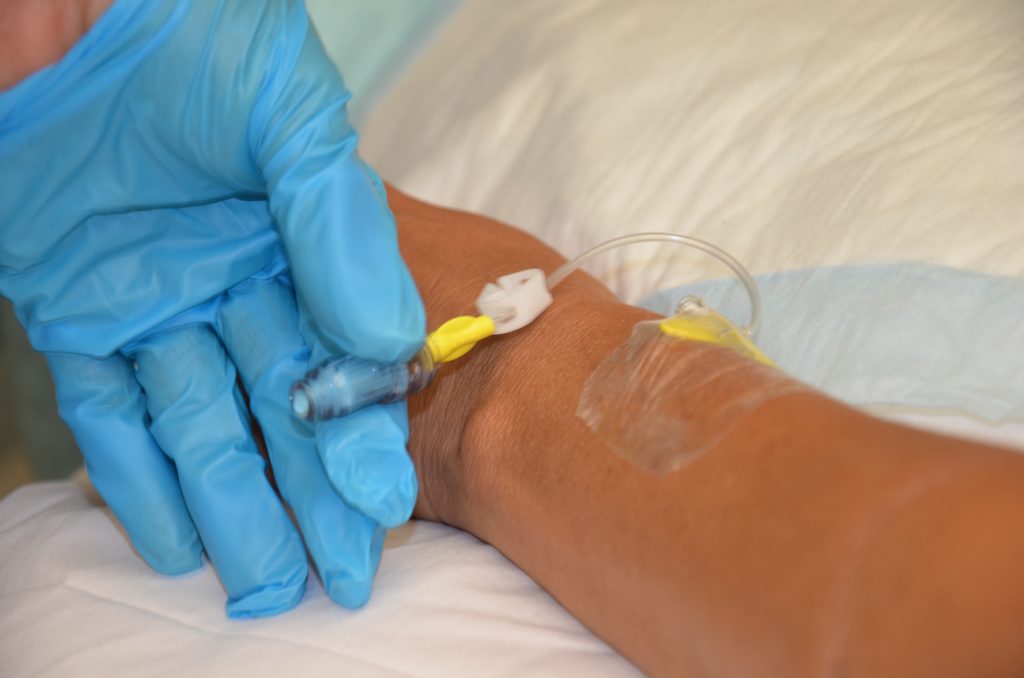
Antiseptic solutions, such as alcohol wipes or chlorhexidine, are crucial for skin preparation. Chlorhexidine is often preferred for its residual antimicrobial effects. The facility’s procedure for cleaning the site should always be followed. Additionally, gauze and tape or securement devices are needed to keep the catheter in place. Transparent dressings are commonly used, as they not only secure the catheter but also allow for continuous monitoring of the insertion site.

Clean gloves are needed. Sterile gloves may be used to palpate the site after cleaning if needed.
At least one normal saline (0.9% sodium chloride) flush, an IV extension set, IV tubing, and fluids (if starting IV fluids) should also be available.
Some facilities may have a vein finder device to assist in visualizing the insertion site.
Site Selection Process
The process of selecting an appropriate site for IV catheter insertion is multifaceted. Anatomical factors should first be considered; preferred sites include the forearm and the dorsum of the hand. Veins should be assessed for size, visibility, and palpability. Veins that are hard, inflamed, or previously used for IV access should be avoided. (Picture of IV sites)
Starting most distal is preferred. The most critical reason for starting distal is to preserve more proximal veins (those located closer to the torso) for future use. IV insertion in the distal veins leaves the larger and more easily accessible veins in the forearm and upper arm available for future insertions, particularly in patients who may require repeated or long-term IV access.
If possible, the non-dominant side should be used to allow patient mobility and comfort. Sites with flexion, such as the antecubital or wrist area, should be avoided, as the IV may occlude when the patient bends these areas.
The condition of the veins should be carefully evaluated, noting their softness and flexibility. Patient factors, such as age and mobility, should also be considered. Older adults, whose veins may be more fragile, may require gentler techniques.
Proper positioning of the patient is vital to facilitate access and promote relaxation. The patient should be comfortably positioned, with the arm supported and slightly elevated to help engorge the veins.
Techniques, Rationale, and Procedure Used in Initiating IV Therapy
The techniques employed during the initiation of IV therapy are critical for minimizing complications and ensuring successful access. Proper techniques must be used during IV insertion to minimize the risk of complications such as infiltration, phlebitis, or infection. Key principles include maintaining aseptic technique throughout the procedure to prevent infection. This includes meticulous hand hygiene and the use of sterile equipment.
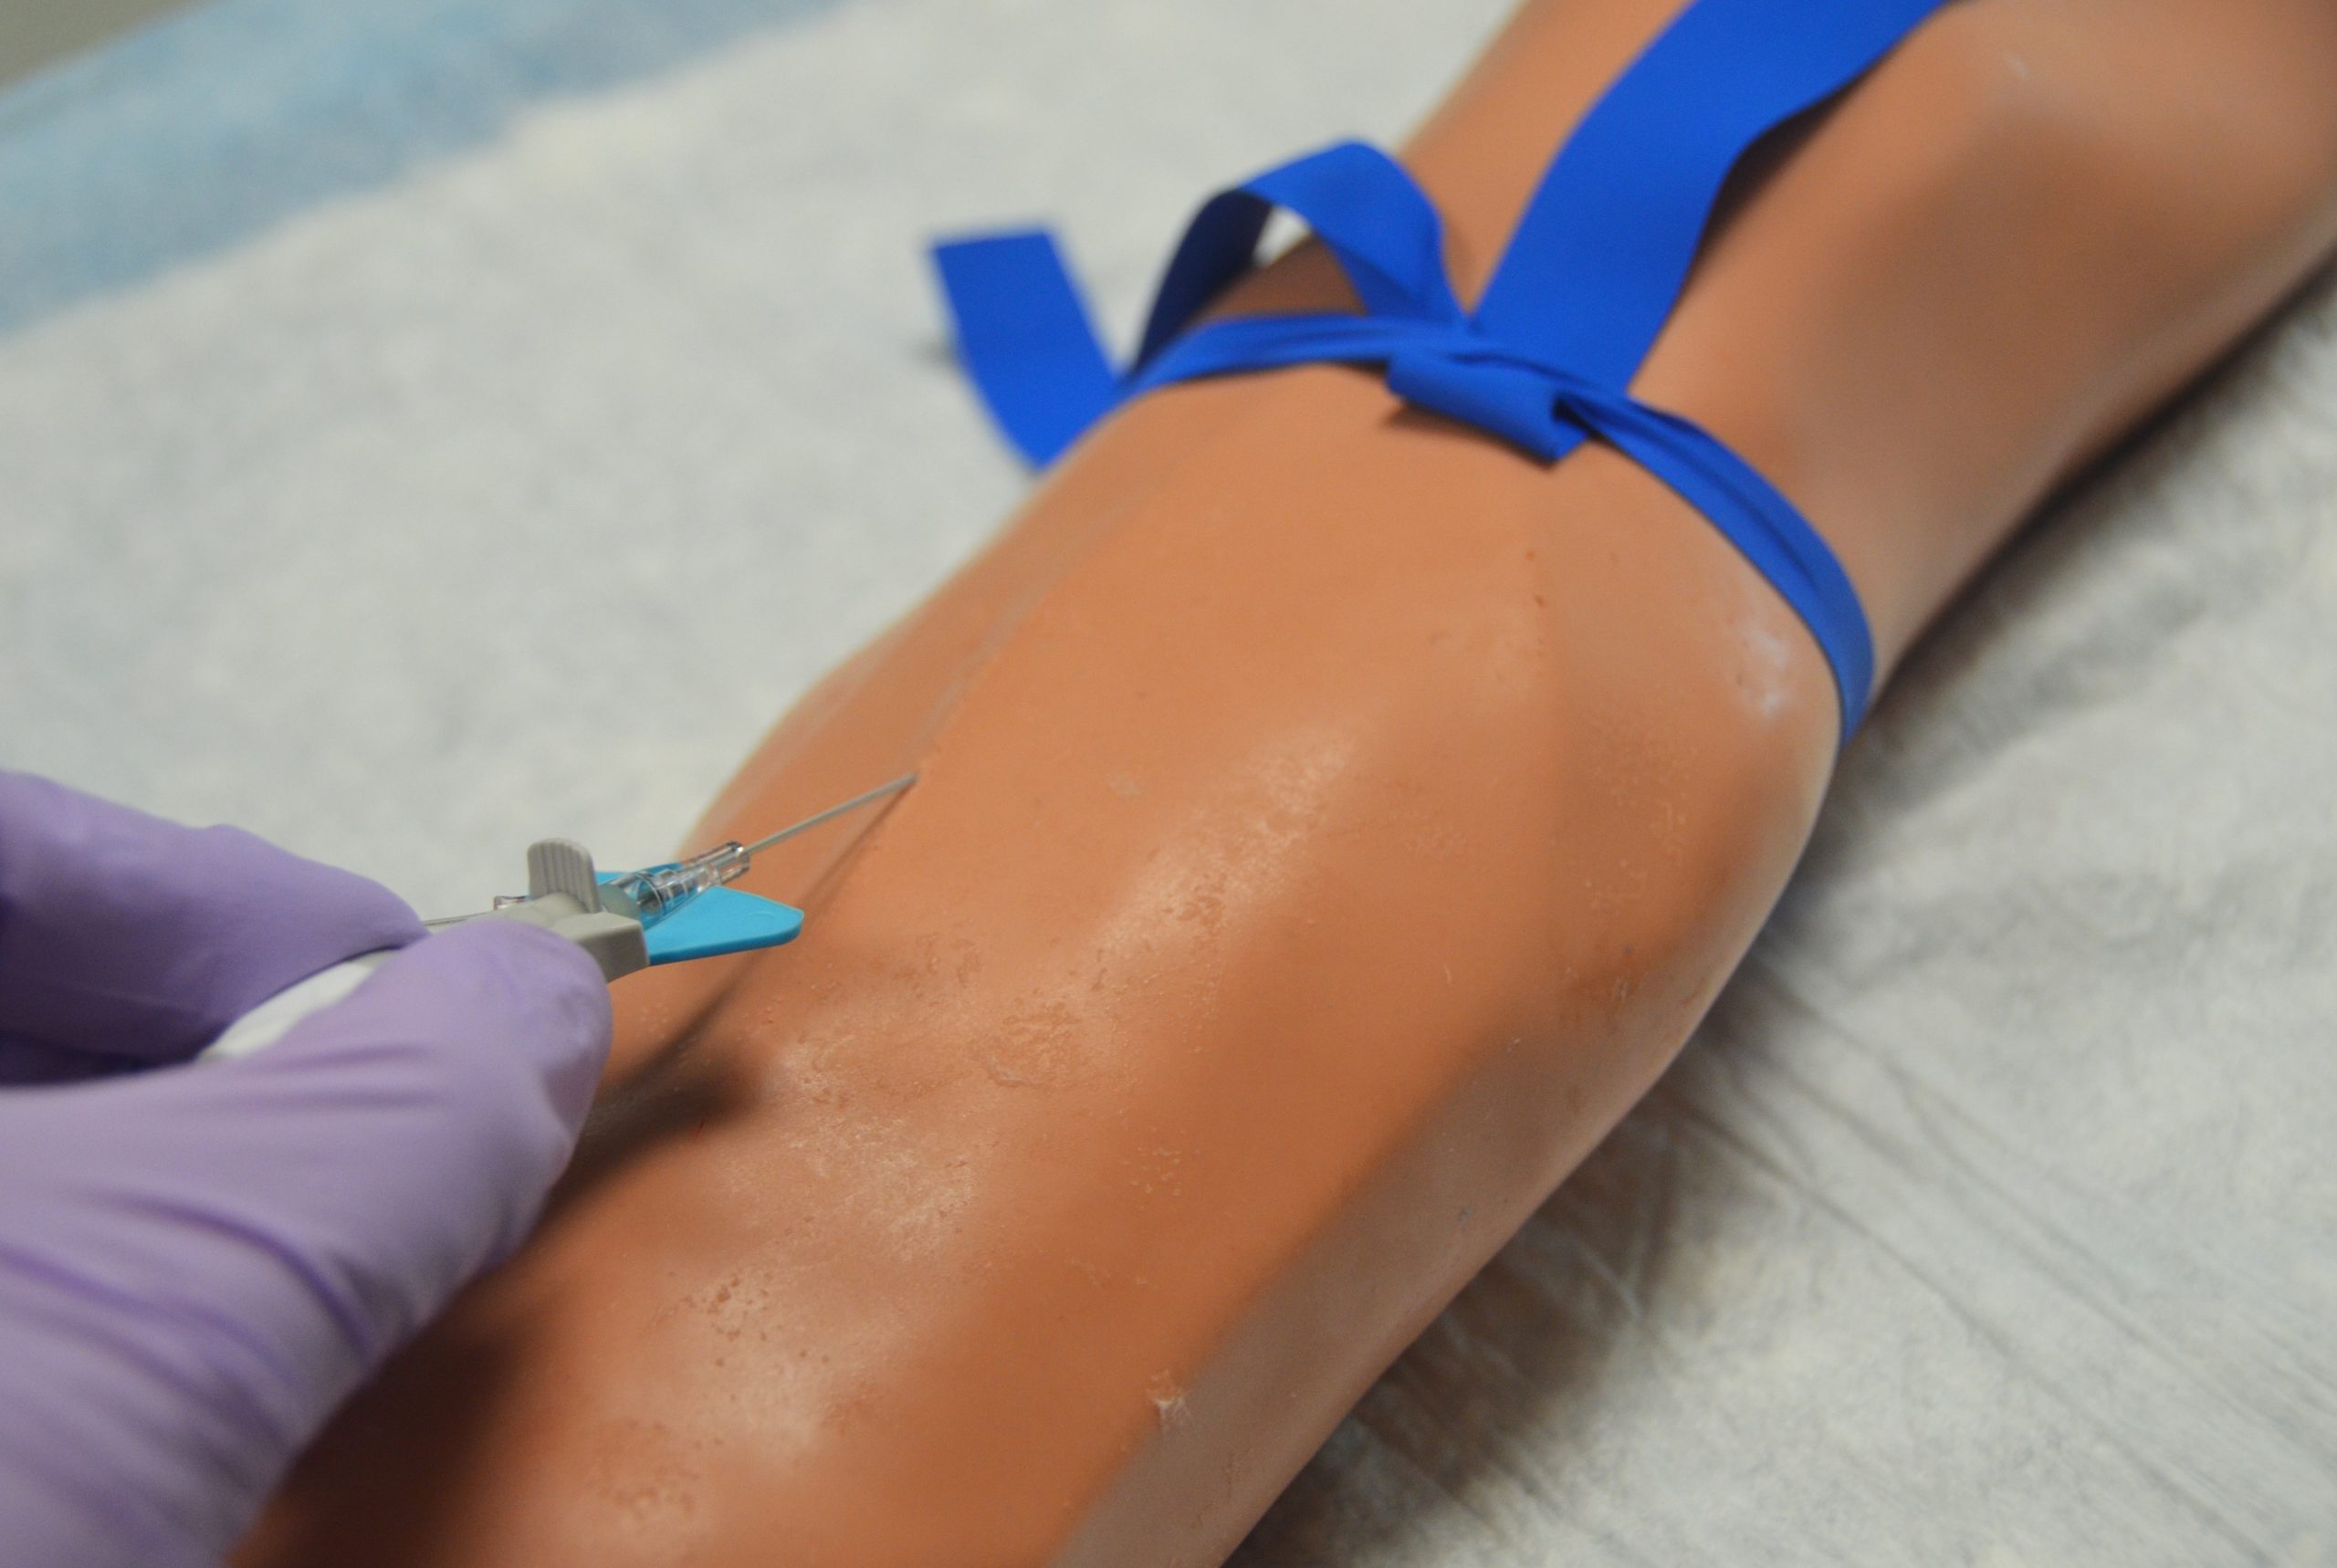
Venipuncture should be performed using a quick and controlled insertion at a 15–30-degree angle to help the catheter enter the vein effectively. A smooth motion should be used to reduce trauma to the vessel, thereby enhancing the likelihood of success.
Procedure
Here add video of all steps and pictures also video of priming tubing
The procedure for initiating IV therapy can be broken down into several key steps:
Assessment/Recognize Clues
| Step / Action | Rationale |
|---|---|
| Review the healthcare provider’s order: Confirm date, time, IV solution, route, volume, rate, duration, and provider’s signature. Follow the rights of medication administration. | Ensures the order is complete and prevents medication errors. A provider’s order is required before starting IV therapy. |
| Gather all necessary equipment and perform hand hygiene. | Ensures all supplies are readily available and reduces infection risk. |
| Check drug reference resources for solution details, potential incompatibilities, and side effects. | Ensures safe IV therapy and appropriate selection of vascular access device (VAD). |
| Perform hand hygiene and assess clinical factors: review the patient’s EHR and/or perform a physical assessment. | Reduces infection risk and establishes a baseline for therapy effectiveness. |
| Assess past medical history, hydration status, level of consciousness, labs, and allergies. | Identifies factors that may impact IV therapy safety or success. |
| Assess past IV experiences and site preferences. | Promotes patient comfort and supports person-centered care. |
| Select appropriate catheter size based on therapy, vein condition, and patient factors. | Ensures adequate flow while minimizing vessel trauma. |
| Explain the procedure, solution, medications, and potential complications to the patient. | Promotes understanding, reduces anxiety, and supports informed consent. |
| Evaluate for upcoming procedures or surgeries. | Prevents VAD placement that may interfere with future procedures. |
| Assess allergies (latex, adhesives, medications). | Prevents allergic reactions. |
| Assess knowledge, experience, and concerns about IV therapy. | Determines educational needs and identifies need for emotional support or pain management. |
| Assess preferred IV site. | Promotes patient comfort and shared decision-making. |
Planning/Generate Solutions
| Step / Action | Rationale |
|---|---|
| Prepare the environment: close doors or curtains, clear bedside table. | Provides privacy and organizes the space. |
| Perform hand hygiene and organize equipment. | Reduces infection risk and increases efficiency. |
| Select appropriate catheter and prepare sterile packages on a clean surface. | Ensures correct equipment and maintains sterility. |
| Position the patient comfortably and ensure adequate lighting. | Promotes comfort and procedural success. |
Implementation/Take Actions
| Step / Action | Rationale |
|---|---|
| Identify the patient using at least two identifiers per facility policy. | Ensures correct patient and complies with safety standards. |
| Prepare IV setup: attach short extension tubing to NS flush, prime with 1–3 mL while maintaining sterility. | Removes air from tubing and prevents embolism. |
| Prepare IV tubing and solution using medication rights; prime tubing and label per policy. | Prevents air embolism and ensures accuracy. |
| Apply tourniquet 4–6 inches above chosen site to engorge the vein; release if discomfort occurs. | Makes veins easier to locate and reduces discomfort. |
| Palpate veins using fingertip for a soft, bouncy feel. | Ensures best vein selection and insertion success. |
| Enhance vein distention by positioning extremity below heart level or applying dry heat; avoid slapping. | Improves vein visibility and reduces injury risk. |
| Choose site on dorsal or ventral arm, starting distally in non-dominant arm. Avoid joints, bruised skin, previous sites, or restricted limbs. | Promotes safety and preserves future access sites. |
| Release tourniquet once site is selected. | Restores circulation while preparing supplies. |
| Trim excess hair with single-use scissors or clippers (do not shave). | Reduces infection risk. |
| Perform hand hygiene and don gloves; use eye protection if risk of blood splash. | Reduces infection and exposure risk. |
| Clean insertion site with 2% chlorhexidine in back-and-forth motion for 30 seconds; allow to dry. | Reduces infection risk. |
| If site is touched after cleansing, repeat antisepsis. | Maintains asepsis. |
| Reapply tourniquet 4–6 inches above site ensuring distal pulse is present. | Enhances venous filling and reduces contamination. |
| Hold skin taut and insert catheter bevel up at 15–30° angle; observe flashback, then advance catheter. | Confirms vein entry and proper placement. |
| Limit IV attempts to two per clinician. | Reduces trauma and promotes patient comfort. |
| Stabilize catheter and release tourniquet. | Prevents catheter dislodgment. |
| Occlude vein, remove needle using safety device, and attach extension set. | Prevents blood leakage and exposure. |
| Aspirate for blood return and flush with saline. | Confirms IV patency. |
| Flush and initiate IV infusion as ordered; use positive pressure if saline locked. | Ensures line patency and prevents clotting. |
| Observe site for swelling, redness, or pain. | Detects infiltration or phlebitis early. |
| Apply securement device or sterile dressing; label with date, time, and catheter details. | Prevents dislodgment and infection. |
| Connect IV line to extension set, maintain sterility, and set infusion rate per order. | Ensures safe and accurate infusion. |
| Dispose of sharps and used materials; perform hand hygiene. | Prevents injury and infection. |
| Reposition patient comfortably; provide safety instructions. | Prevents catheter dislodgment. |
| Raise side rails, lower bed, and ensure call light within reach. | Maintains patient safety. |
| Document insertion details, site condition, gauge, number of attempts, solution, rate, and patient response. | Ensures accurate record and continuity of care. |
Evaluation/Evaluate Outcomes
| Step / Action | Rationale |
|---|---|
| Assess for successful cannulation, absence of complications, and patient comfort. | Verifies procedure effectiveness and identifies any issues promptly. |
| Monitor ongoing infusion for correct rate, patency, and site integrity. | Ensures safe and effective therapy. |
Closed-system IV Catheters
Bloodless IV catheters, also called closed-system or needleless IV catheters, are designed to minimize blood exposure during insertion and connection. These catheters contain an integrated valve that prevents blood from flowing out of the hub after venipuncture. This feature enhances clinician safety and infection control.
While most procedural steps are the same, key differences include:
-
Flashback observation: Blood return is visible through a built-in flash chamber rather than the hub.
-
Connection: Extension tubing or a needleless connector is attached immediately—no need to manually occlude the vein.
-
Flushing: The internal valve closes automatically when the syringe is removed, preventing backflow.
These systems promote a closed fluid pathway, reduce blood exposure, and support facility safety protocols.
Dressing the Site
Dressing the IV line is an essential step in maintaining sterility and protecting the insertion site. A sterile dressing should be applied to create a barrier against infection and to keep the catheter secure.
A transparent adhesive covering should be used that entirely encases the IV site. This allows for continuous observation while providing protection. The dressing should be applied smoothly to avoid wrinkles, which could permit bacteria to enter. Facility protocols for dressing changes should be followed, and the dressing should be replaced if it becomes wet, soiled, or loosened. It should be labeled with date, time and initials.
The line should be primed to remove any air before starting the infusion. Connect the IV time to the IV port maintaining sterility.
Documentation
Accurate documentation of the IV insertion is critical for ensuring continuity of care. Essential details to be documented include:
- Date and time of insertion.
- Size and type of catheter used, including the gauge of the catheter.
- Number of attempts to insert the IV catheter. If unsuccessful after 2 attempts, someone else should be called to start the IV.
- Site selected (e.g., right forearm).
- Patient’s response, including any discomfort, complications, or notable reactions during the procedure.
- How the site is dressed.
- IV solution and flow rate.
- Patient education provided.
- Documentation serves to inform all healthcare providers involved in the patient’s care, ensuring they have access to pertinent information essential for ongoing treatment and monitoring.
Additional Considerations Associated with Central Intravenous Therapy
Central intravenous therapy presents unique challenges and considerations that differ from peripheral IV therapy.
Central line access devices are typically placed in larger veins, such as the subclavian, internal jugular, or femoral veins. Careful anatomical consideration is necessary to avoid complications such as pneumothorax or arterial puncture. Specialized training is often required for central line placement, which typically involves sterile techniques, ultrasound guidance, and advanced procedural skills. The patient’s vital signs should be closely monitored during insertion to identify any immediate complications.
Monitoring and Maintenance
The insertion site should be regularly assessed for early detection of complications, such as infection or thrombosis. Strict protocols for flushing (usually with normal saline and/or heparin, if indicated) and dressing changes should be followed to maintain line patency and prevent infection.
Complication Awareness
Healthcare providers must remain vigilant for complications associated with central lines, including pneumothorax, air embolism, and catheter-related infections. Knowledge of the signs and symptoms of these complications is essential, as well as protocols for their management.
Considerations for the Older Adult When Initiating Intravenous Therapy
Initiating IV therapy in older adults requires special attention due to physiological changes that affect both veins and skin.
Physiological Changes
As individuals age, decreased skin elasticity and more fragile veins may be encountered, making access more challenging. Vein quality should be assessed particularly in this population. Smaller gauge catheters may be used to minimize trauma to delicate veins.
Cognitive and Communication Factors
Engagement with older patients should be approached with sensitivity. Clear, simple language should be used to explain the procedure, ensuring that the patient understands what to expect. Cognitive function should be assessed to tailor communication and ensure comprehension.
Comfort Measures
Additional comfort measures should be provided during the procedure. Warm compresses should be considered on the selected site to promote vein dilation and minimize discomfort during insertion.
Medication Sensitivity
Older adults may experience altered pharmacokinetics, making them more susceptible to adverse reactions from medications administered via IV. Close monitoring for potential complications or reactions should be conducted, and medication dosages may need to be adjusted accordingly.
Key Takeaways
In summary, initiating peripheral intravenous therapy is a multifaceted process that demands thorough patient assessment, careful site selection, precise technique, and diligent monitoring. Understanding the unique needs of different patient populations—especially older adults and those requiring central lines—helps ensure safe, effective IV therapy and improves patient outcomes.