Blood glucose monitoring is performed on patients with diabetes mellitus and other conditions that cause elevated blood sugar levels. Diabetes mellitus is a common medical condition that affects the body’s ability to produce insulin in the pancreas and use insulin at the cellular level. There are two types of diabetes mellitus, type 1 and type 2. Type 1 diabetes mellitus is an autoimmune disease that damages the beta cells of the pancreas so they do not produce insulin; thus, synthetic insulin must be administered by injection or infusion. It typically begins in childhood or adolescence. Type 2 diabetes mellitus accounts for approximately 95 percent of all cases and is highly correlated with obesity and inactivity. During type 2 diabetes, the cells of the body become resistant to the effects of insulin, and the pancreas increases its production of insulin. However, over time, the pancreas may no longer be able to produce insulin. In many cases, type 2 diabetes can be managed by moderate weight loss, regular physical activity, and a healthy diet. However, if blood glucose levels cannot be controlled with healthy lifestyle choices, oral diabetic medication is prescribed and eventually, the administration of insulin may be required.[1] Prediabetes is a medical condition where blood sugar levels are higher than normal, but not high enough yet to be diagnosed as type 2 diabetes. Approximately one in three American adults have prediabetes. Gestational diabetes is a type of diabetes that occurs during pregnancy in women who did not have diabetes before they were pregnant.
Diabetic patients require frequent blood glucose monitoring to administer customized medication therapy to prevent long-term complications from occurring. Hospitalized patients who do not have diabetes may also require frequent blood glucose monitoring due to elevations that can occur as a result of the stress of hospitalization, surgical procedures, and side effects of medications. Additionally, patients receiving enteral feedings typically have their blood glucose monitored every six hours. Health care providers prescribe the frequency of blood glucose monitoring; testing is typically performed before meals and at bedtime. For some patients, a standardized sliding-scale insulin protocol may be prescribed with instructions on the medication administration record (MAR) for administration of insulin based on their blood glucose results.[2],[3] See Table 19.2 for an example of a sliding-scale insulin protocol.
Table 19.2 Sample Sliding-Scale Insulin Protocol
Instructions: Check patient’s blood sugar before meals, at bedtime, and as needed for symptoms of hypoglycemia or hyperglycemia. Use the following table to administer insulin lispro PRN.
| Blood Sugar Range | Lispro Insulin Instructions |
|---|---|
| Less than 70 | Hold all insulin and initiate hypoglycemia protocol. |
| 70-150 | 0 units |
| 151-174 | 2 units |
| 175-199 | 4 units |
| 200-224 | 6 units |
| 225-249 | 8 units |
| 250-274 | 10 units |
| 275-299 | 12 units |
| Greater than 300 | Administer 14 units and call the provider. |
Hypoglycemia
When caring for patients with diabetes mellitus and monitoring their blood glucose readings, it is important to continually monitor for signs of hypoglycemia. Hypoglycemia is defined as blood sugar readings less than 70 and signs and symptoms such as the following:
- Shakiness
- Feeling nervous or anxious
- Sweating, chills, and clamminess
- Irritability or impatience
- Confusion
- Fast heartbeat
- Feeling light-headed or dizzy
- Hunger
- Nausea
- Color draining from the skin (pallor)
- Feeling sleepy
- Feeling weak or having no energy
- Blurred/impaired vision
- Tingling or numbness in the lips, tongue, or cheeks
- Headaches
- Coordination problems or clumsiness
- Nightmares or crying out during sleep
- Seizures[4]
A low blood sugar level triggers the release of epinephrine (adrenaline), the “fight-or-flight” hormone. Epinephrine causes the symptoms of hypoglycemia such as a rapid heartbeat, sweating, and anxiety. If a patient’s blood sugar level continues to drop, the brain has impaired functioning. This may lead to seizures and a coma.[5]
If a nurse suspects hypoglycemia is occurring, a blood sugar reading should be obtained, and appropriate actions taken. Most agencies have a hypoglycemia protocol based on the “15-15 Rule.” The 15-15 Rule is to provide 15 grams of carbohydrate and recheck the blood glucose after 15 minutes. If the reading is still below 70 mg/dL, another serving of 15 grams of carbohydrate should be provided and the process continued until the blood sugar is above 70 mg/dL. Fifteen grams of carbohydrate includes options like 4 ounces of juice or regular soda, hard candy, or glucose tablets. If a patient is experiencing severe hypoglycemia and cannot swallow, a glucagon injection or intravenous administration of dextrose may be required.[6]
Hyperglycemia
Hyperglycemia is defined as elevated blood glucose and often causes signs and symptoms such as frequent urination and increased thirst. Hyperglycemia occurs when the patient’s body does not produce enough insulin or cannot use the insulin properly at the cellular level. There are many potential causes of hyperglycemia, such as not receiving enough medication to effectively control blood glucose, eating more than planned, exercising less than planned, or increased stress from an illness, surgery, hospitalization, or other life events.
If a patient’s blood glucose is greater than 240 mg/dL, their urine is typically checked for ketones. Ketones indicate a condition called ketoacidosis may be occurring. Ketoacidosis occurs in patients whose pancreas is no longer creating insulin, so fats are broken down for energy and waste products called ketones are produced. If the kidneys cannot effectively eliminate ketones in the urine, they build up in the blood and cause ketoacidosis. Ketoacidosis is a life-threatening condition that requires immediate notification of the provider for treatment. Symptoms of ketoacidosis include fruity-smelling breath, nausea, vomiting, very dry mouth, and shortness of breath. Treatment of ketoacidosis often requires the administration of intravenous insulin while the patient is closely monitored in a critical care inpatient unit.[7]
For more information about diabetes mellitus, measuring blood sugar levels, and diabetic medications, visit the “Endocrine” chapter in Open RN Nursing Pharmacology.
Glucometer Use
It is typically the responsibility of a nurse to perform bedside blood glucose readings, but in some agencies, this procedure may be delegated to trained nursing assistants or medical assistants. See Figure 19.1[8] for an image of a standard bedside glucometer kit that contains a glucometer, lancets, reagent strips, and calibration drops. Prior to performing a blood glucose test, read the manufacturer’s instructions and agency policy because they may vary across devices and sites. Ensure the glucometer has been calibrated per agency policy.[9]
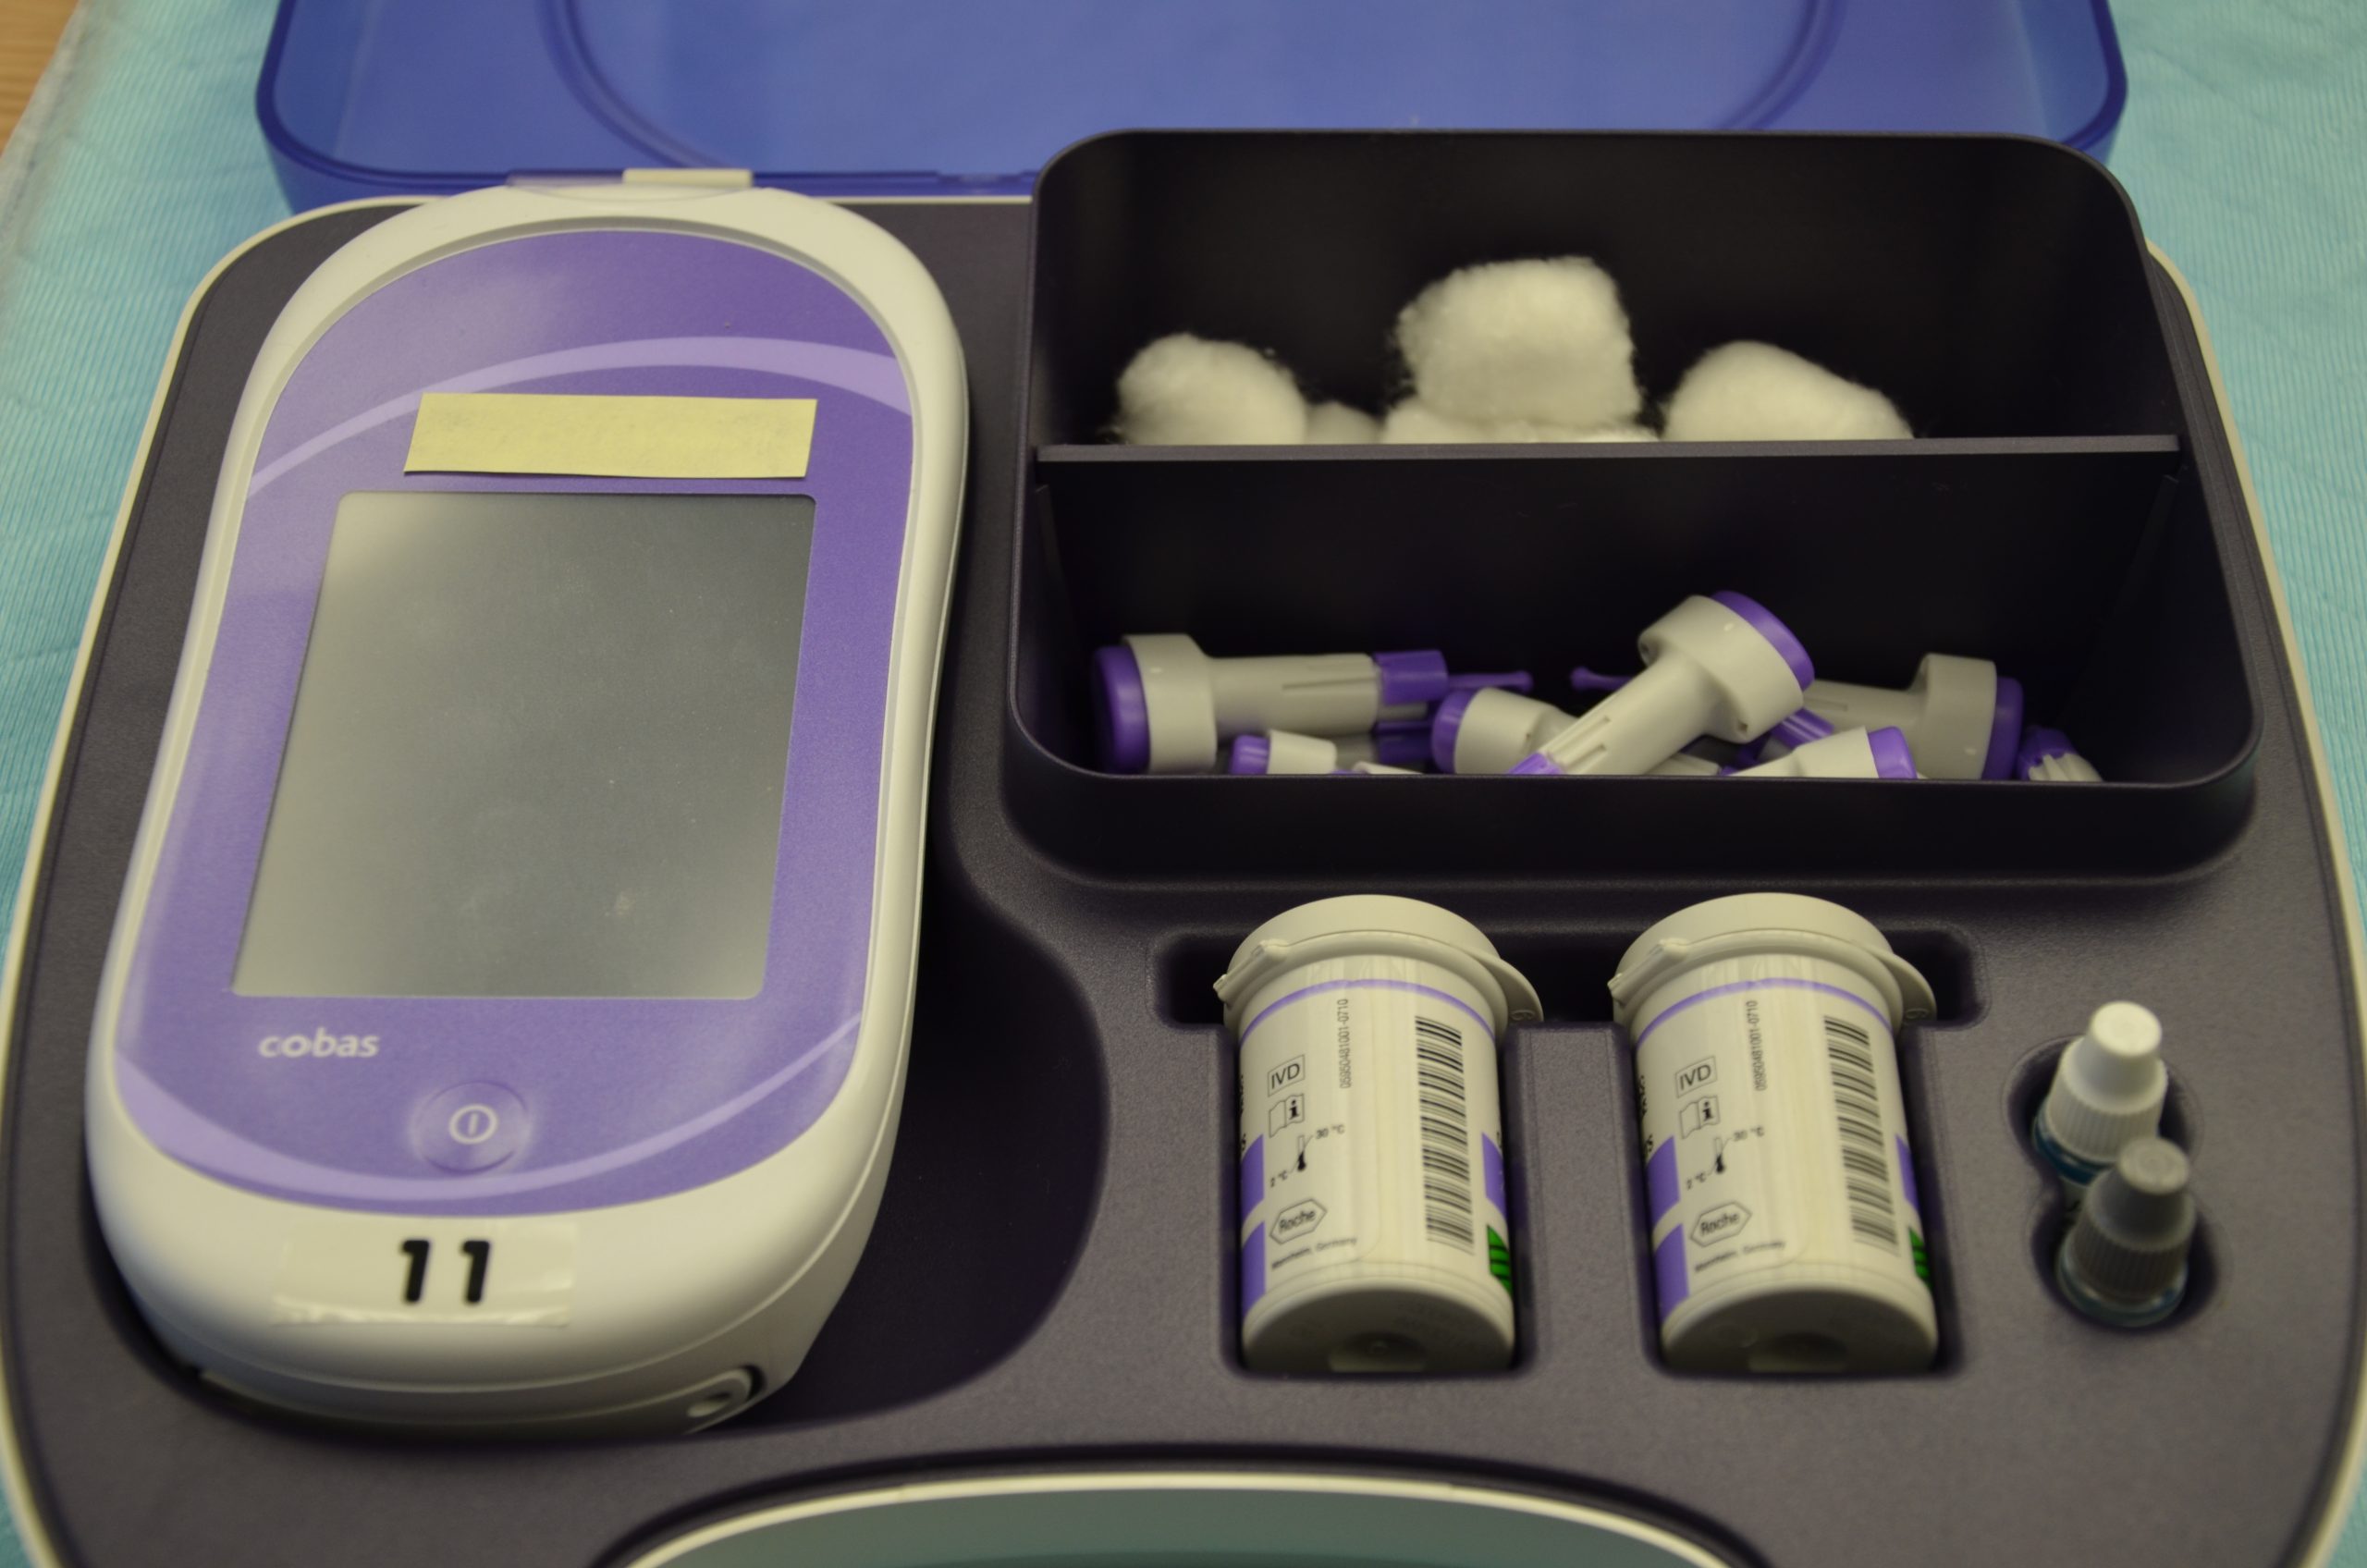
Before beginning the procedure, determine if there are any conditions present that could affect the reading. For example, is the patient fasting? Has the patient already begun eating? Is the patient demonstrating any symptoms of hypoglycemia or hyperglycemia? Keep your patient safe by applying your knowledge of diabetes, the medication being administered, and the uniqueness of the patient to make appropriate clinical judgments regarding the procedure and associated medication administration.[10]
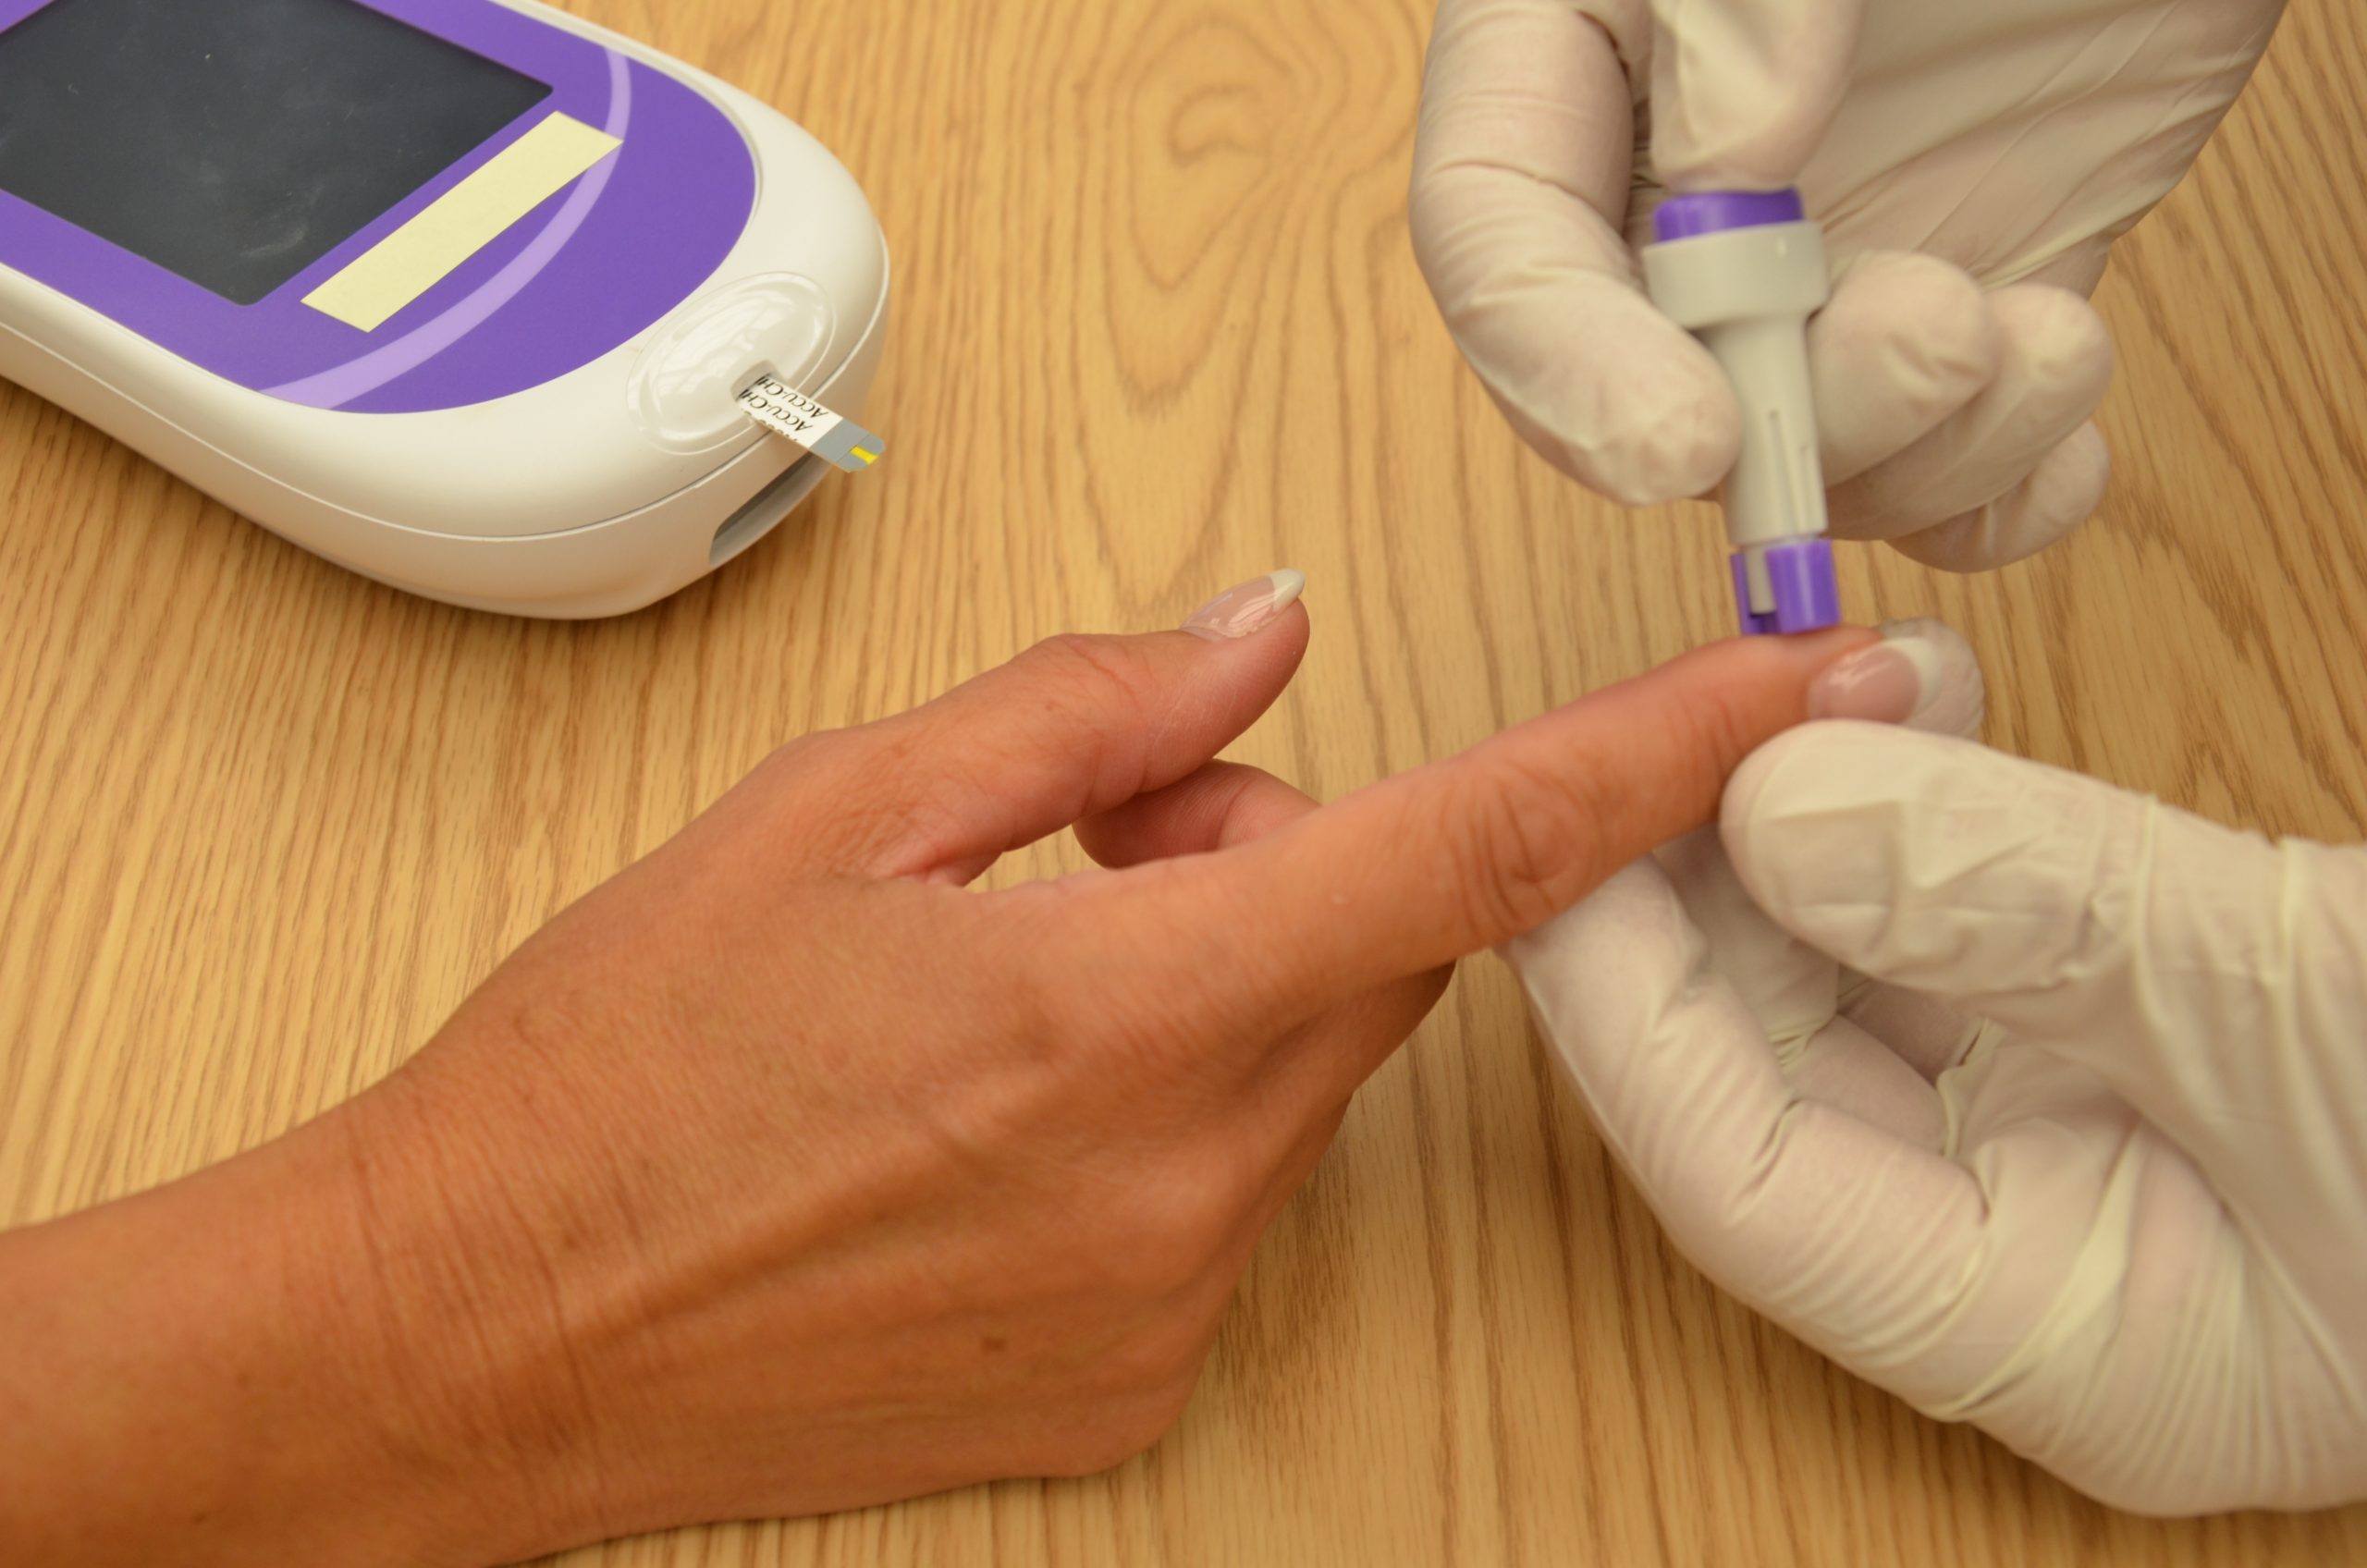
See the “Checklist for Blood Glucose Monitoring” for details regarding the procedure. It is often important to keep the patient’s hand warm and in a dependent position to promote vasodilation and obtain a good blood sample. If necessary, warm compresses can be applied for 10 minutes prior to the procedure to promote vasodilation. Follow the manufacturer’s instructions to prepare the glucometer for measurement. After applying clean gloves, clean the patient’s skin with an alcohol wipe for 30 seconds, allow the site to dry, and then puncture the skin using the lancet. See Figure 19.2[11] for an image of performing a skin puncture using a lancet.
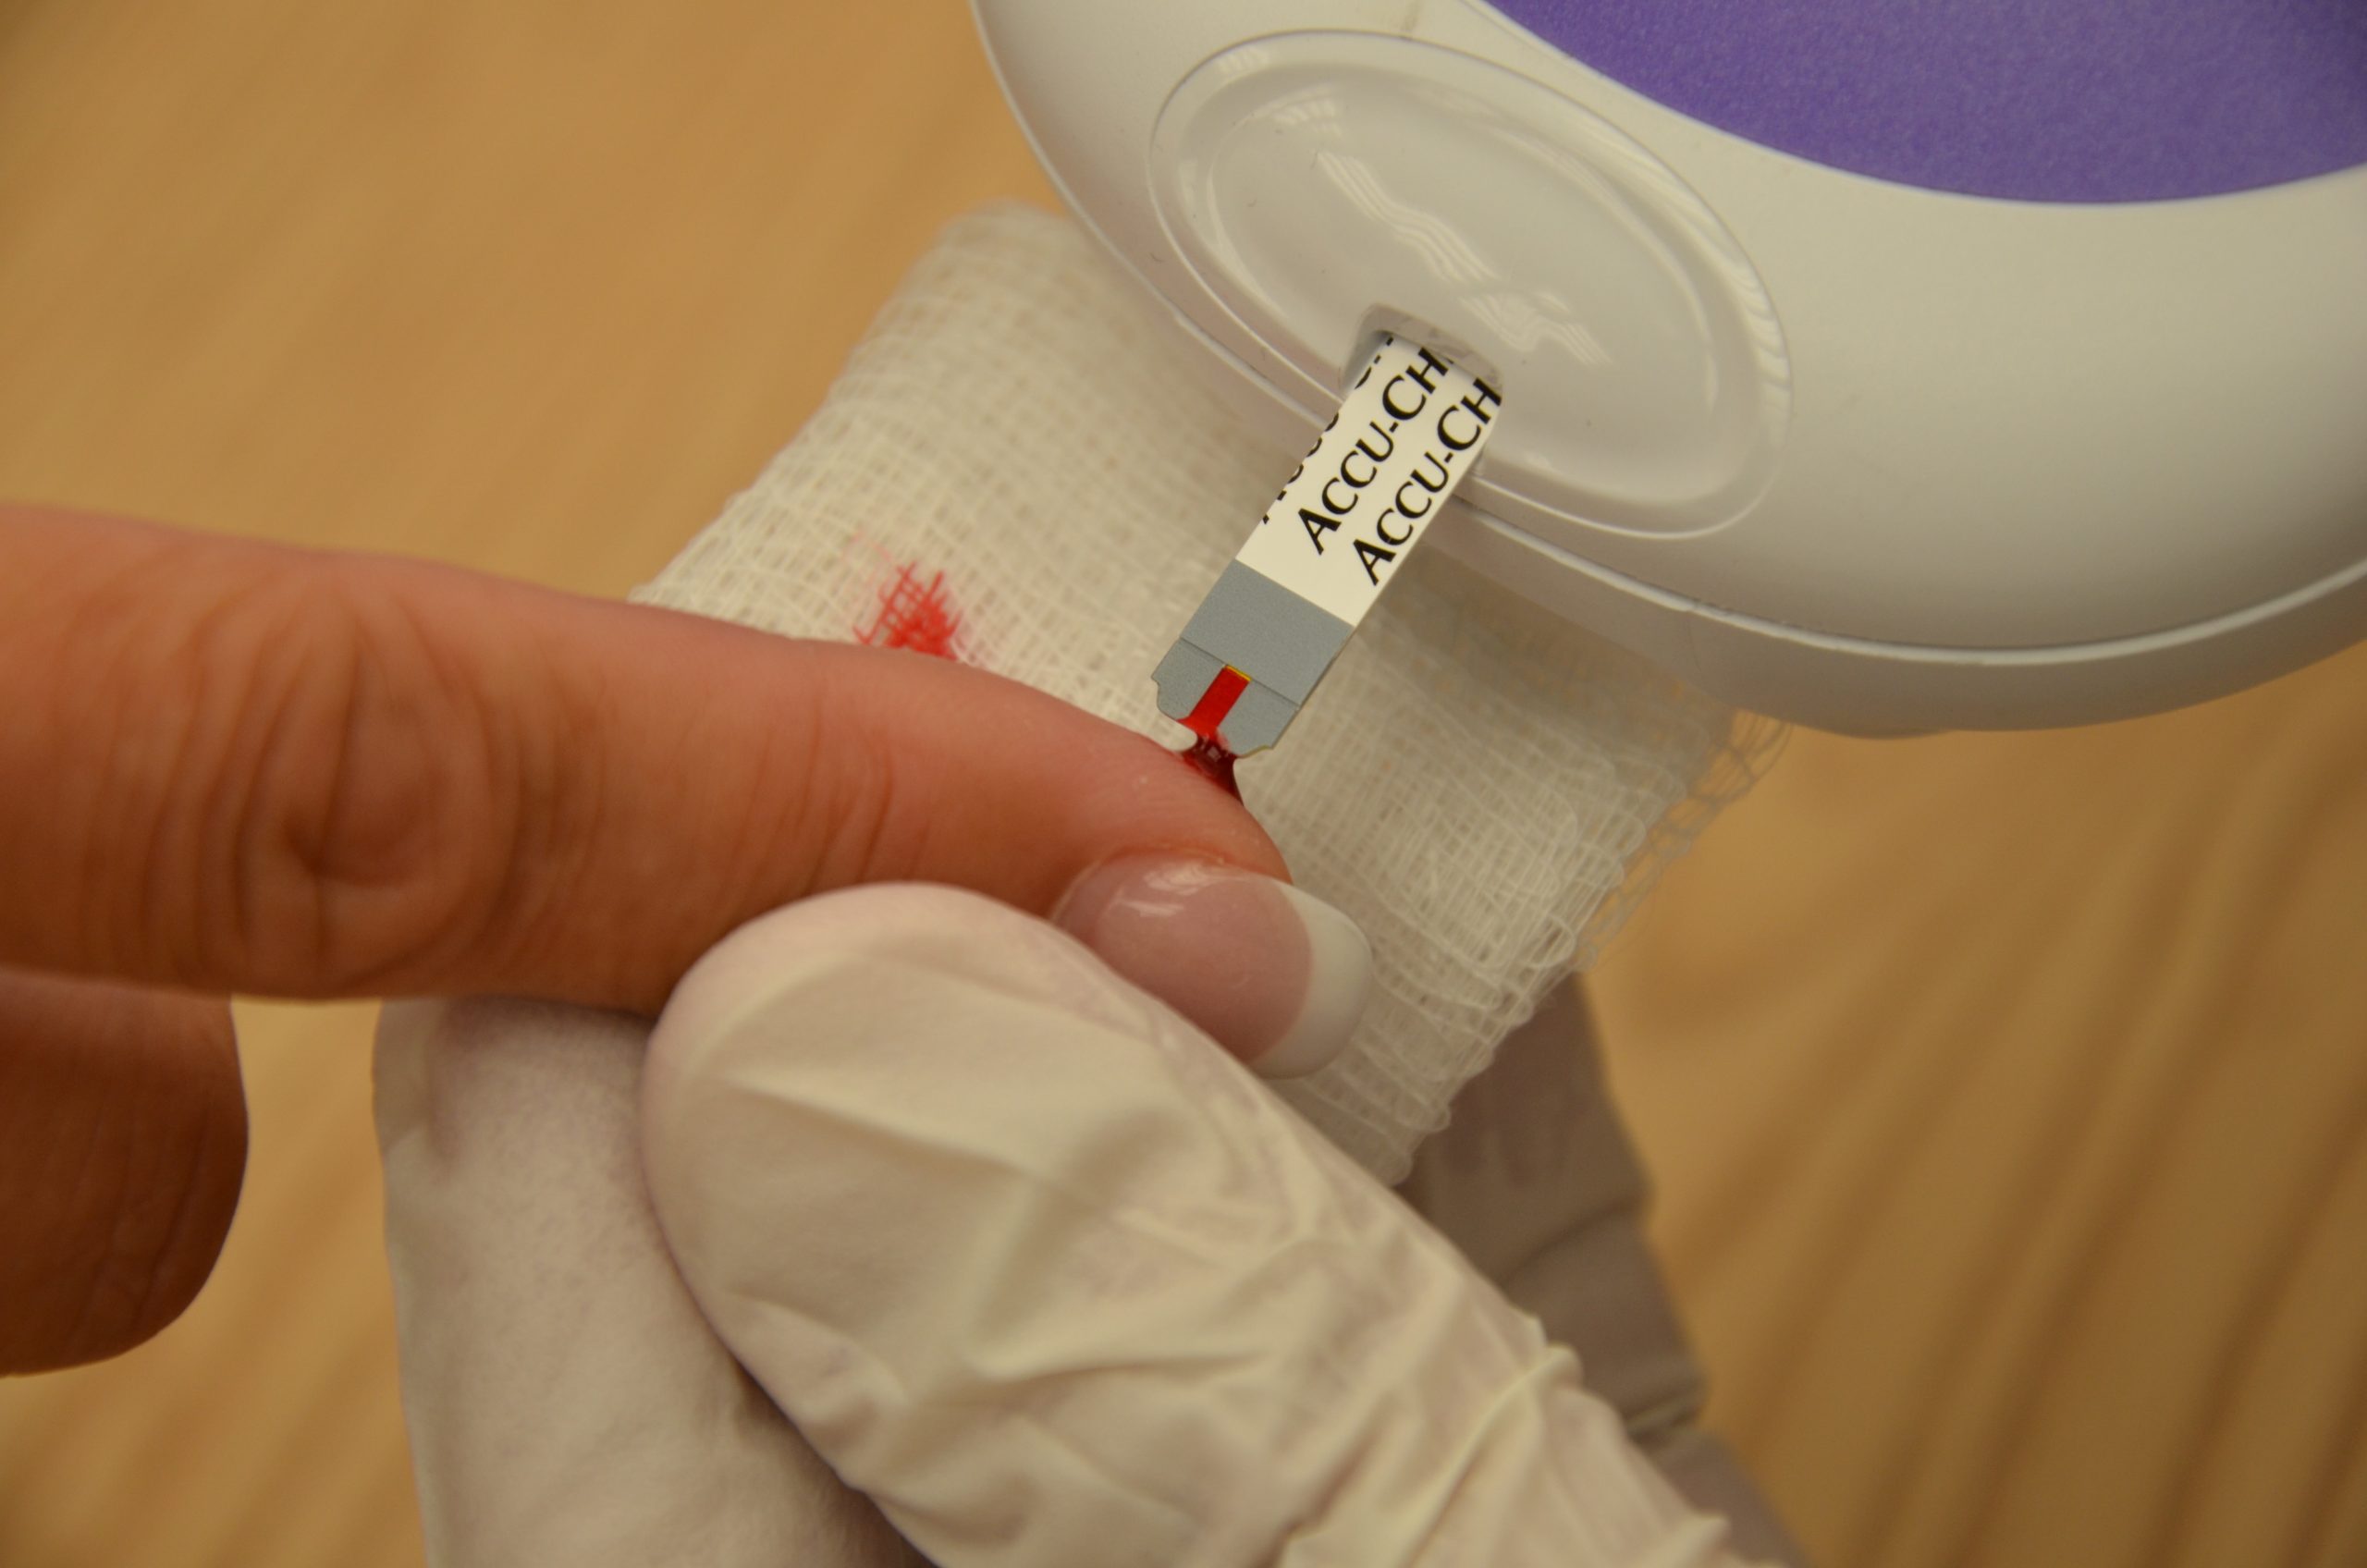
If needed, gently squeeze above the site to obtain a large drop of blood. Do not milk or massage the finger because it may introduce excess tissue fluid and hemolyze the specimen. Wipe away the first drop of blood and use the second drop for the blood sample. Follow agency policy and manufacturer instructions regarding placement of the drop of blood for absorption on the reagent strip. See Figure 19.3[12] for an image of a nurse absorbing the patient’s drop of blood on the reagent strip. Timeliness is essential in gathering an appropriate specimen before clotting occurs or the glucometer times out.
Cleanse the glucometer and document the blood glucose results according to agency policy. Report any concerns about patient symptoms or blood sugar results according to agency policy.
Life Span Considerations
Blood glucose samples should be taken from the heel of newborns and infants up to the age of six months. When obtaining a sample from the heel, the sample is taken from the medial or lateral plantar surface.
View a supplementary YouTube video on Obtaining a Bedside Blood Glucose[13]
- This work is a derivative of Nursing Pharmacology by Open RN licensed under CC BY 4.0 ↵
- This work is a derivative of Clinical Procedures for Safer Patient Care by British Columbia Institute of Technology and is licensed under CC BY 4.0 ↵
- Donihi, A. C., DiNardo, M. M., DeVita, M. A., & Korytkowski, M. T. (2006). Use of a standardized protocol to decrease medication errors and adverse events related to sliding scale insulin. Quality & Safety in Health Care, 15(2), 89–91. https://doi.org/10.1136/qshc.2005.014381 ↵
- American Diabetes Association. (n.d.). Hypoglycemia (Low blood sugar). https://www.diabetes.org/diabetes/medication-management/blood-glucose-testing-and-control/hypoglycemia ↵
- American Diabetes Association. (n.d.). Hypoglycemia (Low blood sugar). https://www.diabetes.org/diabetes/medication-management/blood-glucose-testing-and-control/hypoglycemia ↵
- American Diabetes Association. (n.d.). Hypoglycemia (Low blood sugar). https://www.diabetes.org/diabetes/medication-management/blood-glucose-testing-and-control/hypoglycemia ↵
- American Diabetes Association. (n.d.). Hyperglycemia (High blood glucose). https://www.diabetes.org/diabetes/medication-management/blood-glucose-testing-and-control/hyperglycemia ↵
- “DSC_0718.jpg” by British Columbia Institute of Technology is licensed under CC BY 4.0. Access for free at https://opentextbc.ca/clinicalskills/chapter/8-2-glucometer-use/ ↵
- This work is a derivative of Clinical Procedures for Safer Patient Care by British Columbia Institute of Technology and is licensed under CC BY 4.0 ↵
- This work is a derivative of Clinical Procedures for Safer Patient Care by British Columbia Institute of Technology and is licensed under CC BY 4.0 ↵
- “DSC_1130.jpg” by British Columbia Institute of Technology is licensed under CC BY 4.0. Access for free at https://opentextbc.ca/clinicalskills/chapter/8-2-glucometer-use/ ↵
- “DSC_1141.jpg” by British Columbia Institute of Technology is licensed under CC BY 4.0. Access for free at https://opentextbc.ca/clinicalskills/chapter/8-2-glucometer-use/ ↵
- RegisteredNurseRN. (2015, August 12). How to prick fingertips with a lancet device for checking a blood sugar | Nursing skills [Video]. YouTube. All rights reserved. Video used with permission. https://youtu.be/JPJ4l7QZ9eM ↵
When performing a comprehensive neurological exam, examiners may assess the functioning of the cranial nerves. When performing these tests, examiners compare responses of opposite sides of the face and neck. Instructions for assessing each cranial nerve are provided below.
Cranial Nerve I - Olfactory
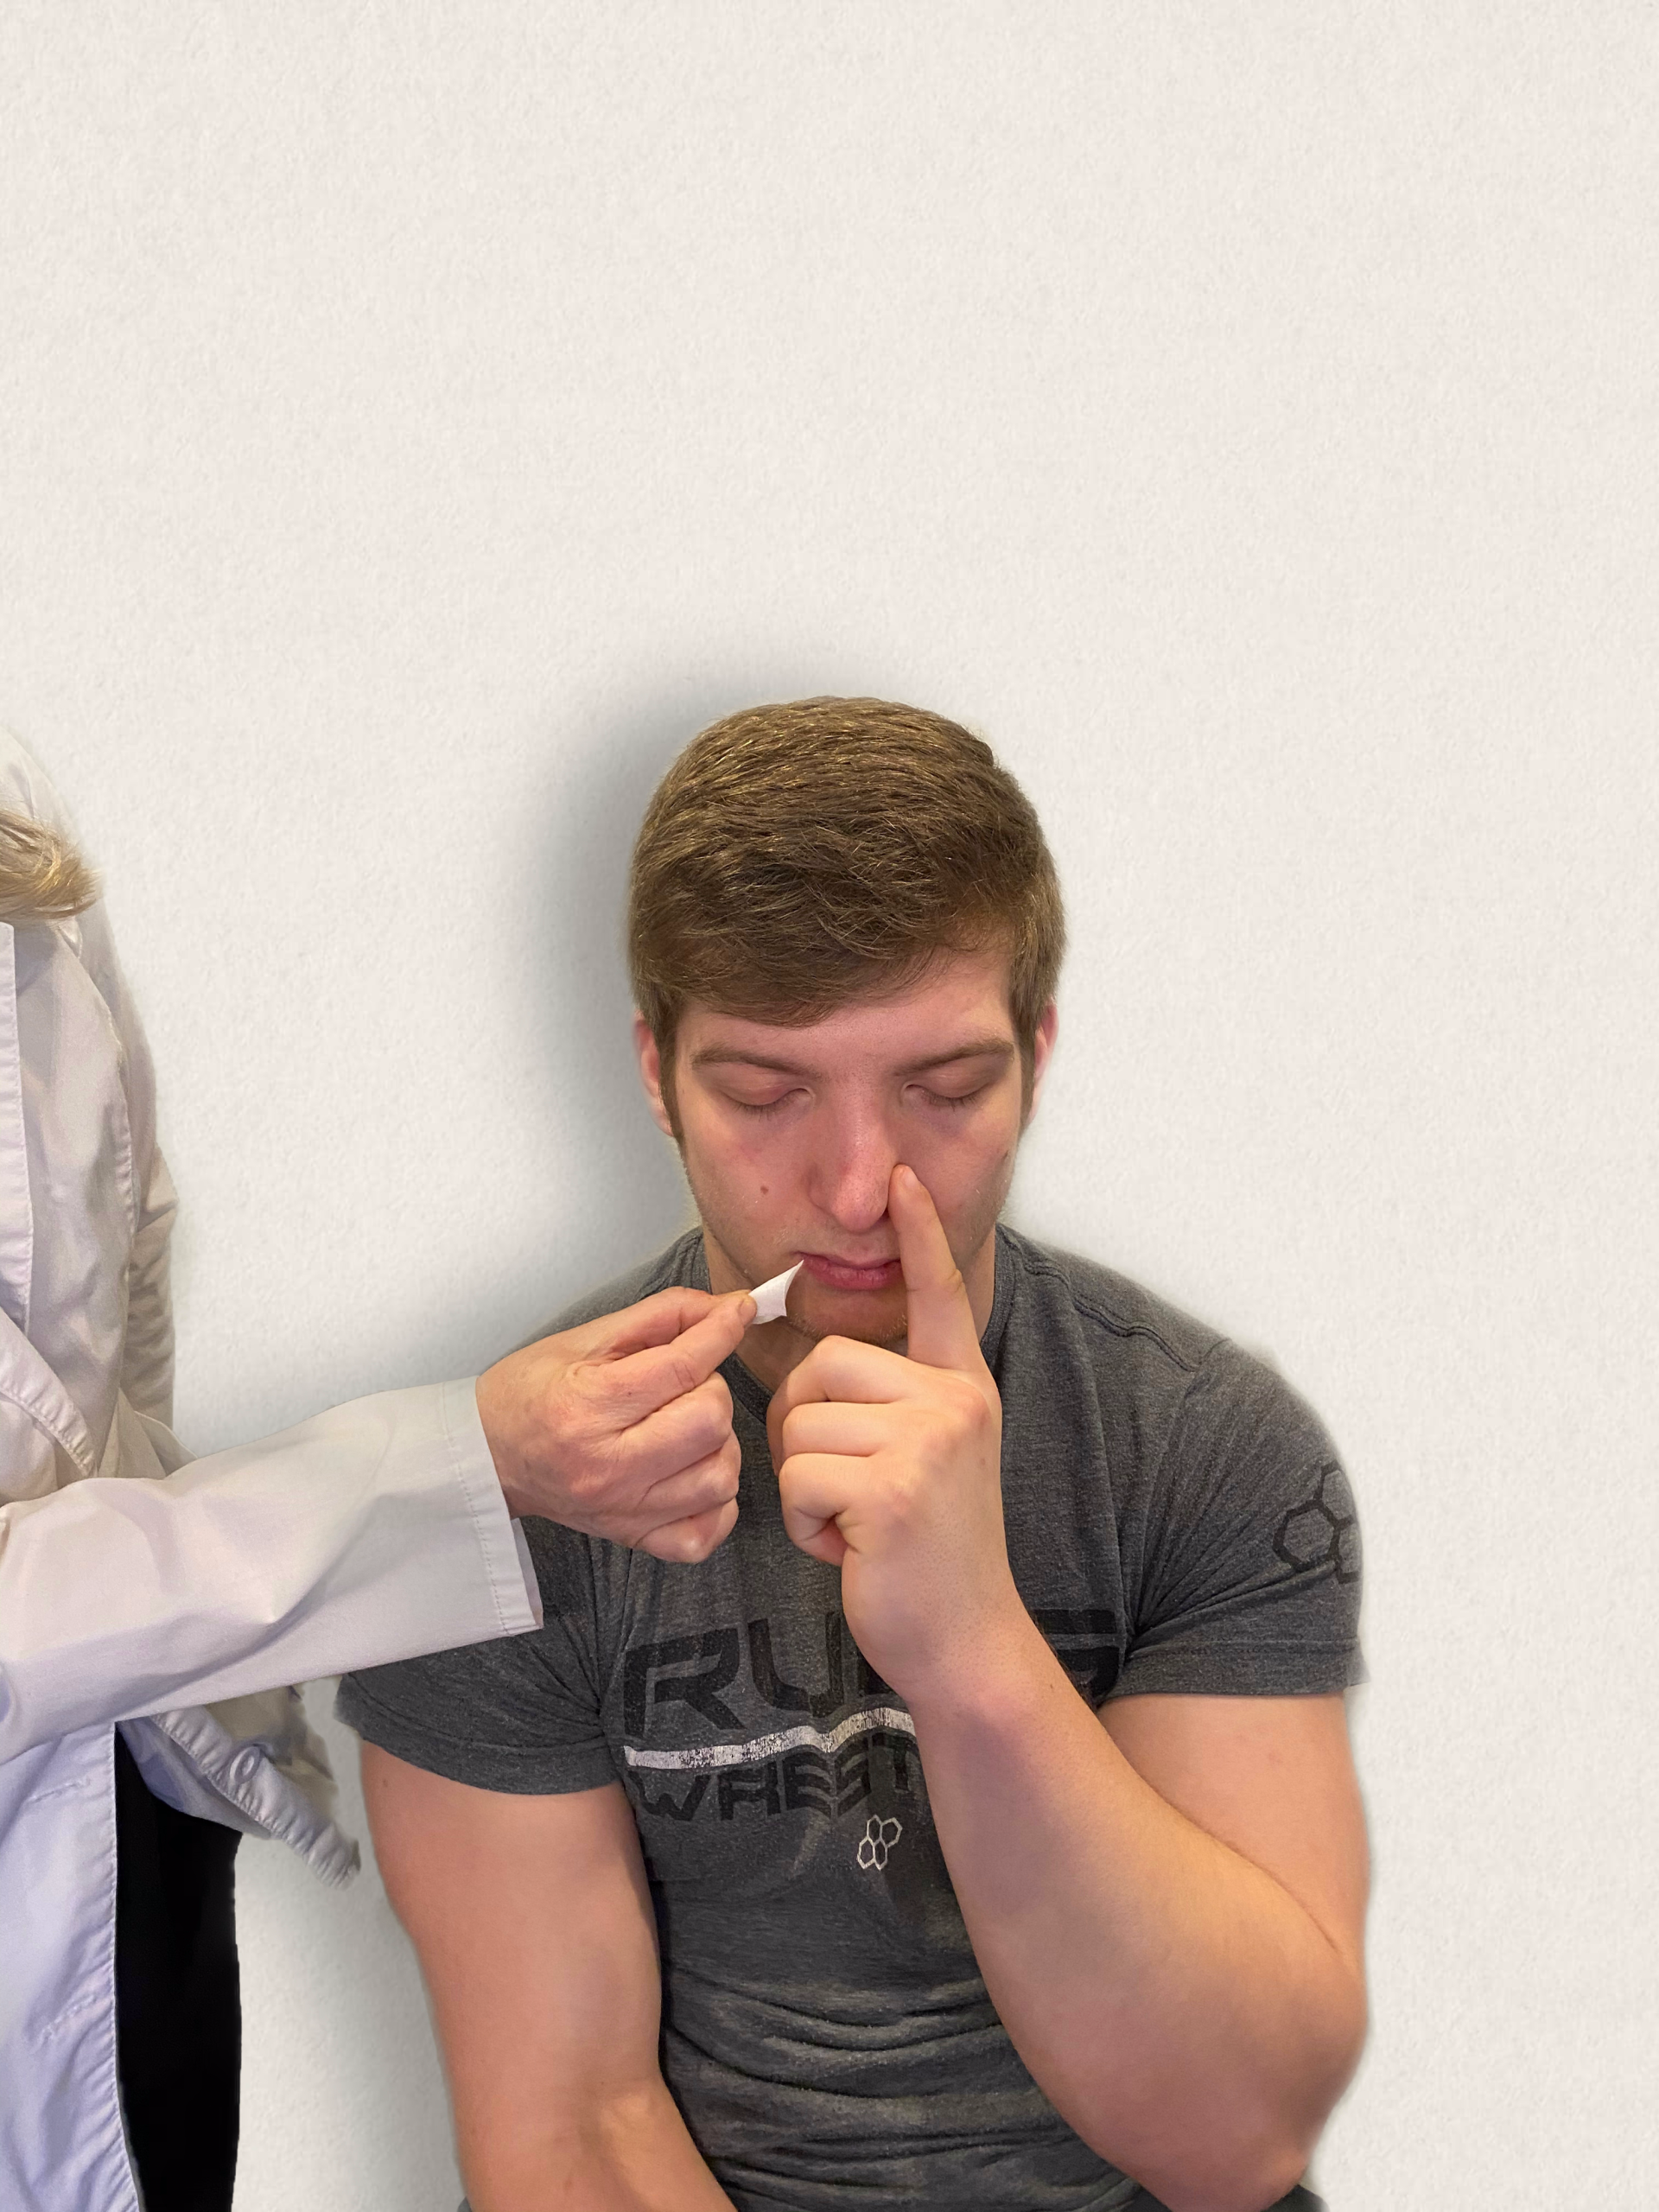
Ask the patient to identify a common odor, such as coffee or peppermint, with their eyes closed. See Figure 6.11[1] for an image of a nurse performing an olfactory assessment.
Cranial Nerve II - Optic
Be sure to provide adequate lighting when performing a vision assessment.
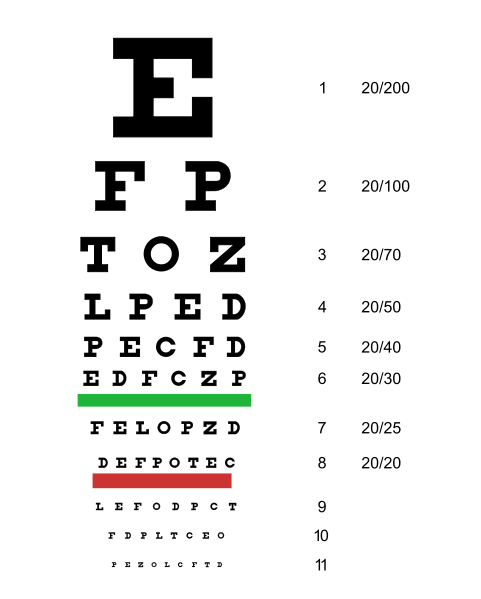
Far vision is tested using the Snellen chart. See Figure 6.12[2] for an image of a Snellen chart. The numerator of the fractions on the chart indicates what the individual can see at 20 feet, and the denominator indicates the distance at which someone with normal vision could see this line. For example, a result of 20/40 indicates this individual can see this line at 20 feet but someone with normal vision could see this line at 40 feet.
Test far vision by asking the patient to stand 20 feet away from a Snellen chart. Ask the patient to cover one eye and read the letters from the lowest line they can see.[3] Record the corresponding result in the furthermost right-hand column, such as 20/30. Repeat with the other eye. If the patient is wearing glasses or contact lens during this assessment, document the results as “corrected vision.” Repeat with each eye, having the patient cover the opposite eye. Alternative charts are available for children or adults who can’t read letters in English.
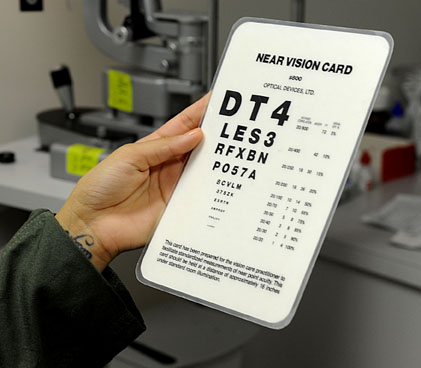
Near vision is assessed by having a patient read from a prepared card from 14 inches away. See Figure 6.13[4] for a card used to assess near vision.
Cranial Nerve III, IV, and VI - Oculomotor, Trochlear, Abducens
Cranial nerve III, IV, and VI (oculomotor, trochlear, abducens nerves) are tested together.
- Test eye movement by using a penlight. Stand 1 foot in front of the patient and ask them to follow the direction of the penlight with only their eyes. At eye level, move the penlight left to right, right to left, up and down, upper right to lower left, and upper left to lower right. Watch for smooth movement of the eyes in all fields. An unexpected finding is involuntary eye movement which may cause the eye to move rapidly from side to side, up and down, or in a circle, and may slightly blur vision referred to as nystagmus.
- Test bilateral pupils to ensure they are equally round and reactive to light and accommodation. Dim the lights of the room before performing this test.
- Pupils should be round and bilaterally equal in size. The diameter of the pupils usually ranges from two to five millimeters. Emergency clinicians often encounter patients with the triad of pinpoint pupils, respiratory depression, and coma related to opioid overuse.
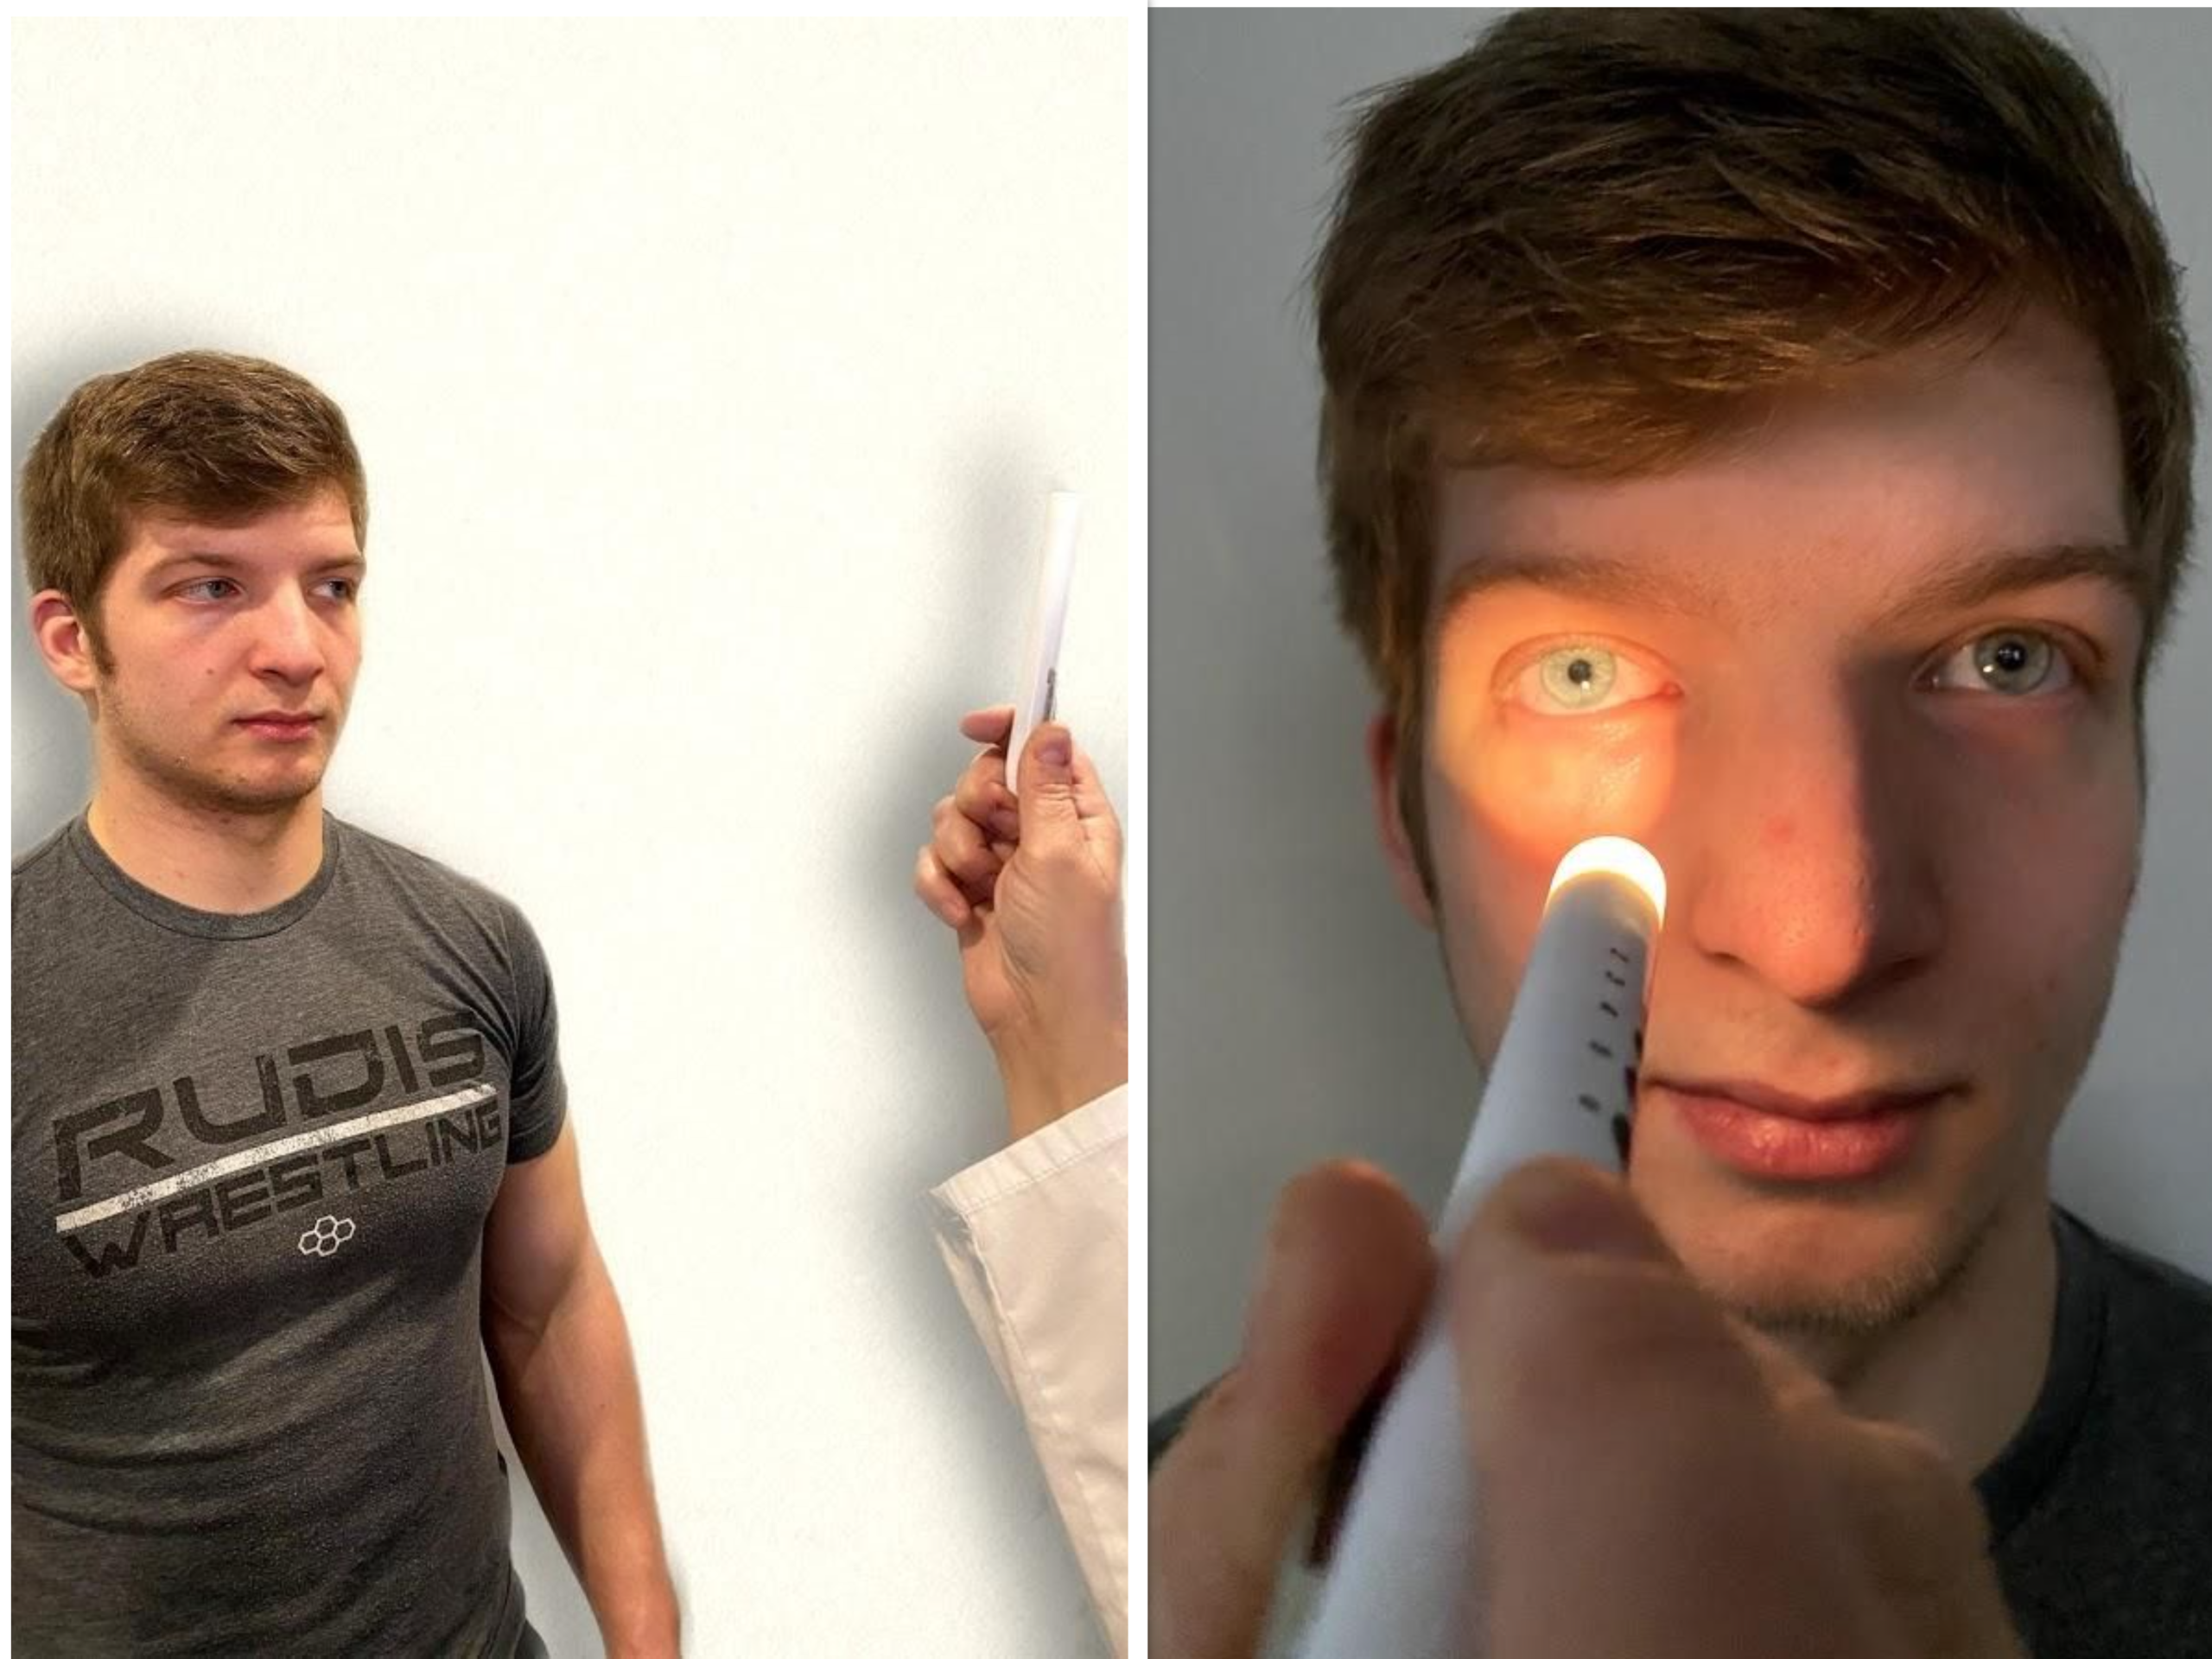
- Test pupillary reaction to light. Using a penlight, approach the patient from the side, and shine the penlight on one pupil. Observe the response of the lighted pupil, which is expected to quickly constrict. The pupil where you shine the light should constrict (direct reaction) and so should the other one (consensual reaction). Repeat by shining the light on the other pupil. Both pupils should react in the same manner to light. See Figure 6.14[5] for an image of a nurse assessing a patient’s pupillary reaction to light. An unexpected finding is when one pupil is larger than the other or one pupil responds more slowly than the other to light, which is often referred to as a “sluggish response.”
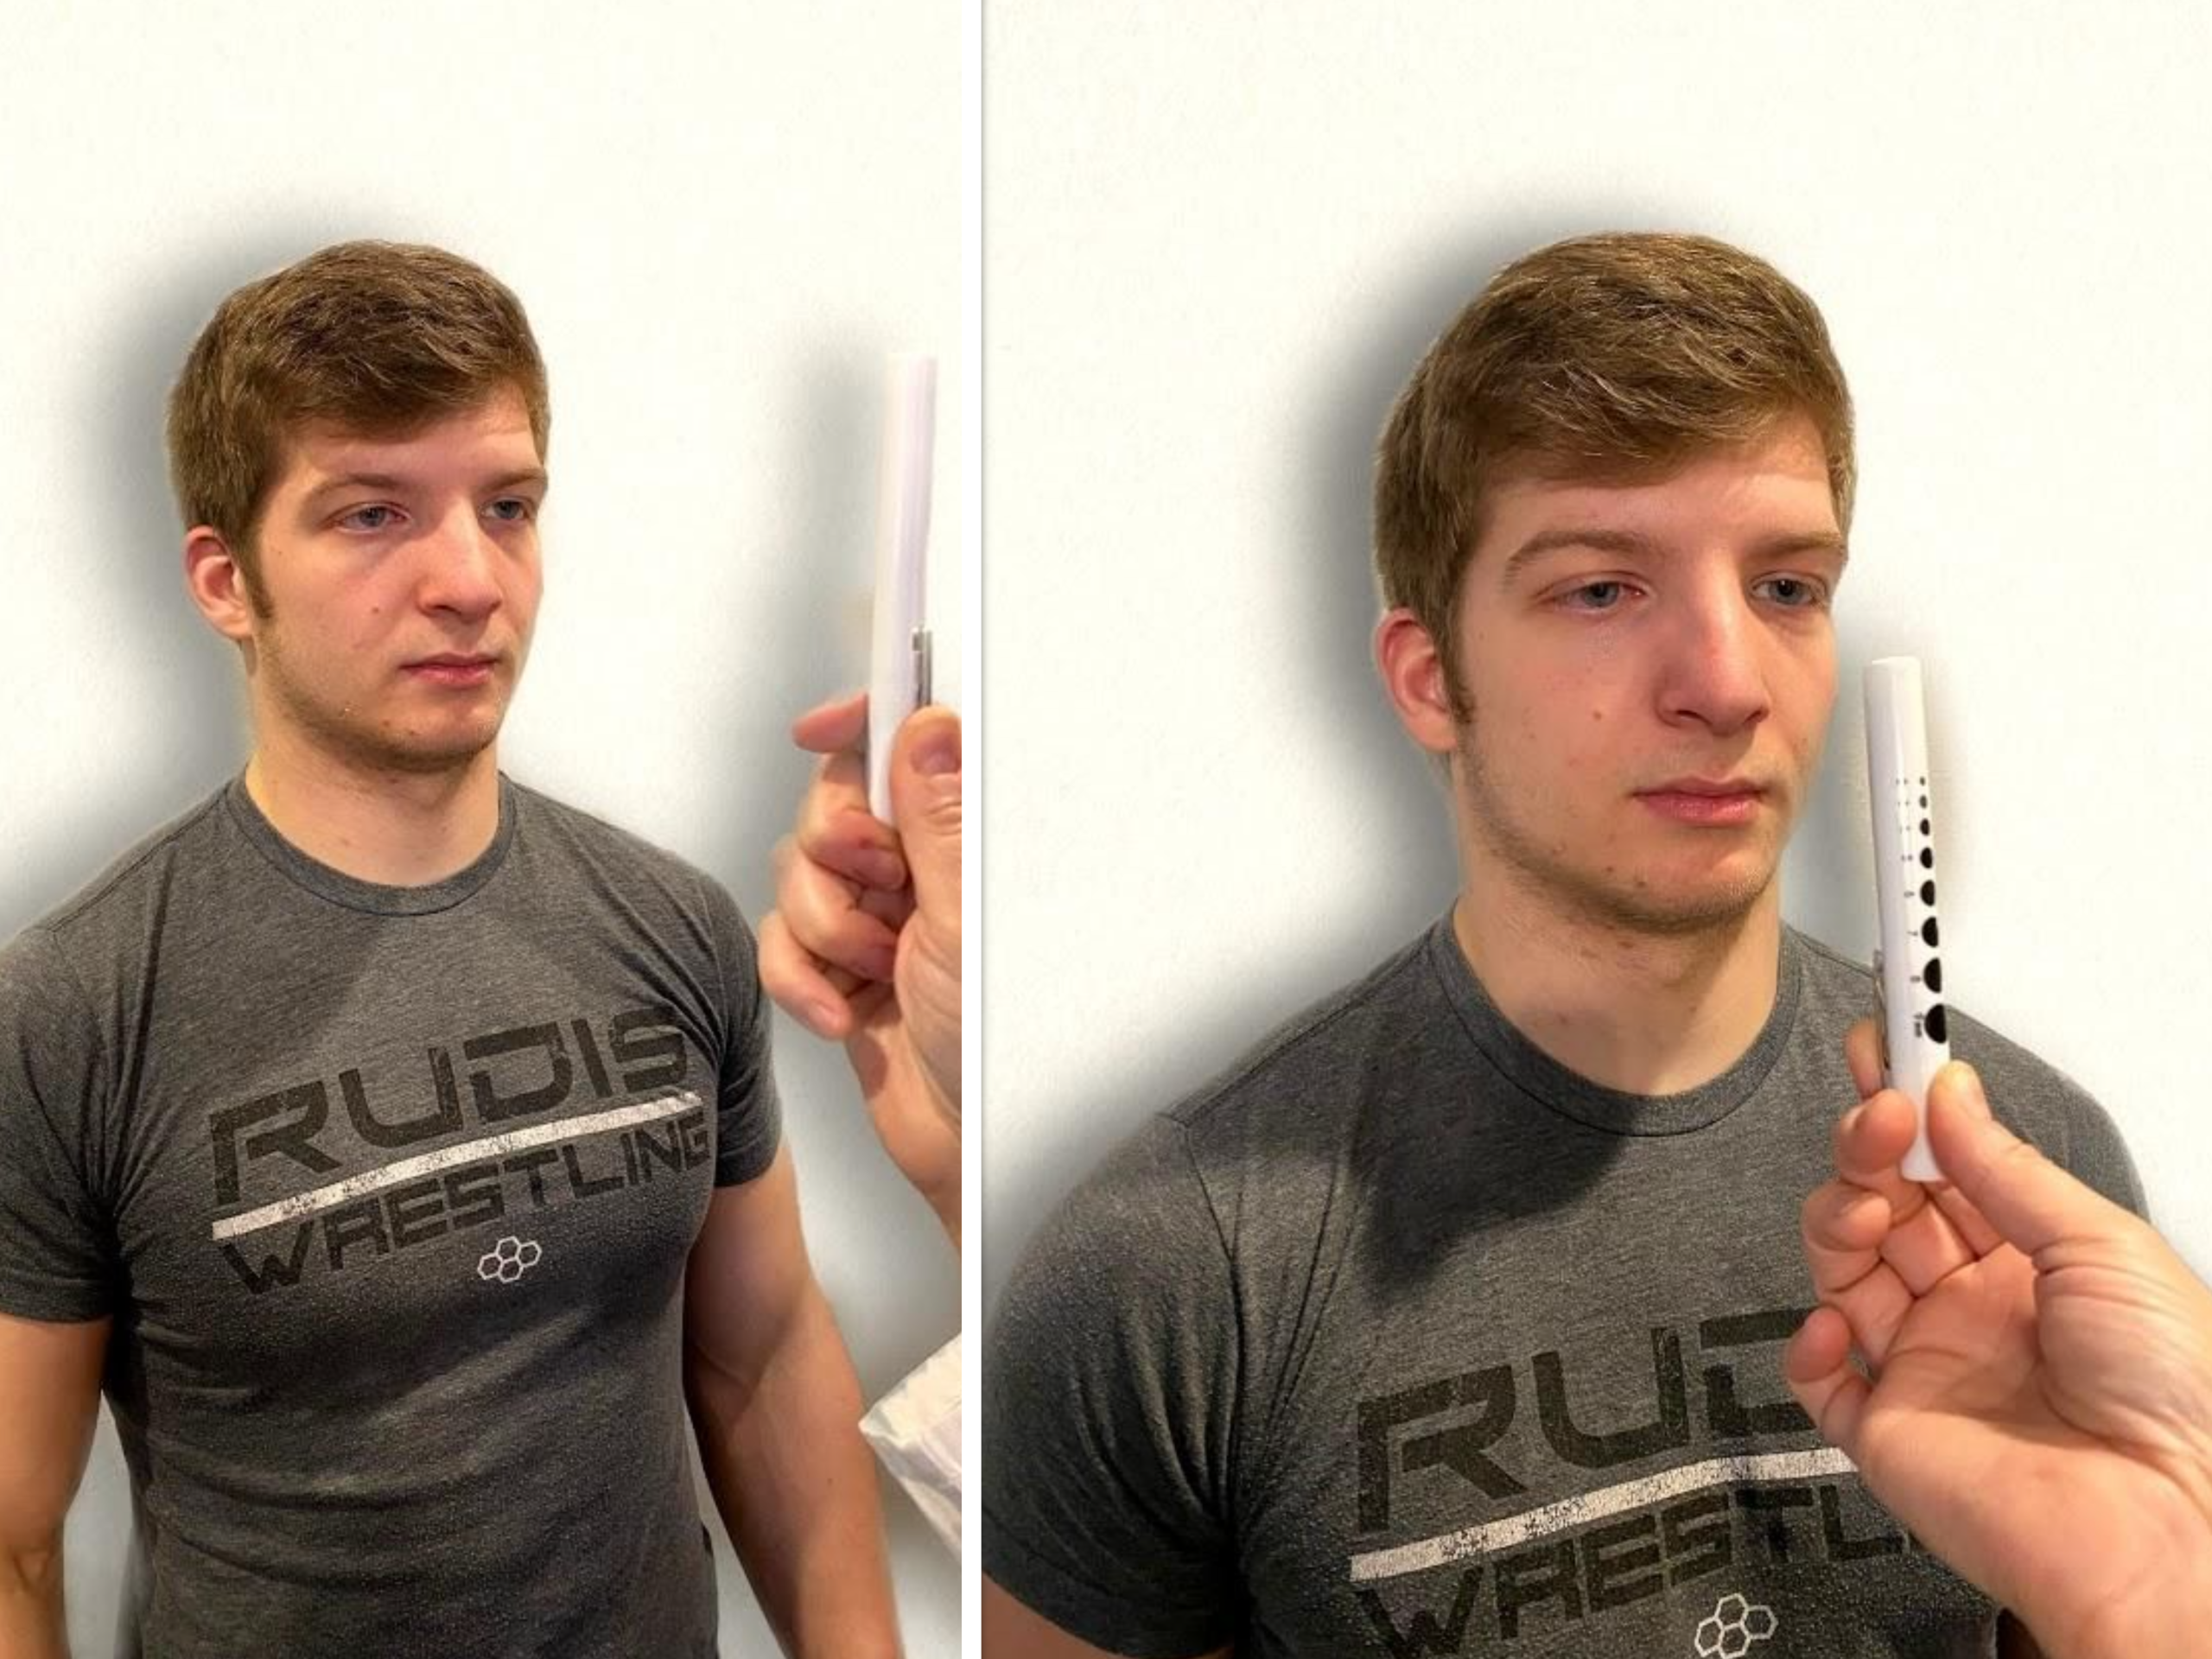
- Test eye convergence and accommodation. Recall that accommodation refers to the ability of the eye to adjust from near to far vision, with pupils constricting for near vision and dilating for far vision. Convergence refers to the action of both eyes moving inward as they focus on a close object using near vision. Ask the patient to look at a near object (4-6 inches away from the eyes), and then move the object out to a distance of 12 inches. Pupils should constrict while viewing a near object and then dilate while looking at a distant object, and both eyes should move together. See Figure 6.15[6] for an image of a nurse assessing convergence and accommodation.
- The acronym PERRLA is commonly used in medical documentation and refers to, "pupils are equal, round and reactive to light and accommodation."
Visit the National Library of Medicine's webpage for more details about assessing the Pupillary Light Reflex.
Cranial Nerve V - Trigeminal
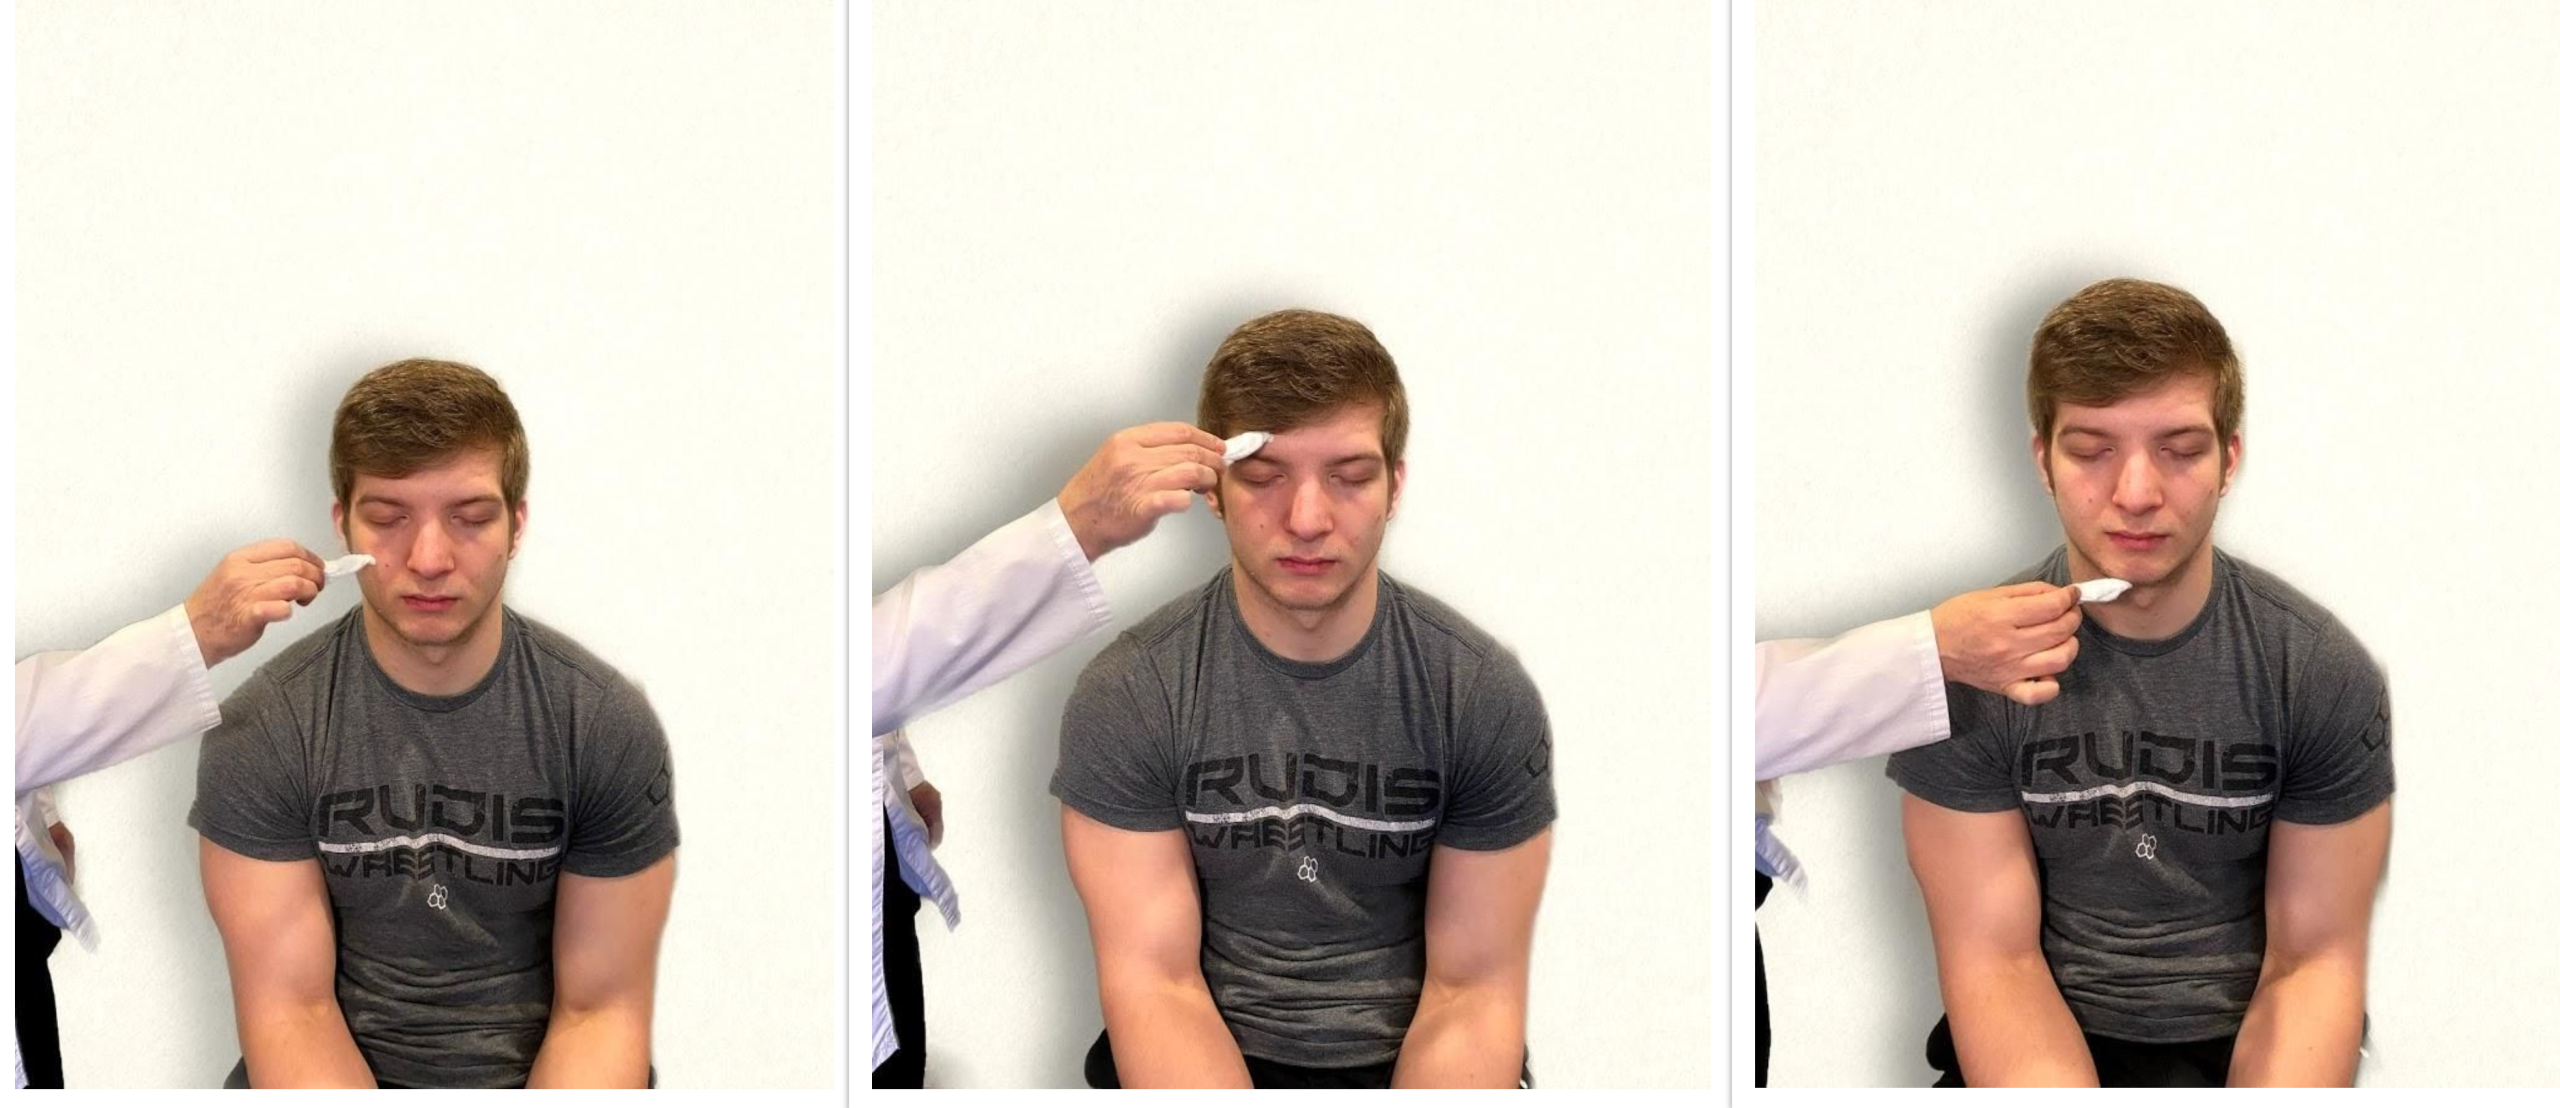
- Test sensory function. Ask the patient to close their eyes, and then use a wisp from a cotton ball to lightly touch their face, forehead, and chin. Instruct the patient to say “Now” every time they feel the placement of the cotton wisp. See Figure 6.16[8] for an image of assessing trigeminal sensory function. The expected finding is that the patient will report every instance the cotton wisp is placed. An advanced technique is to assess the corneal reflex in comatose patients by touching the cotton wisp to the cornea of the eye to elicit a blinking response.
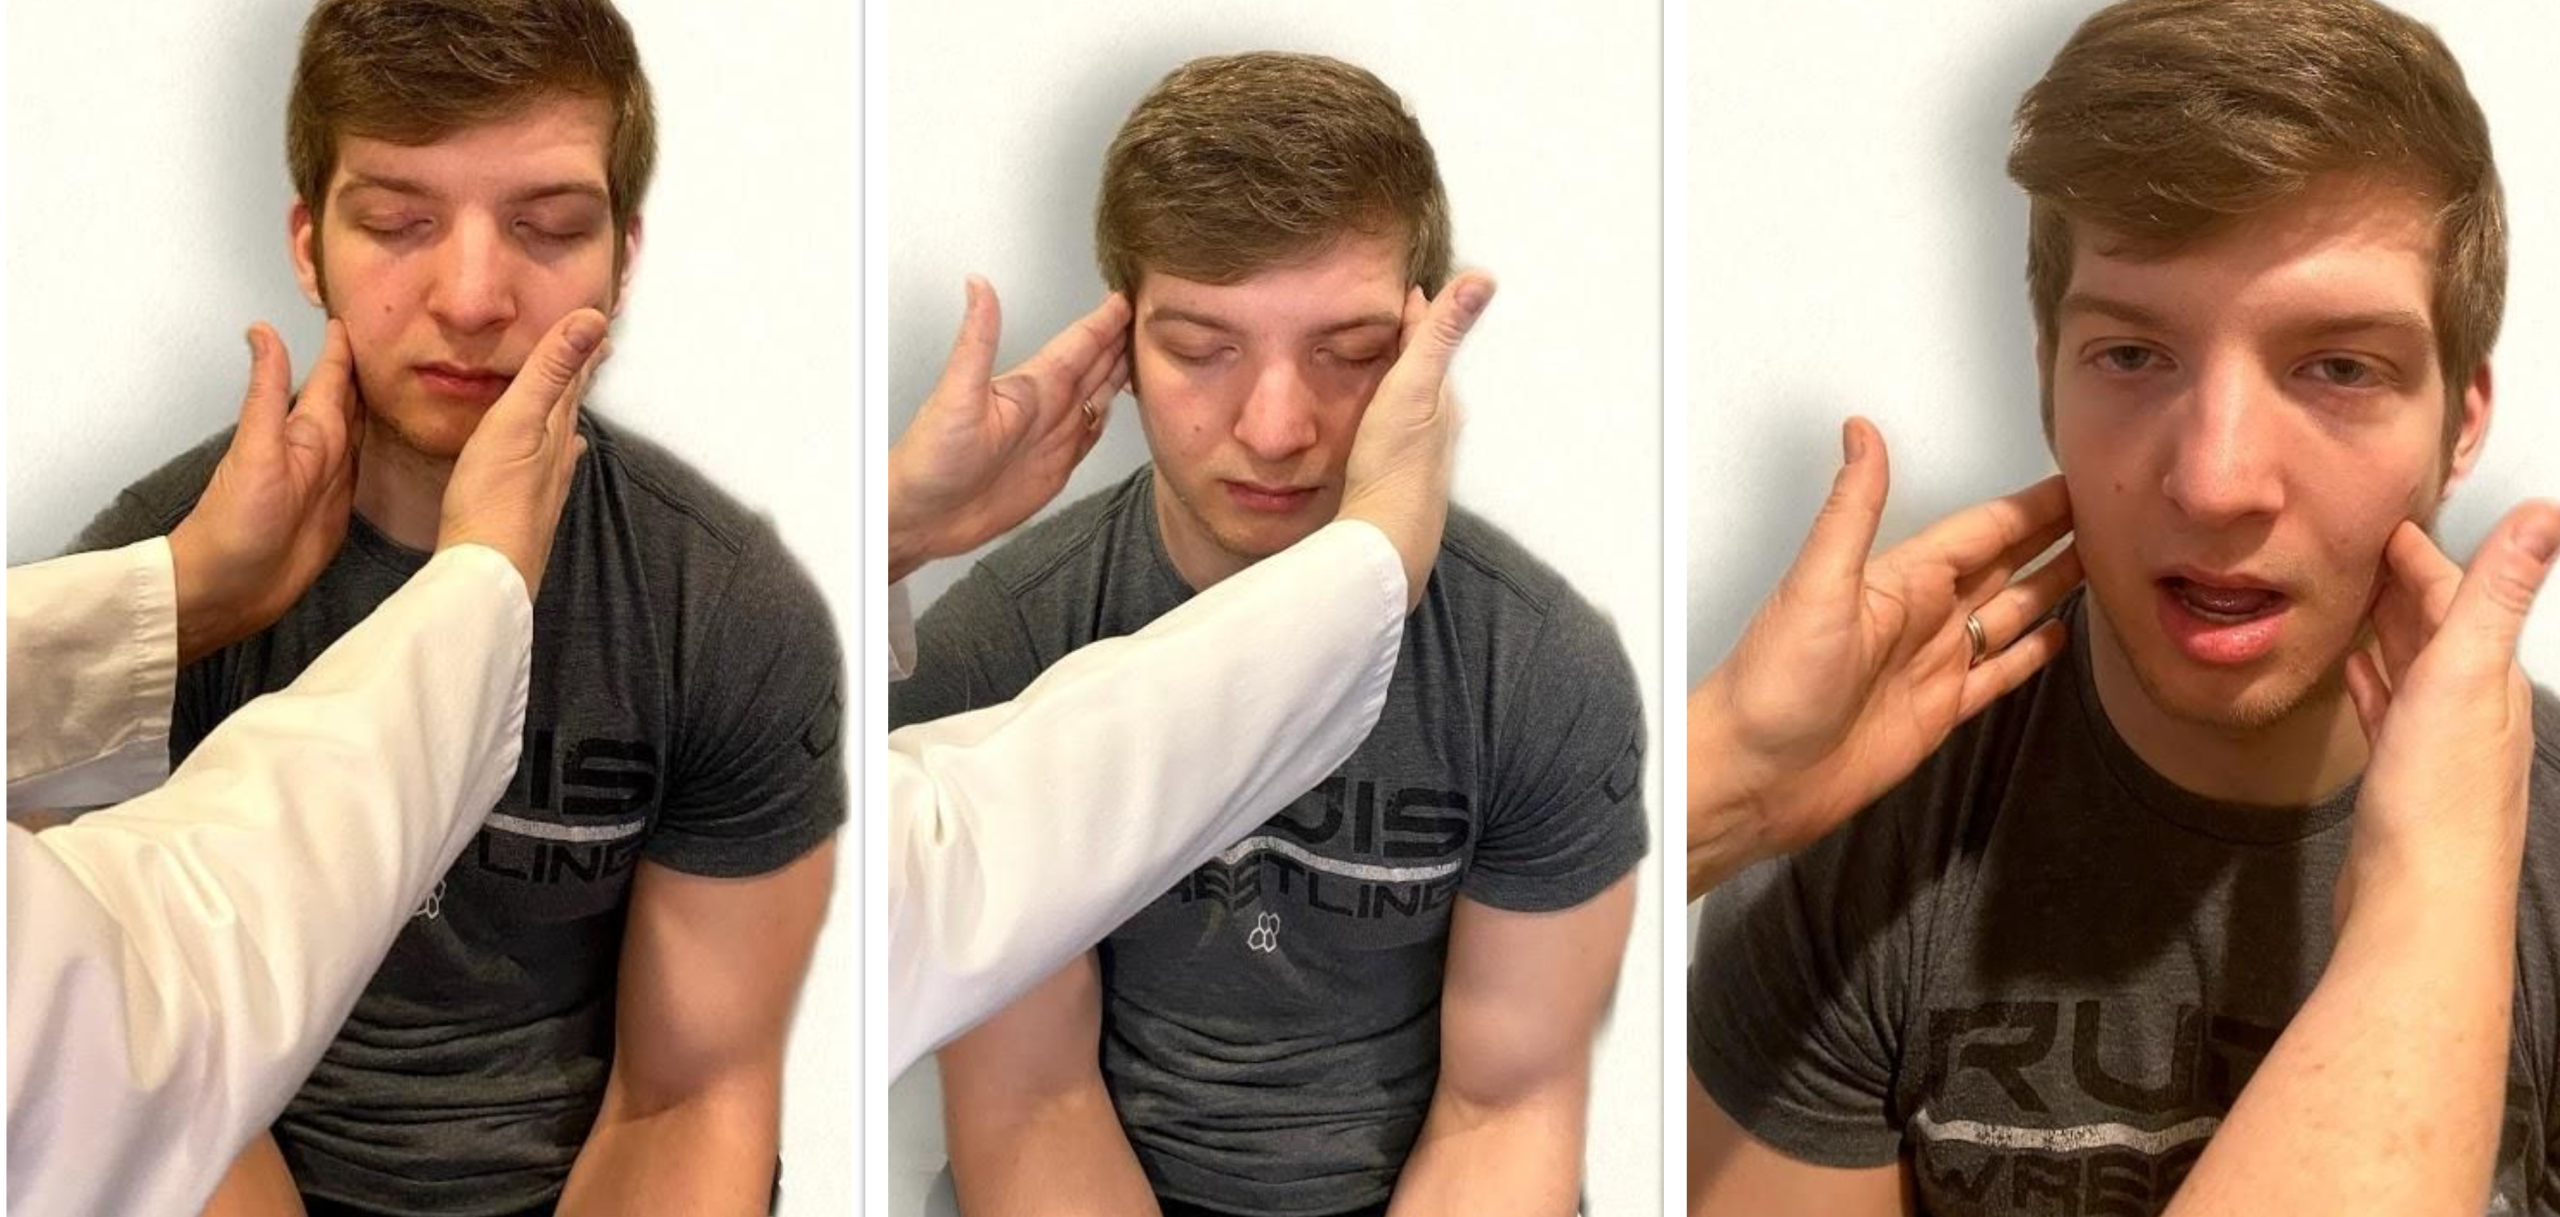
- Test motor function. Ask the patient to clench their teeth tightly while bilaterally palpating the temporalis and masseter muscles for strength. Ask the patient to open and close their mouth several times while observing muscle symmetry. See Figure 6.17[9] for an image of assessing trigeminal motor strength. The expected finding is the patient is able to clench their teeth and symmetrically open and close their mouth.
Cranial Nerve VII - Facial Nerve
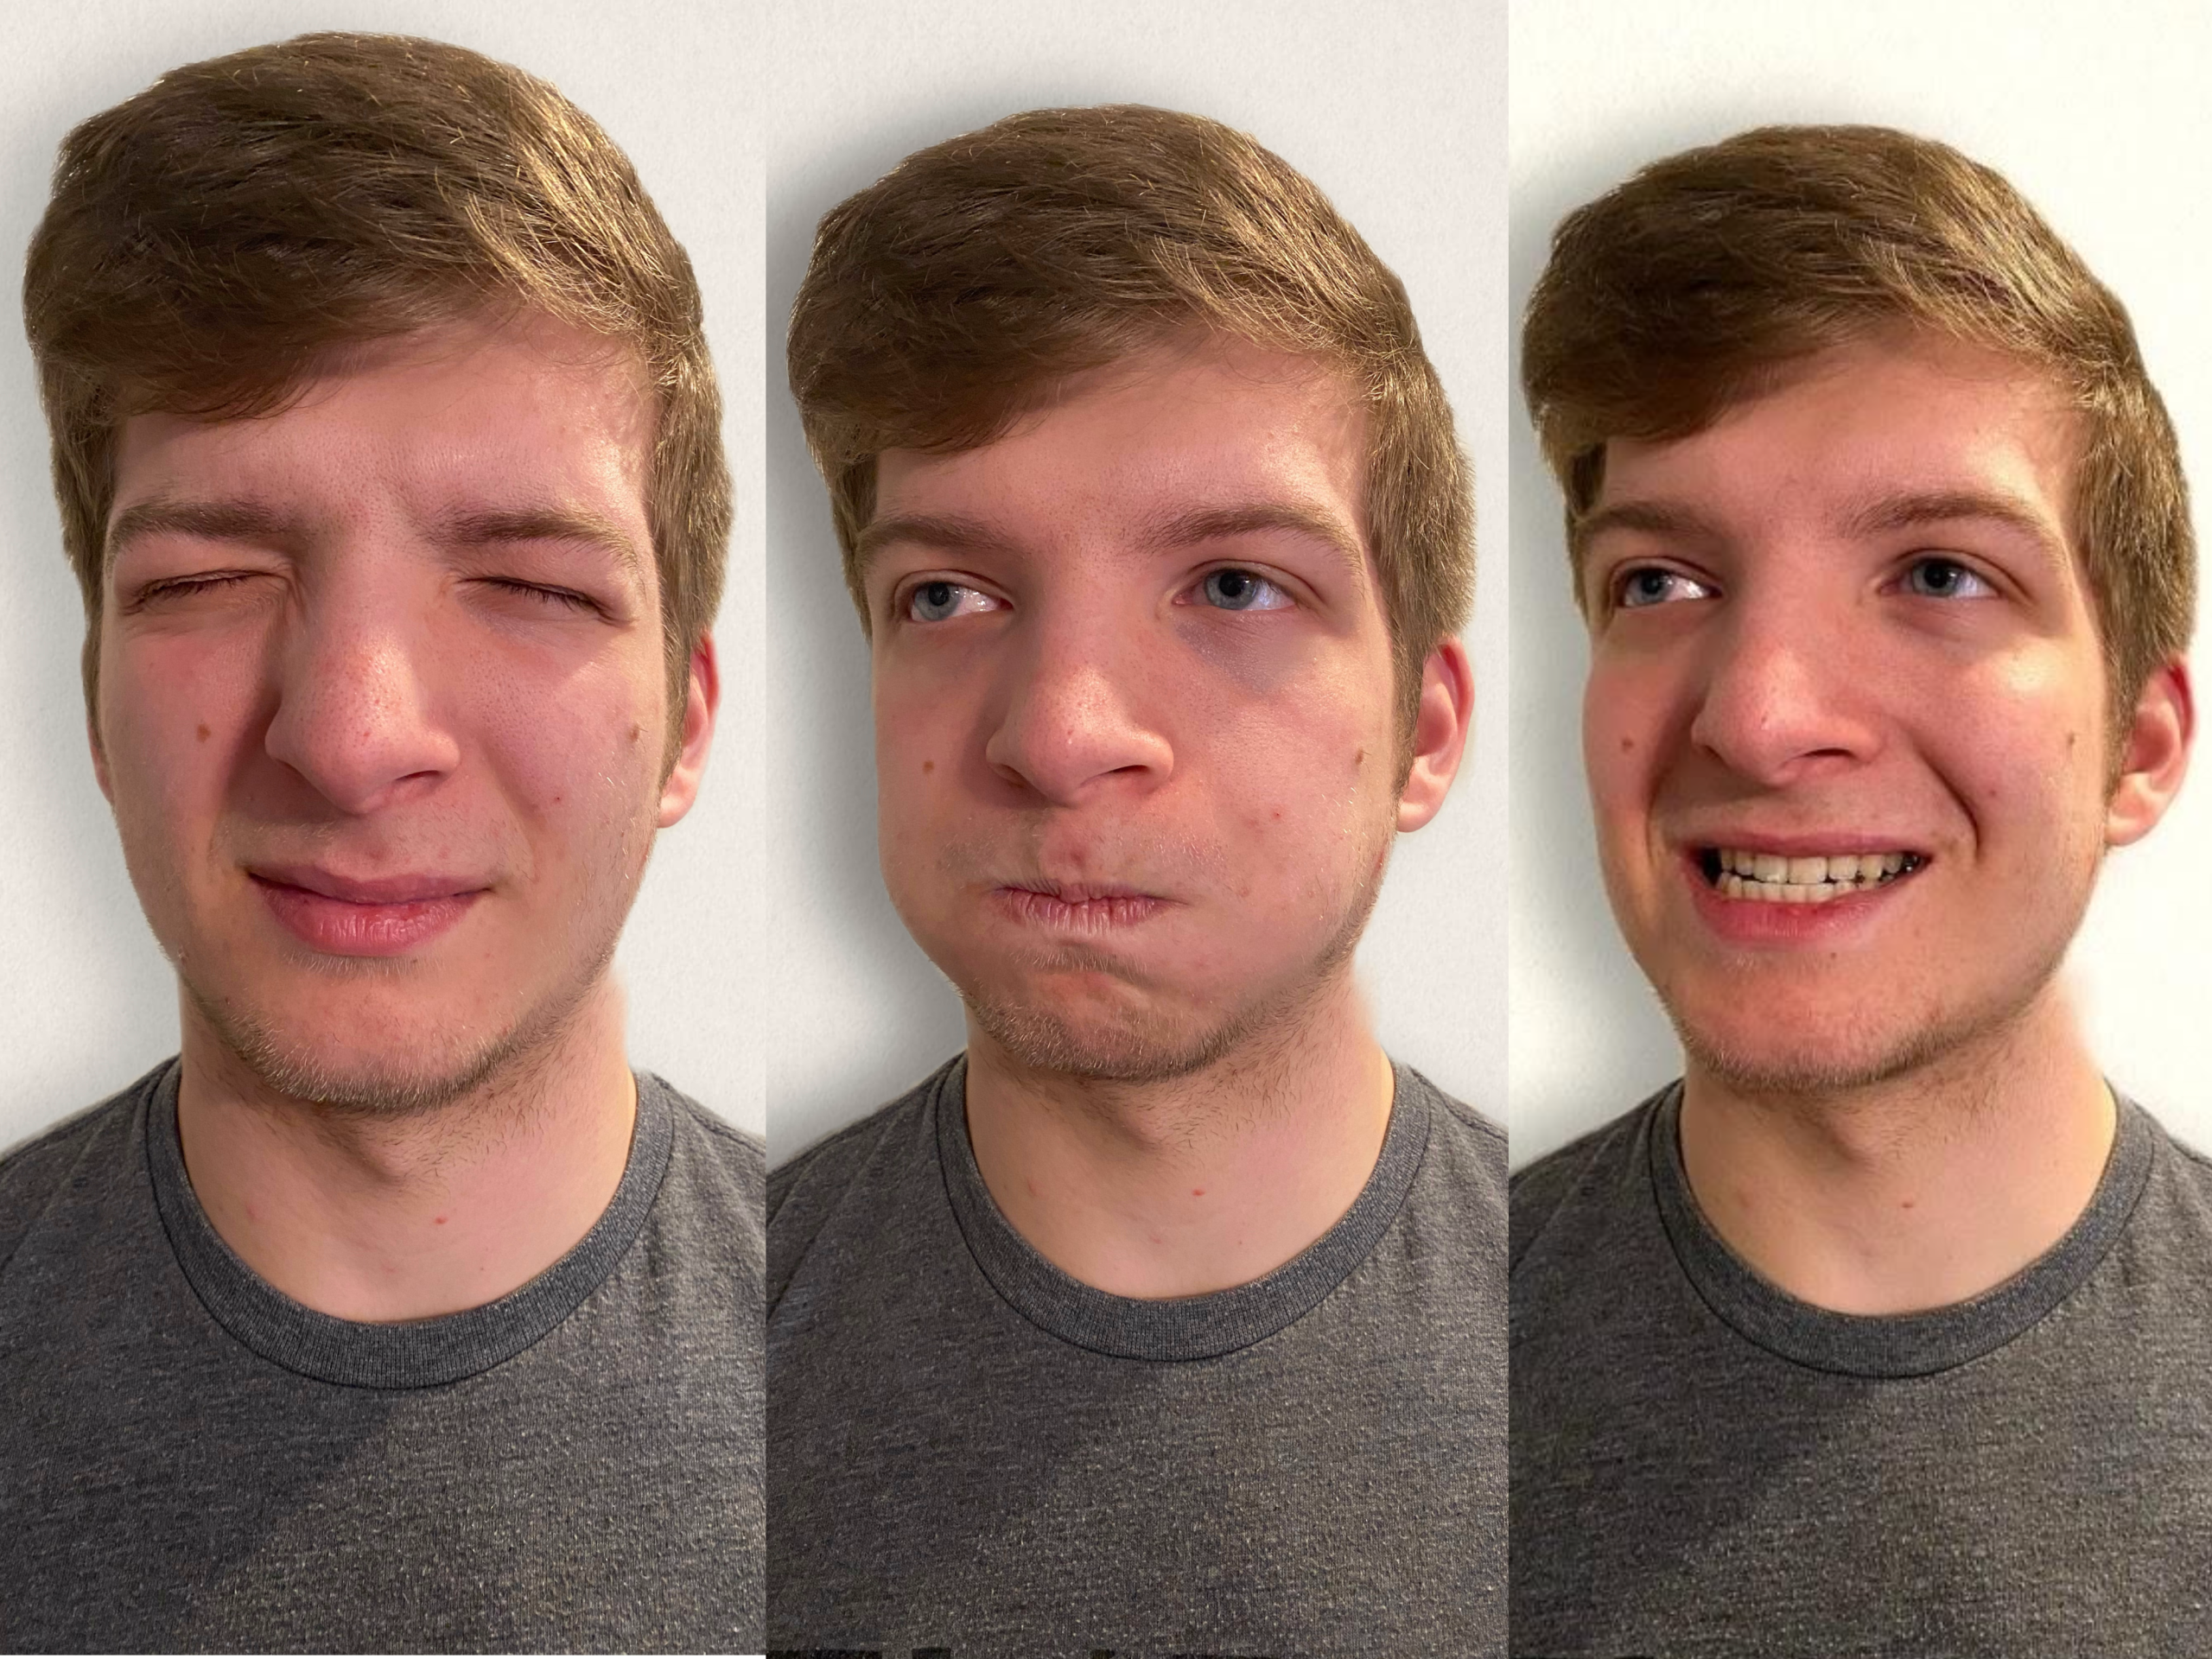
- Test motor function. Ask the patient to smile, show teeth, close both eyes, puff cheeks, frown, and raise eyebrows. Look for symmetry and strength of facial muscles. See Figure 6.18[10] for an image of assessing motor function of the facial nerve.
- Test sensory function. Test the sense of taste by moistening three different cotton applicators with salt, sugar, and lemon. Touch the patient's anterior tongue with each swab separately, and ask the patient to identify the taste. See Figure 6.19[11] for an image of assessing taste.

Cranial Nerve VIII - Vestibulocochlear
- Test auditory function. Perform the whispered voice test. The whispered voice test is a simple test for detecting hearing impairment if done accurately. See Figure 6.20[12] for an image assessing hearing using the whispered voice test. Complete the following steps to accurately perform this test:
- Stand at arm's length behind the seated patient to prevent lip reading.
- Each ear is tested individually. The patient should be instructed to occlude the non-test ear with their finger.
- Exhale before whispering and use as quiet a voice as possible.
- Whisper a combination of numbers and letters (for example, 4-K-2), and then ask the patient to repeat the sequence.
- If the patient responds correctly, hearing is considered normal; if the patient responds incorrectly, the test is repeated using a different number/letter combination.
- The patient is considered to have passed the screening test if they repeat at least three out of a possible six numbers or letters correctly.
- The other ear is assessed similarly with a different combination of numbers and letters.
- Test balance. The Romberg test is used to test balance and is also used as a test for driving under the influence of an intoxicant. See Figure 6.21[13] for an image of the Romberg test. Ask the patient to stand with their feet together and eyes closed. Stand nearby and be prepared to assist if the patient begins to fall. It is expected that the patient will maintain balance and stand erect. A positive Romberg test occurs if the patient sways or is unable to maintain balance. The Romberg test is also a test of the body's sense of positioning (proprioception), which requires healthy functioning of the spinal cord.


Cranial Nerve IX - Glossopharyngeal
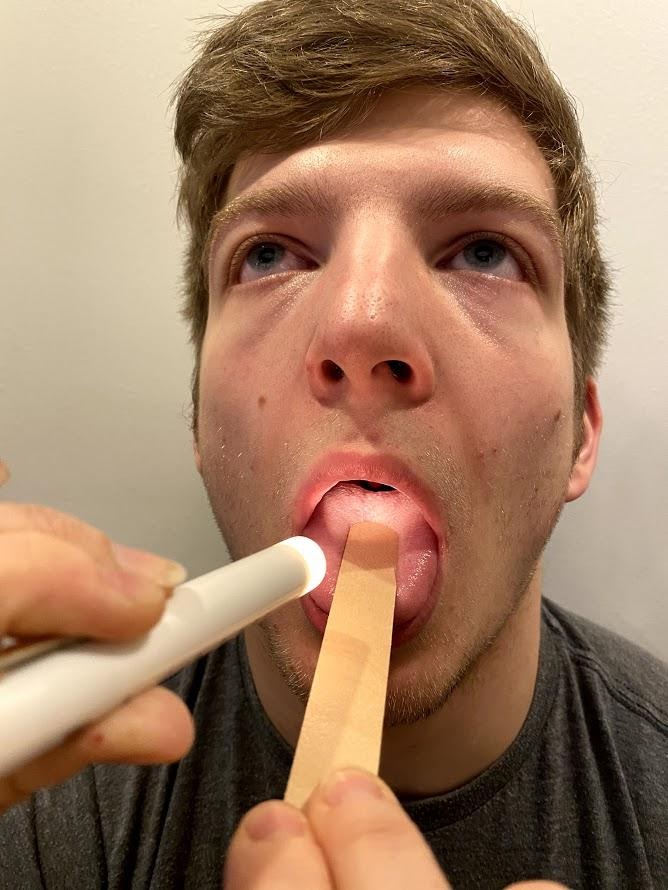
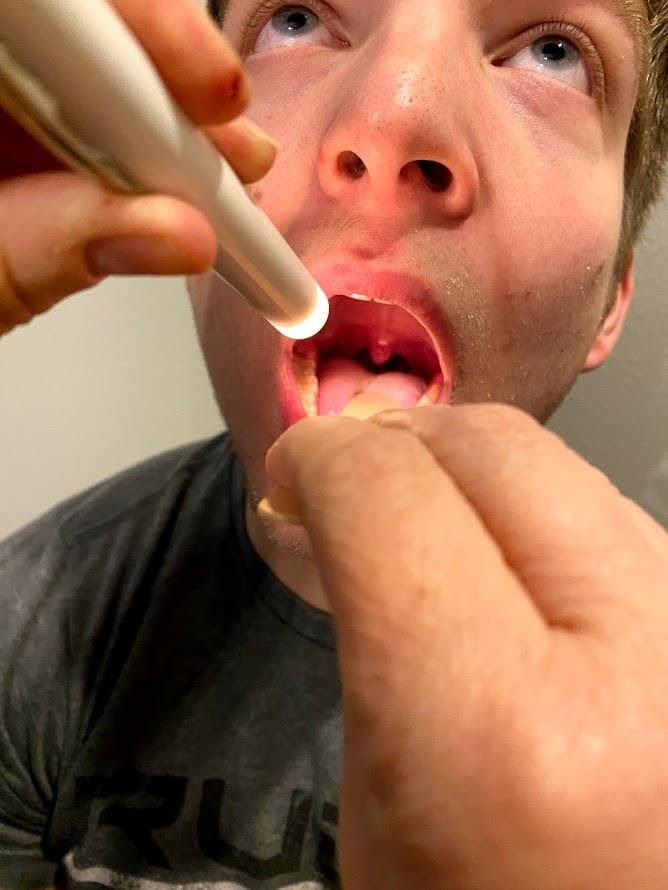
Ask the patient to open their mouth and say “Ah” and note symmetry of the upper palate. The uvula and tongue should be in a midline position and the uvula should rise symmetrically when the patient says "Ah." (See Figure 6.22.[14])
Cranial Nerve X - Vagus
Use a cotton swab or tongue blade to touch the patient’s posterior pharynx and observe for a gag reflex followed by a swallow. The glossopharyngeal and vagus nerves work together for integration of gag and swallowing. See Figure 6.23[15] for an image of assessing the gag reflex.
Cranial Nerve XI - Spinal Accessory
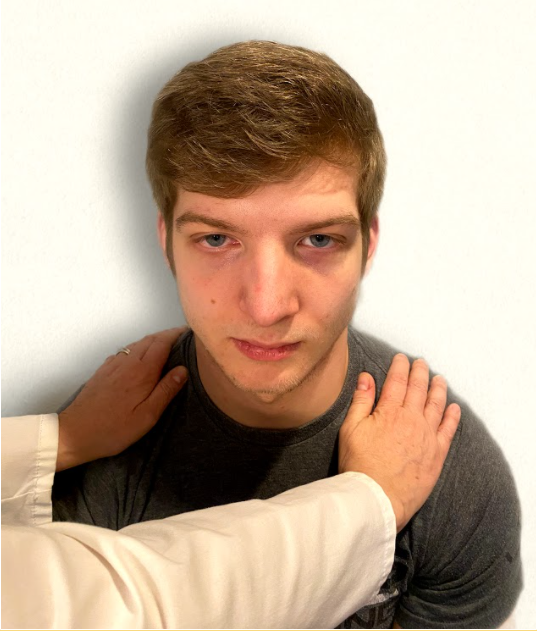
Test the right sternocleidomastoid muscle. Face the patient and place your right palm laterally on the patient's left cheek. Ask the patient to turn their head to the left while resisting the pressure you are exerting in the opposite direction. At the same time, observe and palpate the right sternocleidomastoid with your left hand. Then reverse the procedure to test the left sternocleidomastoid.
Continue to test the sternocleidomastoid by placing your hand on the patient's forehead and pushing backward as the patient pushes forward. Observe and palpate the sternocleidomastoid muscles.
Test the trapezius muscle. Ask the patient to face away from you and observe the shoulder contour for hollowing, displacement, or winging of the scapula and observe for drooping of the shoulder. Place your hands on the patient's shoulders and press down as the patient elevates or shrugs the shoulders and then retracts the shoulders.[16] See Figure 6.24[17] for an image of assessing the trapezius muscle.
Cranial Nerve XII - Hypoglossal
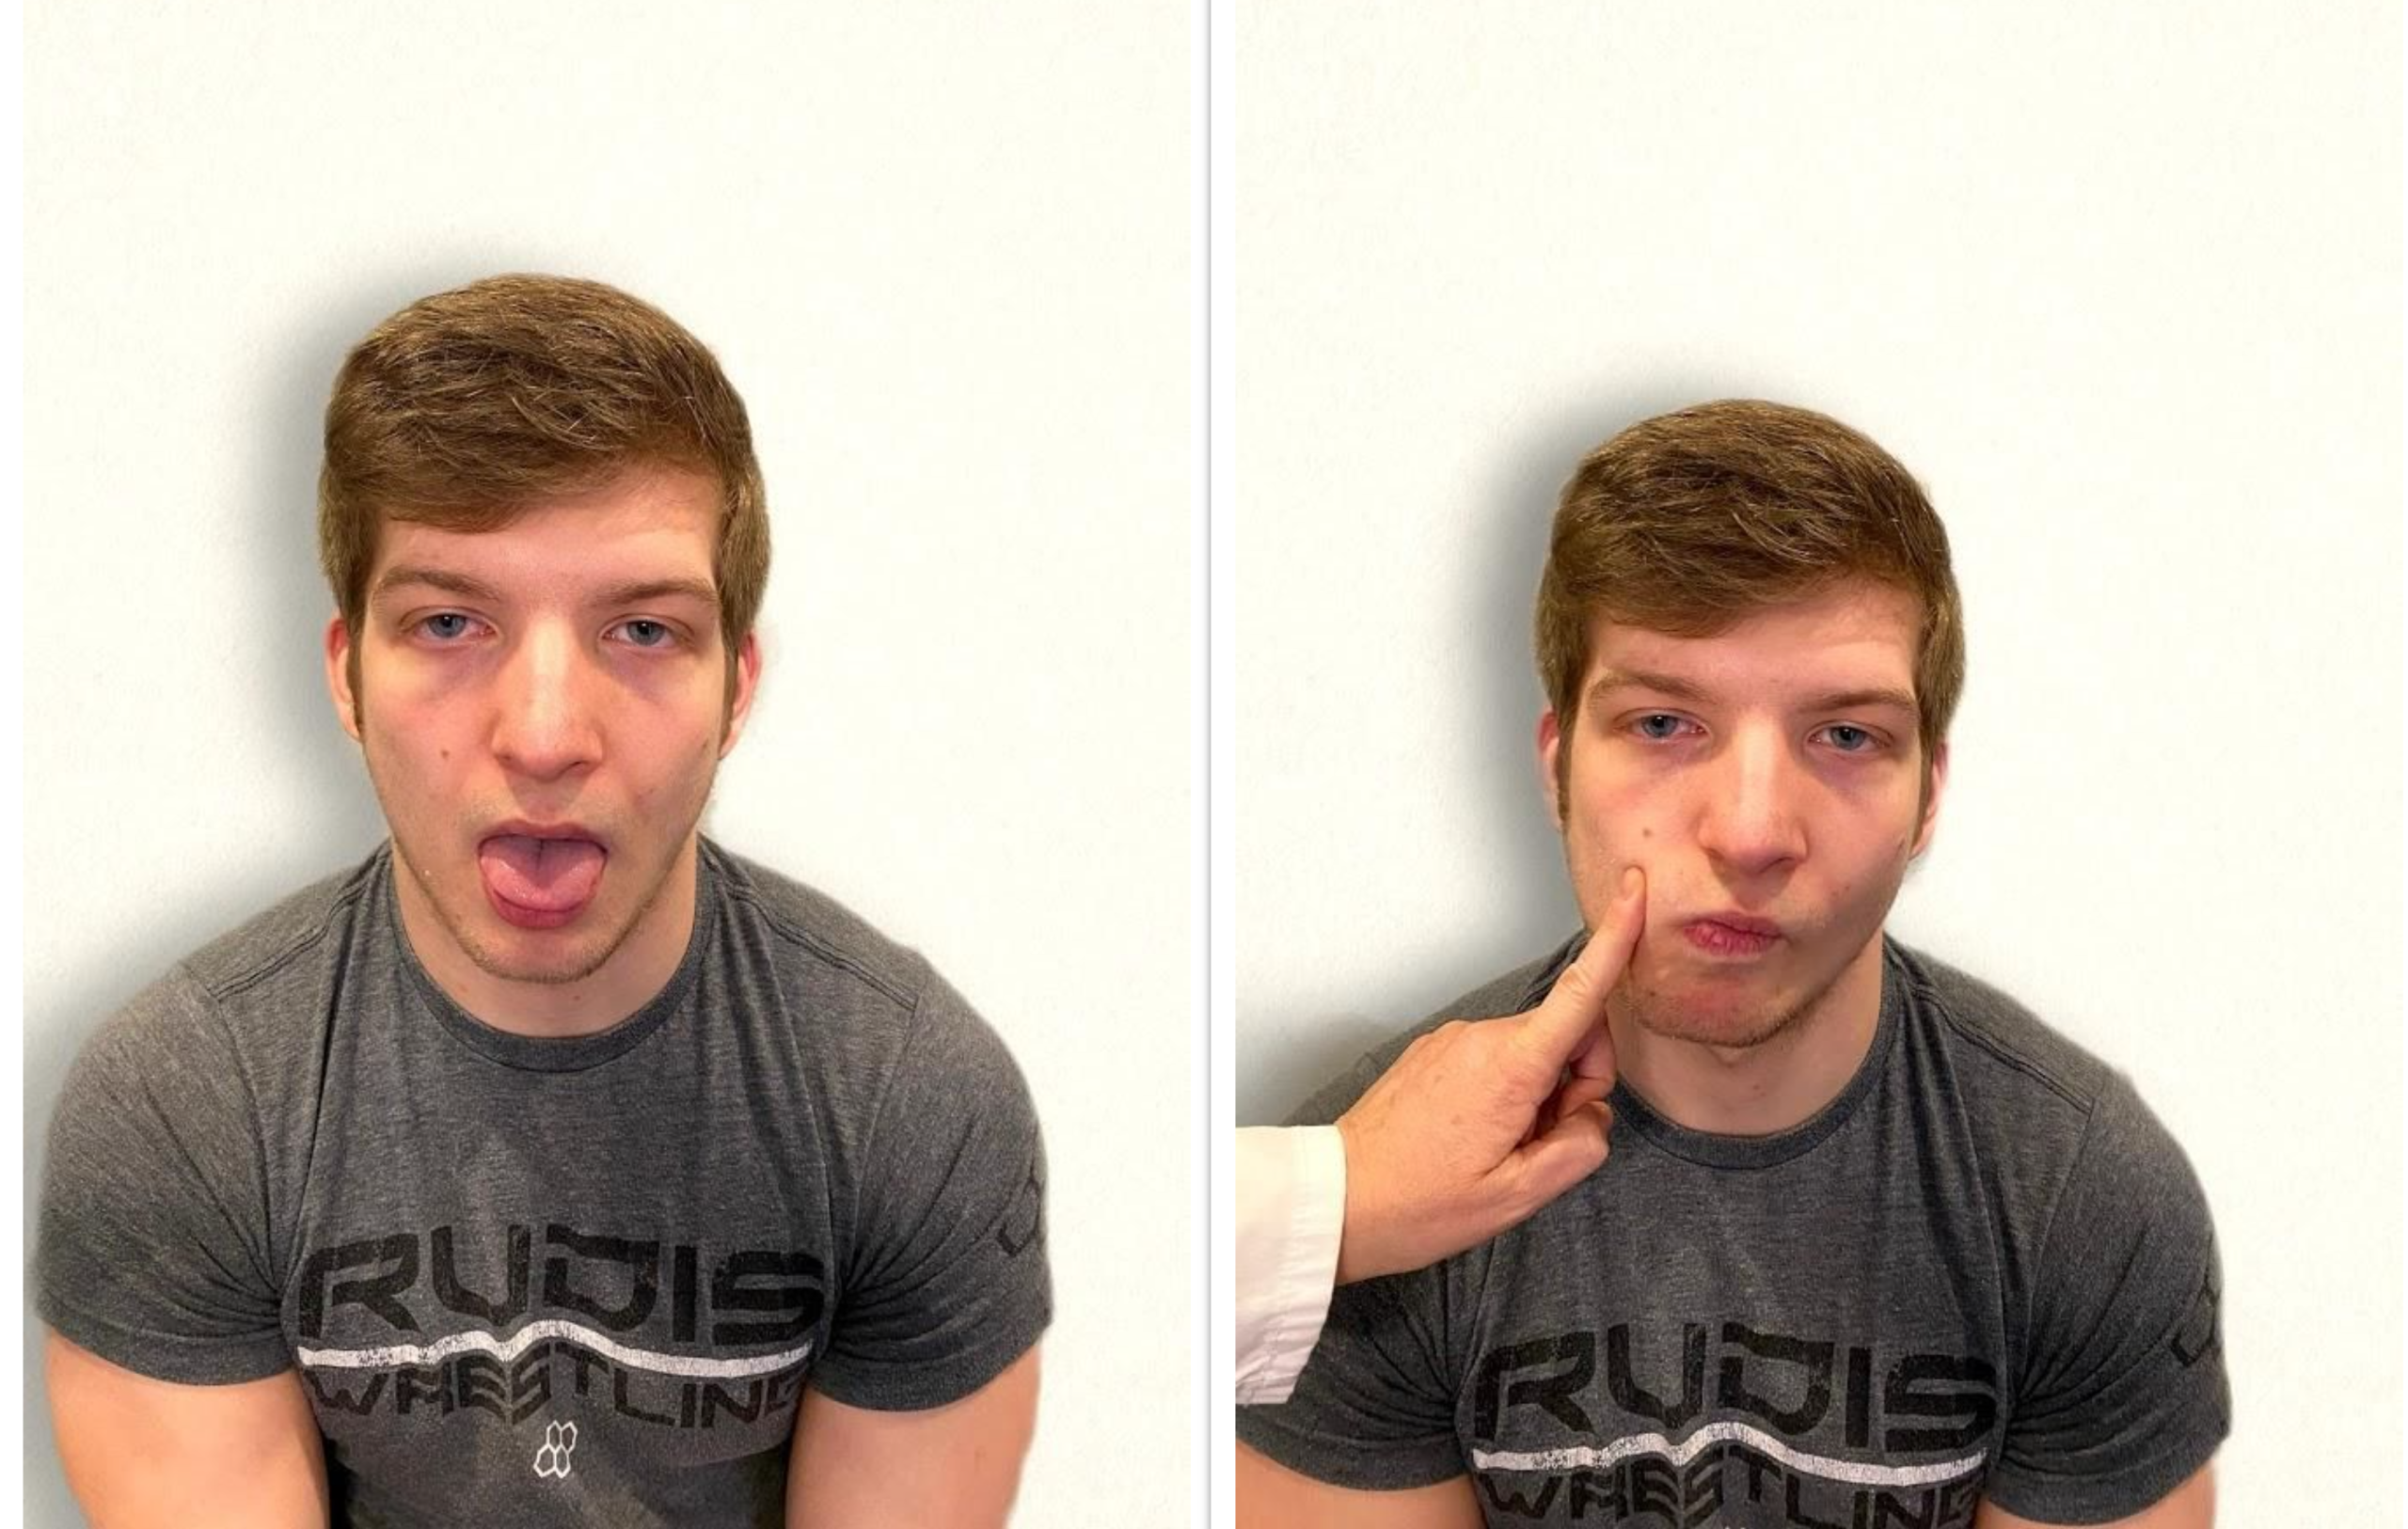
Ask the patient to protrude the tongue. If there is unilateral weakness present, the tongue will point to the affected side due to unopposed action of the normal muscle. An alternative technique is to ask the patient to press their tongue against their cheek while providing resistance with a finger placed on the outside of the cheek. See Figure 6.25[18] for an image of assessing the hypoglossal nerve.
Review of Cranial Nerve Assessment on YouTube[19]
Expected Versus Unexpected Findings
See Table 6.5 for a comparison of expected versus unexpected findings when assessing the cranial nerves.
Table 6.5 Expected Versus Unexpected Findings of an Adult Cranial Nerve Assessment
| Cranial Nerve | Expected Finding | Unexpected Finding (Dysfunction) |
|---|---|---|
| I. Olfactory | Patient is able to describe odor. | Patient has inability to identify odors (anosmia). |
| II. Optic | Patient has 20/20 near and far vision. | Patient has decreased visual acuity and visual fields. |
| III. Oculomotor | Pupils are equal, round, and reactive to light and accommodation. | Patient has different sized or reactive pupils bilaterally. |
| IV. Trochlear | Both eyes move in the direction indicated as they follow the examiner’s penlight. | Patient has inability to look up, down, inward, outward, or diagonally. Ptosis refers to drooping of the eyelid and may be a sign of dysfunction. |
| V. Trigeminal | Patient feels touch on forehead, maxillary, and mandibular areas of face and chews without difficulty. | Patient has weakened muscles responsible for chewing; absent corneal reflex; and decreased sensation of forehead, maxillary, or mandibular area. |
| VI. Abducens | Both eyes move in coordination. | Patient has inability to look side to side (lateral); patient reports diplopia (double vision). |
| VII. Facial | Patient smiles, raises eyebrows, puffs out cheeks, and closes eyes without difficulty; patient can distinguish different tastes. | Patient has decreased ability to taste. Patient has facial paralysis or asymmetry of face such as facial droop. |
| VIII. Vestibulocochlear (Acoustic) | Patient hears whispered words or finger snaps in both ears; patient can walk upright and maintain balance. | Patient has decreased hearing in one or both ears and decreased ability to walk upright or maintain balance. |
| IX. Glossopharyngeal | Gag reflex is present. | Gag reflex is not present; patient has dysphagia. |
| X. Vagus | Patient swallows and speaks without difficulty. | Slurred speech or difficulty swallowing is present. |
| XI. Spinal Accessory | Patient shrugs shoulders and turns head side to side against resistance. | Patient has inability to shrug shoulders or turn head against resistance. |
| XII. Hypoglossal | Tongue is midline and can be moved without difficulty. | Tongue is not midline or is weak. |
[latexpage]
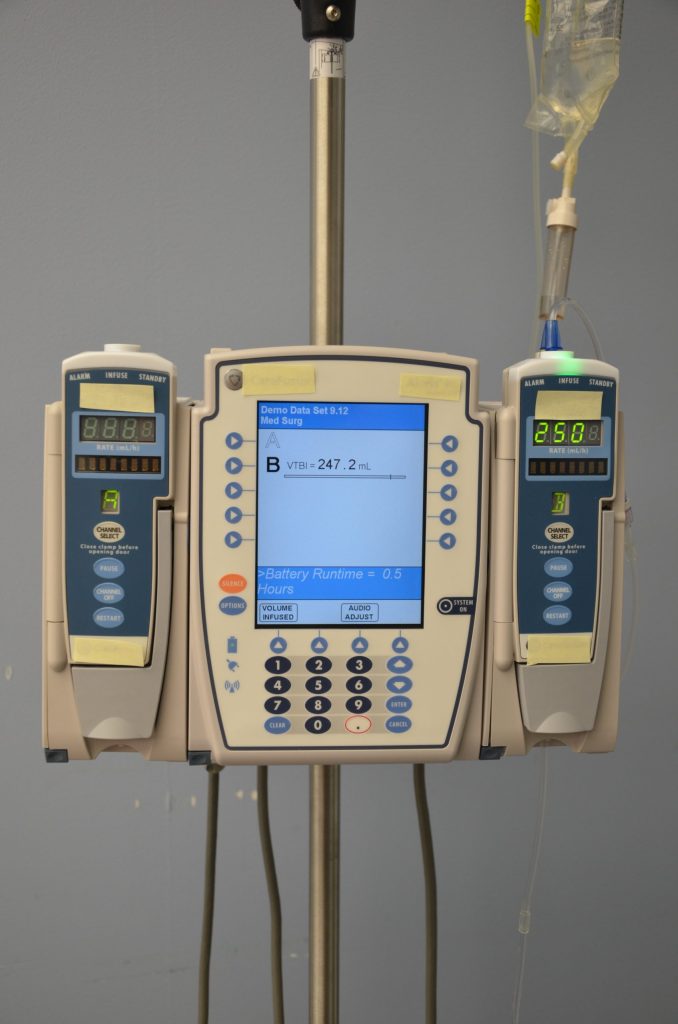
Intravenous (IV) infusion pumps are the second method used to administer intravenous medications and fluids. See Figure 5.18[20] for an image of an IV pump. Infusion pumps provide an additional safeguard by using a pump to provide an exact amount of fluid per hour to prevent medications from being inadvertently administered too slowly or too quickly. While IV pumps are intended to improve patient safety, the nurse is still responsible for safely setting up the pump. The flow rate using IV pumps is typically calculated in mL/hour. There are many different types of infusion pumps, so the nurse should become familiar with the pumps used at the clinical agency and seek assistance when working with unfamiliar equipment. For additional information about IV infusions, see the “IV Therapy Management” chapter.
Practice Problem: Infusion by Pump (Example 1)
Let’s use the same information from the problem for the patient named Amber Gomez in the “IV Infusion by Gravity” subsection, but instead we will calculate the rate of infusion using an IV infusion pump.
Name: Amber Gomez, DOB: 08/26/xxxx, Age 26, Allergies: NKDA, Weight: 50 kg
Prescription: Lactated Ringers 200 mL IV bolus over 2 hours
1. Start by identifying the goal units for which you are solving, which is mL per hour:
\[
\frac{mL}{hour}~=~?
\]
2. Set up the first fraction by matching mL in the numerator. Look at the known information in the problem related to mL. The prescription is to administer 200 mL IV bolus over 2 hours, so put 200 mL in the numerator and 2 hours in the denominator:
\[\frac{mL}{hour}~=~\frac{200~mL}{2~hours}
\]
3. Because the units match the goal unit of mL/hour, divide the numerator by the denominator for the final answer:
\[\frac{mL}{hour}~=~\frac{200~mL}{2~hours}~=~{100~mL/hr}
\]
Practice Problem: Infusion by Pump (Example 2)
Let’s practice another problem calculating flow rate via IV infusion pump, but this time the prescription states the rate in minutes instead of hours.
Patient Information:
Name: Ashley Hanson, DOB: 09/29/20xx, Age 21, Allergies: NKDA
Diagnosis: Dehydration
Prescription: Lactated Ringers 100 mL IV bolus over 30 minutes
1. Start by setting the goal units being solved. In this case, the pump will still be set for mL per hour:
\[\frac{mL}{hour}~=~?
\]
2. Set up the first fraction by matching the numerator to mL. Look for additional information in the problem related to mL. The order states that 100 mL should be administered over 30 minutes. Place 100 mL in the numerator and 30 minutes in the denominator:
\[\frac{mL}{Hr}~=~\frac{100~mL}{30~minutes}
\]
3. Because the pump will be set in mL/hour, convert minutes to hours. Add a second fraction with the intent of crossing off minutes. Place minutes in the numerator so the units will cross out diagonally. Using the known equivalency of 60 minutes in an hour, plug in 60 minutes in the numerator and 1 hour in the denominator. Cross off units diagonally. Multiple across the numerators and the denominators, and then divide for the final answer in mL/hr:
\[\frac{mL}{Hr}~=~\frac{100~mL}{30~\cancel{minutes}}~X~\frac{60~\cancel{minutes}}{1~hour}~=~\frac{100~mL~x~60}{30~x~1~hour}~=~\frac{6000~mL}{30~hour}~=~200~mL/hr
\]
View supplementary YouTube videos on calculating IV infusion rates:
IV Infusion Flow Rate Calculations[21]
IV Bolus Calculations[22]
Review module 1.10 within SWTC's Dimensional Analysis in Nursing page for more information about solving weight-based problems.
Rapid breathing greater than 20 breaths per minute in and adult or outside the range expected for lifespan considerations, and often shallow.
Passage of bloody stool.
Dimensional analysis: Dimensional analysis is a problem-solving technique where measurements are converted to a different (but equivalent) unit of measure by multiplying with a fractional form of 1 to obtain a desired unit of administration.
Drop factor: The number of drops in one mL of solution when fluids or medications are administered using gravity IV tubing.
Equivalency: Two values or quantities that are the same amount. For example, one cup is equivalent to eight ounces.
Macrodrip tubing: Gravity IV tubing with drop factors of 10, 15, or 20 drops per milliliter that are typically used to deliver general IV solutions for adults.
Medication cup: A small plastic or paper cup used to dispense oral medications. Some plastic medication cups have calibration marks for measuring medication amounts.
Microdrip tubing: Gravity IV tubing with a drop factor of 60 drops per milliliter.
Military time: A method of measuring the time based on the full 24 hours of the day rather than two groups of 12 hours indicated by AM and PM.
Oral syringe: A specific type of syringe used to measure and/or administer medications via the oral route.
Reconstitution: The process of adding a liquid diluent to a dry ingredient to make a liquid in a specific concentration.
Syringe: A medical device used to administer parenteral medication into tissue or into the bloodstream. Syringes can also be used to withdraw blood or fluid.
