Chapter 4: The Writing Process—Drafting
Sumita Roy
Chapter Learning Objectives
- Use effective reading strategies to collect and reframe information from a variety of written materials accurately.
- Apply outlining techniques to begin drafting a document.
- Plan, write, revise, and edit short documents and messages that are organized, complete, and tailored to specific audiences.
- Apply the principles of reader-friendly document design to various written formats.
Now that you’ve planned out your document and gathered information that meets your audience’s needs, you’re just about ready to start drafting the document’s message. At this point it’s worthwhile reminding yourself that the words you start entering in your word processor will look different from those your reader will eventually read. By the end of the drafting stage examined in this chapter, your document will be partway there, but how much revising you do in the fourth stage (see Chapter 5) depends on how effectively you’ve organized your message in the first step of this third stage.
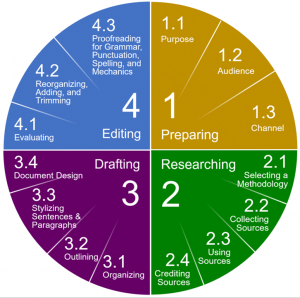

Figure 4: The four-stage writing process and stage 3 breakdown
- 4.1: Choosing an Organizational Pattern
- 4.2: Outlining Your Message
- 4.3: Forming Effective Sentences
- 4.4: Forming Effective Paragraphs
- 4.5: Writing in the Business Standard Style
- 4.6: Effective Document Design
4.1: Choosing an Organizational Pattern
Section 4.1 Learning Objectives
 1. Use effective reading strategies to collect and reframe information from a variety of written materials accurately.
3. Plan, write, revise, and edit short documents and messages that are organized, complete, and tailored to specific audiences.
The shape of your message depends on the purpose you set out to achieve, so a clearly formulated purpose must be kept in mind throughout the writing process. Whether your purpose is to inform, instruct, persuade, or entertain, structuring your message according to set patterns associated with each purpose helps achieve those goals. Without those familiar structures guiding your reader toward the intended effect, your reader can get lost and confused, perhaps reflecting the confusion in your own mind if your thoughts aren’t clearly focused and organized enough themselves. Or perhaps your message is crystal clear in your own mind, but you articulate it in an unstructured way that assumes your reader sees what you think is an obvious main point. Either way, miscommunication results because your point gets lost in the noise. Lucky for us, we have standard patterns of organization to structure our thoughts and messages to make them understandable to our audiences.
From paragraphs to essays to long reports, most messages follow a three-part structure that accommodates the three-part division of our attention spans and memory:
- Attention-grabbing opening
- The job of the opening is to hook the reader in to keep reading, capturing their attention with a major personal takeaway (answering the reader’s question “What’s in it for me?”) or the main point (thesis) of the message. In longer messages, the opening includes an introduction that establishes the frame in which the reader can understand everything that follows.
- This accommodates the primacy effect in psychology, which is that first impressions tend to stick in our long-term memory more than what follows (Baddeley, 2000, p. 79), whether those impressions are of the people we meet or the things we read. You probably remember what a recently made friend at college looked like and said the first time you met them, for instance, despite that happening weeks or even months ago. Likewise, you will recall the first few items you read in a list of words better than those in the middle. This effect makes the first sentence you write in a paragraph or the first paragraph you write in a longer message crucial because it will be what your reader remembers most and the anchor for their understanding of the rest. Because of the way our minds work, your first sentence and paragraph must represent the overall message clearly.
- Detail-packed body
- The message body supports the opening with further detail supporting the main point. Depending on the type of message and organizational structure that suits it best, the body may involve:
- Evidence in support of a thesis
- Background for better understanding
- Detailed explanations and instructions
- Convincing rationale in a persuasive message
- Plot and character development in an entertaining story
This information is crucial to the audience’s understanding of and commitment to the message, so it cannot be neglected despite the primacy and recency effects discussed in this section.
- Our memory typically blurs these details; thus writing notes for future reference is important. You don’t recall the specifics of every interaction with your closest friend in the days, months, and years between the strong first impression they made on you and your most recent memory of them, but those interactions were all important for keeping that relationship. Likewise, the message body is a collection of important subpoints in support of the main point, as well as transitional elements that keep the message coherent and plot a course toward its completion.
- Wrap-up and transitional closing
- The closing completes the coverage of the topic and may also point to what’s next, either by bridging to the next message unit (e.g., the concluding sentence of a paragraph establishes a connection to the topic of the next paragraph) or by offering cues to what action should follow the message (e.g., what the reader is supposed to do in response to a letter, such as reply by a certain date).
- Depending on the size, type, and organizational structure of the message, the closing may also offer a concluding summary of the major subpoints made in the body to ensure that the purpose of the message has been achieved. In a persuasive message, for instance, this summary helps prove the opening thesis by confirming that the body of evidence and argument supported it convincingly.
- The closing appeals to what psychologists call the recency effect, which is that, after first impressions, last impressions stick out because, after the message concludes, we carry them in our short-term memory more clearly than what came before (Baddeley, 2000, p. 79). Just as you probably remember your most recent interaction with your best friend—what they were wearing, saying, feeling, etc.—so you remember well how a message ends.
The effective writer therefore loads the message with important points at both the opening and closing, because the reader will focus on and remember what they read there best, as well as organizes the body in a manner that is engaging and easy to follow. In the next section, we will explore some of the possibilities for different message patterns while bearing in mind that they all follow this general three-part structure. Learning these patterns is valuable beyond merely being able to write better. Though a confused and scattered mind produces confusing and disorganized messages, anyone can become a more clear and coherent thinker by learning to organize messages consistently according to well-established patterns.
4.1.1: Direct Messages
In this method, the writer adopts the direct approach of frontloading the main point, which means getting right to the point and not wasting precious time. In college and in professional situations, no one wants to read or write more than they have to when figuring out a message’s meaning, so everybody wins when you open with the main point or thesis and follow with details in the message body. If it takes you a while before you find your own point in the process of writing, leaving it at the end where you finally discovered what your point was or burying it somewhere in the middle will frustrate your reader by forcing them to go looking for it. If you don’t move that main point by copying, cutting, and pasting it at the very beginning, you risk frustrating your busy reader. Leaving out the main point because it’s obvious to you—though it isn’t at all to the reader coming to the topic for the first time—is another common writing error. The writer who frontloads their message, on the other hand, finds themselves in their readers’ good graces right away for making their meaning clear upfront, freeing up readers to move quickly through the rest of the document.
Whether or not you take the direct approach depends on the effect your message will have on the reader. If you anticipate your reader being interested in the message or their attitude to it being anywhere from neutral to positive, the direct approach is the only appropriate organizational pattern. Except in rare cases where your message delivers bad news or is on a sensitive topic or when your goal is to be persuasive (see §4.1.2 below), all messages should take the direct approach. Since most business messages have a positive or neutral effect, all writers should frontload their messages routinely unless they have good reason to do otherwise. The three-part message organization outlined in the §4.1 introduction above helps explain the psychological reasons why frontloading is necessary: it accommodates the reader’s highly tuned capacity for remembering what they see first as well as respects their time in achieving the goal of communication, which is understanding the writer’s point.
Let’s say, for instance, that you send an email to a client with e-transfer payment instructions so that you can be paid for work you did for them. Because you send this same message so often, the objective and context of this procedure are so well understood by you that you may fall into the trap of thinking that it goes without saying, so your version of “getting to the point” is just to open with the payment instructions. Perhaps you may have even said in a previous email that you’d be sending payment instructions in a later email, so you think that the reader knows what it’s about, or you may get around to saying at the end of the email that this is about paying for the job you did, effectively burying it under a pile of details. Either way, to the reader who opens the email to see a list of instructions for a procedure they’ve never done before with no explanation as to why they need to do this and what it’s all for exactly, confusion abounds. At best the client will email you back asking for clarification; at worst they will just ignore it, thinking that it was sent in error and was supposed to go to someone who would know what to do with it. If you properly anticipated your audience’s reaction and level of knowledge as discussed in Step 1.2 of the writing process, however, you would know that opening with a main point like the following would put your client in the proper frame of mind for following the instructions and paying you on time:
Please follow the instructions below for how to send an e-transfer payment for the installation work completed at your residence on July 22.
In the above case, the opening’s main point or central idea is a polite request to follow instructions, but in other messages it may be a thesis statement, which is a summary of the whole argument; in others it may be a question or request for action. The main point of any message, no matter what type or how long, should be an idea that you can state clearly and concisely in one complete sentence if someone came up to you and asked you what it’s all about in a nutshell. Some people don’t know what their point is exactly when they start writing, in which case writing is an exploratory exercise through the evidence assembled in the research stage. As they move toward such a statement in their conclusion, however, it’s crucial that they copy, cut, and paste that main point so that it is among the first—if not the first—sentences the reader sees at the top of the document, despite being among the last written.

4.1.2: Indirect Messages
While the direct approach leads with the main point, the indirect approach buries it deeper in the message when you expect that your reader will be resistant to it, displeased with it, upset or shocked by it, or even hostile toward it. In such cases, the direct approach would come off as overly blunt, tactless, and even cruel by hitting the reader over the head with it in the opening. The goal of indirect messages is not to deceive the reader nor make a game of finding the main point but instead to use the opening and some of the message body to ease the reader toward an unwanted or upsetting message by framing it in such a way that the reader becomes interested enough to read the whole message and is in the proper mindset for following through on it. This organizational pattern is ideal for two main types of messages: those delivering bad news or addressing a sensitive subject and those requiring persuasion, such as marketing messages pitching a product, a service, or even an idea.
For now, however, all we need to know is that the organization of a persuasive message follows the so-called AIDA approach, which divides the message body in the traditional three-part organization into two parts, making for a four-part structure:
- Attention-grabbing opener
- Interest-generating follow-up
- Desire-building details
- Action cue
Most commercials you’ve ever seen follow this general structure, which is designed to keep you interested while enticing you toward a certain action, such as buying a product or service. If a commercial took the direct approach, it would say upfront “Give us $19.99 and we’ll give you this turkey,” but you never see that. Instead you see all manner of techniques used to grab your attention in the opening, keep you tuned in through the follow-up, pique your desire in the third part, and get you to act on it with purchasing information at the end. Marketing relies on this structure because it effectively accommodates our attention spans’ need to be hooked in with a strong first impression and told what to do at the end so that we remember those details best while working on our desires—even subconsciously—in the two-part middle body.
Likewise, a bad-news message divides the message body into two parts with the main point buried in the second of them (the third part overall), with the opening used as a hook that delays delivery of the main point and the closing giving action instructions as in persuasive AIDA messages. The typical organization of a bad-news message is:
- Buffer offering some good news, positives, or any other reason to keep reading
- Reasons for the bad news about to come
- Bad news buried and quickly deflected toward further positives or alternatives
- Action cue
Delaying the bad news till the third part of the message manages to soften the blow by surrounding it with positive or agreeable information that keeps the audience reading so that they miss neither the bad news nor the rest of the information they need to understand it. If a doctor opened by saying “You’ve got cancer and probably have six months to live,” the patient would probably be reeling so much in hopelessness from the death-sentence blow that they wouldn’t be in the proper frame of mind to hear important follow-up information about life-extending treatment options. If an explanation of those options preceded the bad news, however, the patient would probably walk away with a more hopeful feeling of being able to beat the cancer and survive. Framing is everything when delivering bad news.
Consider these two concise statements of the same information taking both the direct and indirect approach:
Table 4.1.2: Comparison of Direct and Indirect Messages
| Direct Message | Indirect Message |
|---|---|
| Global Media is cutting costs in its print division by shutting down several local newspapers. | Global Media is seeking to improve its profitability across its various divisions. To this end, it is streamlining its local newspaper holdings by strengthening those in robust markets while redirecting resources away from those that have suffered in the economic downturn and trend toward fully online content. |
Here we can see at first glance that the indirect message is longer because it takes more care to frame and justify the bad news, starting with an opening that attempts to win over the reader’s agreement by appealing to their sense of reason. In the direct approach, the bad news is delivered concisely in blunt words such as “cutting” and “shutting,” which get the point across economically but without tact. The indirect approach, however, makes the bad news sound quite good—at least to shareholders—with positive words like “improve,” “streamlining,” and “strengthening.” The good news that frames the bad news makes the action sound more acceptable. The combination of careful word choices and the order in which the message unfolds determines how well it is received, understood, and remembered, as we shall see when we consider further examples of persuasive and bad-news messages later in Chapters 6 and 7.
4.1.3: Organizing Principles
Several message patterns are available to suit your purposes for writing in both direct- and indirect-approach message bodies, so choosing one before writing is essential for staying on track. Their formulaic structures make the job of writing as easy and routine as filling out a form—just so long as you know which form to grab and have familiarized yourself with what they look like when they’re filled out. Examples you can follow are your best friends through this process. By using such organizing principles as chronology (a linear narrative from past to present to future), comparison-contrast, or problem-solution, you arrange your content in a logical order that makes it easy for the reader to follow your message and buy what you’re selling.
If you undertake a large marketing project like a website for a small business, it’s likely that you’ll need to write pieces based on many of the available organizing principles identified, explained, and exemplified in Table 4.1.3 below. For instance, you might:
- Introduce the product or service with a problem-solution argument on the home page
- Include a history of the company using the chronological form as well as the journalistic 5W+H (who, what, where, when, why, and how) breakdown on the About page; you may also include short biographies of key staff
- Use technical descriptions and a comparison-contrast structure for product or service explanations that distinguish what you offer from your competitors
- Provide short research articles or essays on newsworthy topics related to your business in the general-to-specific pattern on the Blog page
- Provide point-pattern questions and answers on the FAQ page, such as the pros and cons of getting a snow-removal service in answer to the question of whether to pay someone to do it for you
- Provide instructions for setting up service on the Contact page
Checking out a variety of websites to see how they use these principles effectively will provide a helpful guide for how to write them yourself. So long as you don’t plagiarize their actual wording, copying their basic structure so you don’t have to reinvent the wheel means that you can provide readers with a recognizable form that will enable them to find the information they need.
Table 4.1.3: Ten Common Organizing Principles
| Organizing Principle | Structure & Use | Example |
|---|---|---|
| 1. Chronology & 5W+H |
|
Wolfe Landscaping & Snowblowing began when founder Robert Wolfe realized in 1993 that there was a huge demand for reliable summer lawncare and winter snow removal when it seemed that the few other available services were letting their customers down. Wolfe began operations with three snow-blowing vehicles in the Bridlewood community of Kanata and expanded to include the rest of Kanata and Stittsville throughout the 1990s.
WLS continued its eastward expansion throughout the 2000s and now covers the entire capital region as far east as Orleans, plus Barrhaven in the south, with 64 snow-blowing vehicles out on the road at any one time. WLS recently added real-time GPS tracking to its app service and plans to continue expanding its service area to the rural west, south, and east of Ottawa throughout the 2020s. |
| 2. Comparison & Contrast |
|
Wolfe Snowblowing goes above and beyond what its competitors offer. While all snow-blowing services will send a loader-mount snow blower (LMSB) to your house to clear your driveway after a big snowfall, Wolfe’s LMSBs closely follow the city plow to clear your driveway and the snow bank made by the city plow in front of it, as well as the curbside area in front of your house so you still have street parking.
If you go with the “Don’t Lift a Finger This Winter” deluxe package, Wolfe will additionally clear and salt your walkway, stairs, and doorstep. With base service pricing 10% cheaper than other companies, going with Wolfe for your snow-removal needs is a no-brainer. |
| 3. Pros & Cons |
|
Why would you want a snow-removal service?
Advantages include:
The disadvantages of other snow-removal services include:
As you can see, the advantages of WLS outweigh the disadvantages for any busy household. |
| 4. Problem & Solution |
|
Are you fed up with getting all geared up in −40 degree weather at 6 a.m. to shovel your driveway before leaving for work? Fed up with finishing shoveling the driveway in a hurry, late for work in the morning, and then the city plow comes by and snow-banks you in just as you’re about to leave? Fed up with coming home after a long, hard day at work only to find that the city plow snow-banked you out?
Well worry no more! Wolfe Landscaping & Snowblowing has got you covered with its 24-hour snow-removal service that follows the city plow to ensure that you always have driveway access throughout the winter months. |
| 5. Cause & Effect |
|
As soon as snow appears in the weather forecast, Wolfe Landscaping & Snowblowing reserves its crew of dedicated snow blowers for 24-hour snow removal. When accumulation reaches 5 cm in your area, our fleet deploys to remove snow from the driveways of all registered customers before the city plows get there. Once the city plow clears your street, a WLS snow blower returns shortly after to clear the snow bank formed by the city plow at the end of your driveway. |
| 6. Process & Procedure |
|
Ordering our snow removal service is as easy as 1 2 3:
|
| 7. General to Specific |
|
Wolfe Landscaping & Snowblowing provides a reliable snow-removal service throughout the winter. We’ve got you covered for any snowfall of 5 cm or more between November 1st and April 15th. Once accumulation reaches 5 cm at any time day or night, weekday or weekend, holiday or not, we send out our fleet of snow blowers to cover neighborhood routes, going house-by-house to service registered customers. At each house, a loader-mount snow blower scrapes your driveway and redistributes the snow evenly across your front yard in less than five minutes. |
| 8. Definition & Example |
|
A loader-mount snow blower (LMSB) is a heavy-equipment vehicle that removes snow from a surface by pulling it into a front-mounted impeller with an auger and propelling it out of a top-mounted discharge chute. Our fleet consists of green John Deere SB21 Series and red M-B HD-SNB LMSBs. |
| 9. Point Pattern |
|
Wolfe Landscaping & Snowblowing’s “Don’t Lift a Finger This Winter” deluxe package ensures that you will always find your walkway and driveway clear when you exit your home after a snowfall this winter! It includes:
|
| 10. Testimonial |
|
According to Linda Sinclair in the Katimavik neighborhood, “Wolfe did a great job clearing our snow this past winter. We didn’t see them much because they were always there and gone in a flash, but the laneway was always scraped clear by the time we left for work in the morning if it snowed in the night. We never had a problem when we got home either, unlike when we used Sherman Snowblowing the year before and we always had to stop, park on the street, and shovel the snow bank made by the city plow whenever it snowed while we were at work. Wolfe was the better service by far.” |
Though shorter documents may contain only one such organizing principle, longer ones typically involve a mix of different organizational patterns used as necessary to support the document’s overall purpose.
Key Takeaway
 Before beginning to draft a document, let your purpose for writing and anticipated audience reaction determine whether to take a direct or indirect approach, and choose an appropriate organizing principle to help structure your message.
Exercises
 1. Consider some good news you’ve received recently (or would like to receive if you haven’t). Assuming the role of the one who delivered it (or who you would like to deliver it), write a three-part direct-approach message explaining it to yourself in as much detail as necessary.
2. Consider some bad news you’ve received recently (or fear receiving if you haven’t). Write a four-part indirect-approach message explaining it to yourself as if you were the one delivering it.
3. Draft a three-paragraph email to your boss (actual or imagined) where you recommend purchasing a new piece of equipment or tool. Use the following organizational structure:
i. Frontload your message by stating your purpose for writing directly in the first sentence or two.
ii. Describe the problem that the tool is meant to address in the follow-up paragraph.
iii. Provide a detailed solution describing the equipment/tool and its action in the third paragraph.
4. Picture yourself a few years from now as a professional in your chosen field. You’ve been employed and are getting to know how things work in this industry when an opportunity to branch out on your own presents itself. To minimize start-up costs, you do as much of the work as you can manage yourself, including the marketing and promotion. To this end, you figure out how to put together a website and write the content yourself. For this exercise, write a piece for each of the ten organizing principles explained and exemplified in Table 4.1.3 above and about the same length as each but tailored to suit the products and/or services you will be offering in your chosen profession.
Reference
Baddeley, A. (2000). Short-term and working memory. In E. Tulving & F. I. M. Craik (Eds.) The Oxford Handbook of Memory (pp. 77-92). New York: Oxford University Press. Retrieved from https://books.google.ca/books?id=DOYJCAAAQBAJ
4.2: Outlining Your Message
Section 4.2 Learning Objectives
1. Use effective reading strategies to collect and reframe information from a variety of written materials accurately.
2. Apply outlining techniques to begin drafting a document.
3. Plan, write, revise, and edit short documents and messages that are organized, complete, and tailored to specific audiences.
Once you’ve clarified the organizing principle of your message, outlining with hierarchical notes helps you plot out the bare-bones structure of the message’s full scope so that you can flesh it out into full sentences and paragraphs shortly after. Outlining helps you get past one of the most terrifying moments in any student’s or professional’s job, especially when beginning a large writing project: writer’s block. Even after completing all the other steps of the writing process explored above, freezing up while staring down a blank screen is an anxiety-driven mental bottleneck that often comes from either lacking anything to say because you haven’t researched the topic or thinking that your draft writing has to come out perfectly just as the reader will see it by the end of the process. It absolutely doesn’t. Drafting is supposed to produce a sketchy, disappointing mess only because the goal at this stage is to get ideas down fast so that you can fix them up later in the editing stage.
Outlining is a structured brainstorming activity that helps keep you on track by assigning major, overarching ideas and relatively minor, supporting points to their proper places in the framework of your chosen organizing principle. At its most basic form for a three-part message, an outline looks like the following:
- Opening
- Point 1
- Point 2
- Body
- Point 1
- Subpoint 1
- Subpoint 2
- Sub-subpoint 1
- Sub-subpoint 2
- Sub-sub-subpoint 1
- Sub-sub-subpoint 2
- Sub-sub-subpoint 3
- Sub-subpoint 3
- Subpoint 3
- Point 2
- Subpoint 1
- Subpoint 2
- Subpoint 3
- Point 1
- Closing
- Point 1
- Point 2
You can add further points in the body and, as shown in the middle of the above outline template, subdivide them even further with lowercase roman numerals, regular numbers, lowercase letters, etc. depending on the size of the document and the support needed. Even when drafting a short email, throwing down a few point-form words as soon as you think of them, arranged in the basic three-part message structure, can help you get started, especially if you don’t have time to write the full email as soon as you think of it but nonetheless need to get some quick ideas down before you forget so that you can expand on those points later when you have time. For instance, if it occurs to you that subscribing to a snow-removal service might be a good idea and you quickly draft an email on the weekend while doing several other winterizing chores, it may look like the one in the left column of Table 4.2a below.
Table 4.2a: Brief Message Outline as a Basis for an Email Draft
| Message Outline | Email Message Draft |
|---|---|
|
Greetings! I am interested in your snow-removal service this winter.
We’re at 5034 Tofino Crescent, and our driveway can fit four cars, so how much would that come to for the prepaid service? Alternatively, if we decide to do the snow removal ourselves for most of the winter but are in a jam at some point, is it possible to call you for one-time snow removal? How much would that be? Also, do you offer any discounts for first-time customers? Warm regards, Christine Cook |
However numbered, the hierarchical structure of these notes is like the scaffolding that holds you up as you construct a building from the inside out, knowing that you will just remove that scaffolding when its exterior is complete. Once the outline is in place, you can likewise just delete the numbering and flesh out the points into full sentences, such as those in the email message in the second column of Table 4.2a above, as well as add the other conventional email message components (see §6.1 below).
The specific architecture of the outline depends on the organizing principle you’ve chosen as appropriate for your writing purpose. In the case of the 10 common organizing principles used throughout the Wolfe Landscaping & Snowblowing website example in Table 4.1.3 above, Table 4.2b below shows how the outline for each of the first three principles keeps each piece organized prior to being fleshed out into sentences.
Table 4.2b: Outline Possibilities Based on Organizing Principles
| Organizing Principle | Outline |
| 1. Chronology & 5W+H |
|
| 2. Comparison & Contrast |
|
| 3. Pros & Cons |
|
As we shall see later on, outlining is key to organizing other projects such as presentations. If your task is to do a 20-minute presentation, preparing for it involves outlining your topic so that you can plot out the full scope of your speech, then fleshing out that outline into a coherent script with smooth transitions linking each point and subpoint. If it takes you 15 minutes to read that first version of the script out loud, then you simply add a third more material in the form of points in areas that need more development in your outline, then script them out into five more minutes of speech. But if it takes a half hour to read the first version of the script, then you know that you need to pare it down, chopping about a third of its length. Outlining and scripting prior to building a PowerPoint for a 20-minute presentation that would take you a half hour to present would save you the time of making slides for material that would have to be cut out anyway. In this way, outlining keeps you on track to prevent wasted efforts.
Key Takeaway
Begin your draft by outlining the major and minor points in a framework based on the organizing principle appropriate for your purpose so that you can flesh it out into full draft sentences after.
Exercises
1. Find a sample article or document and break it down into a hierarchically structured outline with brief points for each level of organization. Follow the numbering divisions in the outline template given at the beginning of this section. Does this help you understand the structure of the message that you otherwise didn’t consider but nonetheless relied on to understand it?
2. Outline your next substantial email (i.e., more than a hundred words in length) using hierarchical notes following the structure given at the beginning of this section. Does doing so offer any advantages to approaching the writing process without a plan?
4.3: Forming Effective Sentences
Section 4.3 Learning Objectives
3. Plan, write, revise, and edit short documents and messages that are organized, complete, and tailored to specific audiences.
Once you’ve put words on the screen with research material and outlined the shape of your content with point-form notes, building around that research and fleshing out those notes into correct English sentences should be quick and dirty composition—“quick” because speed-typing helps get your thoughts down almost as soon as they occur to you and “dirty” because it’s fine if those typed-out thoughts are garbage writing rife with errors. A talented few might be able to think and draft in perfectly correct sentences, but that’s not our goal at this stage.
As long as you clean it all up later, what’s important during the drafting stage is that you get your ideas down quickly to avoid losing any important points. If you’re still working on speeding up your typing (it can be a lifelong process!), however, consider using your smartphone’s voice recorder to capture what you want to say out loud, then transcribe it into somewhat proper sentences by playing it back sentence by sentence. Correcting that writing as you draft is a waste of time because, in the first substage of editing, you may find yourself deleting whole sentences and even paragraphs that you meticulously perfected at the drafting stage. As we shall see in Chapter 5, scrupulously proof-editing for spelling, grammar, and mechanical errors—as well as the finer points of style—should be one of your final tasks in the whole writing process. At this stage, however, you at least need some sentences to work with.
Fashioning effective sentences requires an understanding of sentence structure. Now, the eyes of many native English speakers glaze over as soon as English grammar terminology rears its head. But think of it this way: to survive as a human being, you must take care of your health, which means occasionally going to the doctor for help with the injuries and conditions that inevitably afflict you; to understand these, you listen to your doctor’s explanations of how they work in your body, and you add to your vocabulary anatomical terms and processes—words you didn’t need for those processes to function when you were healthy. Now that you need to work to improve your health, however, you need that technical understanding to know how exactly to improve. It’s likewise worth learning grammar terminology because writing mistakes undermine your professionalism, and you won’t know how to write correctly, such as where to put punctuation and where not to, if you don’t know basic sentence structure and the terminology we use to describe it. Trust me, we’ll be using it often throughout this chapter and the next. Many ESL speakers who say “I don’t know what the rule’s called, but I know what looks right” actually can improve their writing if they understand more about how it works. Pay close attention throughout the following introductory lesson on sentence structure and variety especially if you’re not entirely confident in your knowledge of grammar.
- 4.3.1: Four Sentence Moods
- 4.3.2: Four Sentence Varieties
- 4.3.3: Sentence Length
- 4.3.4: Active- vs. Passive-voice Sentences
4.3.1: Sentence Structure and the Four Moods
Four basic sentence moods (or types) help you express whatever you want in English, as detailed in Table 4.3.1 below. The most common sentence mood, the declarative (a.k.a. indicative), must always have a subject and a predicate to be grammatically correct. The subject in the grammatical sense (not to be confused with the topic in terms of the content) is the doer (actor or performer) of the action. The core of the subject is a noun (person, place, or thing) that does something, but this may be surrounded by other words (modifiers) such as adjectives (words that describe the noun), articles (a, an, the), possessive determiners (e.g., our, my, your, their), quantifiers (e.g., few, several), etc. to make a noun phrase. The core of the predicate is a verb (action), but it may also be preceded by modifiers such as adverbs, which describe the action in more detail, and followed by an object, which is the thing (noun or noun phrase) acted upon by the verb. If you consider the sentence Our business offers discount rates, you can divide it into a subject and predicate, then further divide those into their component parts of speech (nouns, verbs, adjectives, etc.):
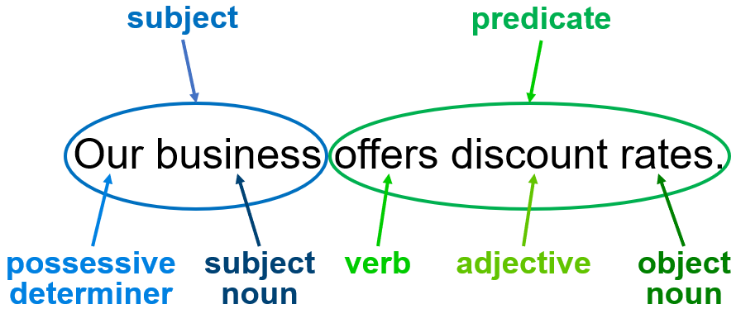
Our business offers discount rates
- Subject = Our business
- Possessive determiner = Our
- Subject noun = business
- Predicate = offers discount rates
- verb = offers
- adjective = discount
- object noun = rates
Subjects and predicates can also grow with the addition of other types of phrases (e.g., prepositional, infinitive, participial, gerund phrases) to clarify meaning even further. As large as a sentence can get with the addition of all these parts, however, you should always be able to spot the core noun of the subject and main verb of the predicate. Sentences that omit either are called fragments and should be avoided because they confuse the reader, being unclear about who’s doing what.
Table 4.3.1: Four Sentence Moods
| Sentence Mood | Structure and Use | Example and Breakdown |
|---|---|---|
| 1. Declarative |
|
We quickly updated our computer systems.
Subject: We (pronoun)
|
| 2. Imperative |
|
Please update our computer systems quickly.
The subject (e.g., You) that would be identified in the declarative form is always assumed (never included). |
| 3. Interrogative |
|
Can you please update our computer systems quickly? |
| 4. Exclamatory |
|
Thanks for updating our computer systems so quickly! |
| 5. Subjunctive |
|
If you were to update our computer systems this weekend, we would be incredibly grateful. |
A declarative sentence with just a straightforward subject and predicate is a simple sentence expressing a complete thought. If all sentences were simple, such as you might see in a children’s reader (e.g., The dog’s name is Spot. Spot fetched the stick. He is a good boy sometimes.), we would say that this is a choppy or wooden style of writing. We avoid this result by adding subject-predicate combinations together within a sentence to clarify the relationships between complete thoughts. Such combinations make what’s called compound, complex, and compound-complex sentences. Before we break down these sentence varieties, however, it’s important to know what a clause is.
4.3.2: Four Sentence Varieties
We keep our readers interested in our writing by using a variety of sentence structures that combine simple units called clauses. These combinations of subjects and predicates come in two types:
- An independent or main clause can stand on its own as a sentence like the simple declarative ones broken down in §4.3.1 above.
- A dependent or subordinate clause begins with a subordinating conjunction like when, if, though, etc. and needs to either precede or follow a main clause to make sense. Like a domesticated dog that strays from their owner, a dependent clause can’t survive on its own; if it tries anyway, a subordinate clause posing as a sentence on its own is just a fragment that confuses the reader.
An independent clause on its own plus combinations of these two types of clauses make up the four varieties of sentences we use every day in our writing. Two or more independent clauses joined together with a comma and coordinating conjunction (see Table 4.3.2a below for the seven of them, represented by the mnemonic acronym fanboys) or semicolon (;) make a compound sentence. When combined with a main clause by a subordinating conjunction, a subordinate clause makes a complex sentence. That subordinating conjunction (see a variety of them in Table 4.3.2a below) establishes the relationship between the subordinate and main clause as one of time, place, or cause and effect (Simmons, 2012). When a subordinate clause precedes the main clause, a comma separates it from the main clause (as in this sentence to this point), but a comma is unnecessary if the subordinate clause follows the main clause (as in this sentence from but onward; notice that a comma doesn’t come between unnecessary and if).
Table 4.3.2a: Coordinating and Subordinating Conjunctions
| Coordinating Conjunctions | Subordinating Conjunctions |
|---|---|
| for and nor but or yet so |
After Although As As if As long as As though Because Before Even if Even though If If only In order that Now that Once Provided that Rather than Since So that Than That Though Till Unless Until When Whenever Where Whereas Wherever Whether While |
You can combine compound and complex sentences into compound-complex sentences, like the sentence that precedes this one, though you should keep these streamlined so your wordcount (29 words in the sentence just before Table 4.3.2a, not including the parenthetical asides) doesn’t make comprehension difficult. We’ll return to the question of length in the following subsection (§4.3.3), but let’s focus now on how these four sentence varieties are structured.
Table 4.3.2b: Four Sentence Varieties
| Sentence Variety | Structure & Use | Examples |
|---|---|---|
| 1. Simple |
|
We quickly updated our computer systems.
Subject: We (noun)
Productivity increased 35% by the end of the week. |
| 2. Compound |
|
We updated our computer systems on the 12th, and productivity increased 35% by the end of the week.
We updated our computer systems on the 12th; productivity increased 35% by the end of the week. We updated our computer systems on the 12th, yet productivity didn’t increase the next day. We updated our systems on the 12th, but gains in productivity weren’t seen till the end of the week. If the subject is the same in both clauses, omit the comma that precedes the conjunction as well as the repeated the subject: We updated our computer systems and increased our productivity 35% by the end of the week. (The subject “we” is common to both clauses, so the second “we” [in “we increased”] is omitted, making this a single independent clause with coordinated verbs [“updated” and “increased”] rather than two coordinated clauses.) |
| 3. Complex |
|
After we updated our computer systems on the 12th, productivity increased 35% by the end of the week.
When the subordinate clause precedes the main clause, a comma separates them, as in the example above. When the subordinate clause follows the main clause, a comma is unnecessary, as in the example below. Productivity increased by 35% in a week after we updated our computer systems on the 12th. However, if the subordinate clause strikes a contrast with the main clause preceding it, a comma separates them: Productivity increased by 35%, although it took a week after updating our systems to see those gains. |
| 4. Compound-complex |
|
When we updated our computer systems on the 12th, productivity increased 35% by the end of the week, but the systems needed updating again within the month to restore productivity increases. (31 words)
Introductory dependent clause + independent clause + independent clause |
Combinations of sentence moods and varieties are all possible, so we have many hybrid sentence structures available to express our thoughts. For instance, an introductory subordinate clause can precede an interrogative main clause:
If you are available to update our computer systems on the 12th, can you please sign and return the attached contract at your earliest convenience?
Combining clauses to communicate your ideas is a skill like any other that requires practice, which you do whenever you draft a message. The more you do it, the better you get at it and the easier it becomes. It’s essential to your professional success that you become good at it, however, because your reading audiences will become frustrated with you if you cannot put sentences together effectively. Worse, disorganized sentences betray a scattered mind. Rather than stop to help you, your readers are more likely to avoid you because they have no time for the lack of professionalism signaled by poor writing and the miscommunication it leads to. Before we return to the subject of clauses when we examine how to correct sentence errors, we should stop to consider the issue of sentence length brought up in our discussion of compound-complex sentences above.
4.3.3: Sentence Length
What is the appropriate length for a sentence? Ten words? Twenty? Thirty? The answer will always be: it depends on what you expect your audience to be able to handle and what you need to say to express a complete thought to them. A children’s primer sticks to simple sentences of 5 to 7 concise words because children learning how to read will be stymied by anything but the simplest possible sentences. A 30-page market analysis report aimed at business executives with advanced literacy skills, on the other hand, will have sentences of varying lengths, perhaps anywhere from 5 to 45 words. The longer sentences with plenty of subordination and compounding will hopefully be rare because too many sentences of 45 words will exhaust a reader’s patience and compromise comprehension with complexity. Too many five-word sentences will insult the reader’s intelligence, but they play well as punchy follow-ups that conclude paragraphs full of long sentences. Ultimately, you should treat your audience to a variety of sentence lengths (Nichol, 2016).
Sentences in most business documents should average around 25 words, which you may consider your baseline goal for sentence length. There’s nothing wrong with sentences shorter than that if they don’t sacrifice clarity in achieving conciseness. There’s also nothing wrong with writing the odd 40-word sentence if it takes that many words to express a complete (and probably complex) thought when anything less would again sacrifice clarity. In all cases, however, you must consider your intended audience’s reading abilities.
If the goal of communication is to plant an idea hatched in your brain undistorted into someone else’s brain, don’t make length a distorting factor. Sentences can technically go on forever with compounding and subordination yet still be grammatically correct, because a long sentence is not the same as a run-on. But too many 40-word sentences in a row will betray a lack of skill in concision and respect for audience attention spans. Ultimately, no hard-and-fast rules for sentence length keep us from writing sentences that are as short or long as they need to be, but there is such a thing as too much if length becomes a barrier to understanding.
4.3.4: Active- vs. Passive-voice Sentences
When your style goal is to write clear, concise sentences, most of them should be in the active voice rather than passive. Voice in this grammatical sense concerns the order of words around the main verb and whether the verb requires an additional auxiliary (helper) verb. We use two voice varieties:
- Active-voice clauses are easy and straightforward because they begin by identifying the subject (the doer of the action), then say what the subject does (the verb or action) without an auxiliary verb, and end by identifying the object (the thing acted upon) if the verb is transitive (takes an object). The simple sentence we saw in Table 4.3.2b above follows this easy subject-verb-object order.
- Passive-voice clauses, on the other hand, reverse this subject-verb-object order to place the object first, follow with a passive verb phrase (more on that below), and optionally end with the doer of the action in a prepositional phrase starting with by.
Consider the following example simple sentences that say the very same thing in both voices, one in the subject-verb-object active voice, and the other in the object-verb-subject passive voice:
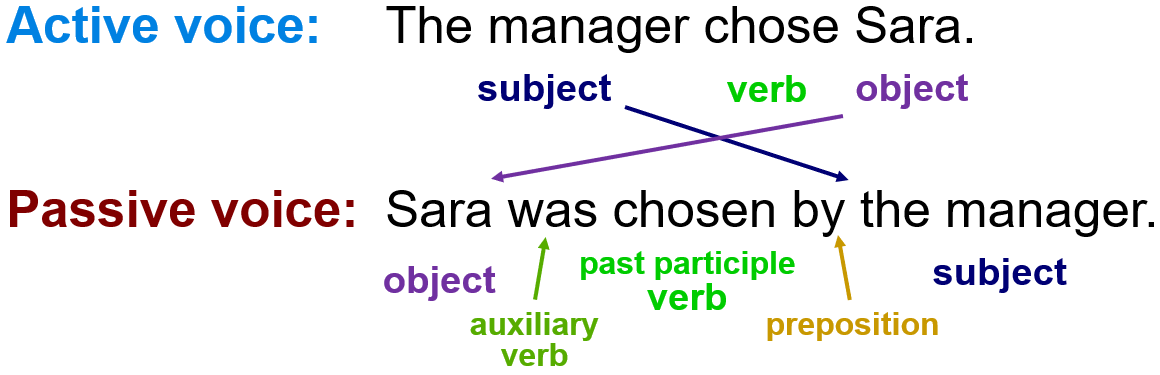
Active Voice: The manager chose Sara
- Subject = The manager
- Verb = chose
- Object = Sara
Passive Voice: Sara was chosen by the manager.
- Object = Sara
- Auxiliary verb = was
- Past participle verb = chosen
- Preposition = by
- Subject = the manager
We can further divide the passive voice into sentences that identify the doer of the action and those that don’t:
Table 4.3.4: Comparison of Active- and Passive-voice Sentences
| Voice | Examples | Structural Breakdown |
|---|---|---|
| Active Voice | The manager chose Sara. | Subject (doer): The manager Verb: chose (past tense) Object: Sara |
| Passive Voice | Sara was chosen by the manager. | Object: Sara Verb phrase: was chosen (form of to be + past participle) Preposition: by Subject (doer): the manager |
| Passive Voice | Sara was chosen. | Object: Sara Verb phrase: was chosen (form of to be + past participle) |
From this you can see that the two necessary markers of a passive-voice construction are:
- A form of the verb to be as an auxiliary (helper) verb paired with the main verb, usually right before it. The auxiliary verb determines the tense of the main verb:
- Past forms of to be: was, were
- Sara was chosen. We were chosen.
- Past perfect form of to be: had been
- Sara had been chosen.
- Present forms of to be: am, are, is
- Sara is chosen. You are chosen.
- Future form of to be: will be
- Sara will be chosen.
- Future perfect form of to be: will have been
- Sara will have been chosen by then.
- Past forms of to be: was, were
- The main verb in its past participle form.
- Some verbs, like to choose, will have an n added to the past-tense form to make the past participle (chosen).
- Other verbs’ past participle form is the same as their past-tense form, such as to promote, which forms promoted in both the simple past tense and past participle; e.g., the active-voice sentence The manager promoted Sara becomes the passive Sara was promoted.
Be careful, however: a sentence having a form of the verb to be in it doesn’t necessarily make it passive; if the form of the verb to be is the main verb and it isn’t accompanied by an auxiliary, such as in the sentence Sara is thrilled, then the form of the verb to be is what’s called a copular verb, which functions as an equals sign (“Sara = thrilled”). And though the prepositional phrase “by [the doer of the action]” may also signal a passive voice, the fact that identifying the doer is optional means that having the word by in the sentence doesn’t guarantee that it’s in the passive voice. For instance, the active-voice sentence Sara won the promotion by working hard all year is in the active voice and uses by in a manner unrelated to voice type.
Readers prefer active-voice (AV) verbs in most cases because AV sentences are more clear and concise—clear because they identify who does what (the manager chose someone in the Figure 4.3.4 and Table 4.3.4 example AV sentences) and concise because they use as few words as possible to state their point. Passive-voice (PV) verbs, on the other hand, say the same thing with more words because, in flipping the order, they must add an auxiliary verb (was in the above case) to indicate the tense—as well as the preposition by to identify the doer of the action, totaling six words in the above example to say what the AV said in four. If the PV didn’t add these words, then simply flipping the order of words to say “Sara chose the manager” would turn the meaning of the sentence on its head.
You can make the PV sentence shorter than even the AV one while still being grammatically correct, however, by omitting the doer of the action, as in the second PV example given in Table 4.3.4. The catch is that doing this makes the sentence less clear than the AV version. AV clauses cannot just omit the subject because they would be grammatically incorrect fragments: Chose Sara, for instance, would make no sense on its own as a sentence, whereas Sara was chosen would, even though it begs the question, “By whom?” PV sentences are thus either vague or wordy compared with AV, which are qualities exactly opposite our stylistic ideal of being clear and concise.
Now, before you fall into the trap of thinking that this is some kind of advanced writing technique just because it takes considerable explanation to break it all down, it’s worth stopping to appreciate that you speak AV sentences all day every day, as well as naturally slip into the PV for strategic purposes probably about 5–10% of the time, even if you didn’t have the terminology to describe what you were doing until now. You just do it to suit your purposes. Sometimes those purposes are contrary to the ideals of good writing, such as when people lapse into the passive voice—even if they don’t realize it—because they think it makes their writing look more sophisticated and scientific sounding, or they just want to write complicated, word-count-extending sentences to make up for an embarrassing lack of things to say. In such cases, discerning readers aren’t fooled; they know what the writer is doing and are frustrated by having to hack and slash through vague and wordy verbiage to rescue what meager point the author meant to make. Please (please!) don’t use the PV in this way.
Appropriate uses of the PV, on the other hand, are few. You can use it to:
- Emphasize the object of the verb (the person, place, or thing acted upon) for variety amid a majority of AV sentences that prioritize the subject. In the Table 4.3.4 example, saying “Sara was chosen” in the PV focuses the audience’s attention on the object, Sara, by putting her first, rather than on the manager as the doer of the action. Indeed, the manager’s role in the choosing might be so irrelevant that they can exit the sentence altogether, perhaps because the context of the conversation makes it so obvious that it goes without saying.
- Hide the doer of the action. If Sara was chosen for a promotion over her colleagues, saying “Sara was chosen” in the PV focuses on her accomplishment while drawing attention entirely away from the manager. Perhaps you don’t want the people who were passed up for promotion to know who exactly they should direct their resentment at. Using the PV in this case makes the choice of Sara sound objective, like anyone would have chosen her for this promotion because she really deserved it. PV is often used in this way as a public relations strategy to control the message. This use of the PV can be quite problematic when used as a cover for the doer (see #3 below), however, as we see in the rhetoric surrounding gender violence. Rephrasing a sentence like John beat Mary as Mary was beaten shifts the focus of violence to the victim rather than the perpetrator by dropping the latter from the conversation altogether. We need to target the perpetrators of gender violence (mainly men and boys), however, as the root of the problem if we hope to reduce and eliminate the harm done to women and girls.
- Avoid accepting responsibility. In answer to an irate parent’s question “Who broke this glass?” a fibbing two-year-old might say, “It was just broken when I got here.” We learn early—long before we even know how to read and write—how to cover up for our mistakes with this trick of language. Even dodging politicians will say, “Clearly, mistakes were made,” which makes it sound as if the blunders were made by unknown actors rather than the policy-makers themselves, as the more honest alternative in the AV, “Clearly, we made mistakes,” would make clear (Benen, 2015).
- Indicate that you don’t actually know who the doer is. Saying “A charitable donation was left in our mailbox” in the PV is stylistically appropriate if you want to focus on the donation and don’t know who left it, whereas “Someone left a charitable donation in our mailbox” is an AV equivalent that focuses more on the anonymity of the benefactor.
- State a general rule or principle without singling anyone out. Declaring that “Returns must be accompanied with a receipt in order to receive a refund” in the PV is a more tactful, less authoritarian and negative way of saying “You can’t get a refund without a receipt” in the AV.
- Follow a stylistic preference for PV sentences in some scientific writing. Saying “The titration was performed” or “a lean approach is recommended” sounds more objective—albeit a little unnatural, especially when nearly every sentence is in the PV rather than the 5–10% we are used to in conversation—compared with the more subjective-sounding AV statements “I performed the titration” or “I recommend a lean approach.” (See the following paragraph for a solution to this predicament.)
We’re focusing on AV and PV now at the drafting stage of the writing process because favoring the AV is a stylistic requirement in business and technical writing, where clarity and conciseness are especially valued, but it’s also possible to sound objective in the AV in technical writing. You can, for instance, identify the role of the doer rather than an individual person by name or first-person pronoun. Sentences like “The lab technician performed the titration” or “This report recommends a lean approach” still sound objective in the AV and therefore have an advantage over the PV.
We will return to the issue of AV vs. PV in Chapter 5 on editing for style, but if you train yourself to write in the AV rather than PV as a habit and only use PV when it’s justified by strategic advantage or necessity, you can save yourself time in both the drafting and editing stages of the writing process. For further explanation of the AV vs. PV and example sentences, see:
- Active versus Passive Voice (Purdue OWL)
- Passive Voice: When to Use It and When to Avoid It (Corson & Smollett, 2007)
Key Takeaway
Flesh out your draft by expanding outlined points into full, mostly active-voice sentences that are varied in length and style as simple, compound, complex, and compound-complex structures correct in their declarative, imperative, interrogative, exclamatory, or subjunctive mood.
Exercises
1. Re-read the paragraphs above in this chapter section and pull out examples of declarative and imperative sentences, as well as simple, compound, and complex sentences (but not those given as examples when illustrating each form, in or out of the tables). In your document, write headings in bold for each sentence type and variety, then copy and paste at least a few examples under each.
2. Take the outline you drafted for the email if you did Exercise 2 at the end of §4.2 (or any other outlined message that you intend to write) and expand those points into a message that includes at least one example of each of the four sentence types and varieties covered in this section.
3. Identify whether the sentences in the following Guide to Grammar & Writing digital activity are in the active or passive voice: http://www.dactivity.com/activity/index.aspx?content=3BIFrLublu
4. Copy and paste at least five active- and five passive-voice main clauses from sentences in the paragraphs of this chapter section (besides those used as examples) into a document and break them down to identify their subject, main verb (or passive verb phrase, including the auxiliary verb), and object in the manner demonstrated in Table 4.3.4. Under each, rewrite the five active-voice clauses as passive-voice sentences and each of the passive-voice clauses as active-voice sentences.
References
Benen, S. (2015, February 18). A passive-voice Bush Family tradition. MSNBC. Retrieved from http://www.msnbc.com/rachel-maddow-show/passive-voice-bush-family-tradition
Corson, T., & Smollett, R. (2007). Passive voice: When to use it and when to avoid it. University of Toronto. Retrieved from http://advice.writing.utoronto.ca/revising/passive-voice/
Nichol, M. (2016, May 9). How long should a sentence be? Daily Writing Tips. Retrieved from https://www.dailywritingtips.com/how-long-should-a-sentence-be/
Now Novel. (2014, January 21). Writer’s tip: Avoid passive voice. Retrieved from https://www.nownovel.com/blog/writers-tip-avoid-passive-voice/
Purdue Online Writing Lab. Active versus Passive Voice. Retrieved from https://owl.purdue.edu/owl/general_writing/academic_writing/active_and_passive_voice/active_versus_passive_voice.html
Simmons, R. L. (2012, December 20). The subordinate conjunction. Grammar Bytes! Retrieved from: http://www.chompchomp.com/terms/subordinateconjunction.htm
4.4: Forming Effective Paragraphs
Section 4.4 Learning Objectives
3. Plan, write, revise, and edit short documents and messages that are organized, complete, and tailored to specific audiences
As you expand your research material and outline notes into sentences, you will also begin to package those sentences into larger units—paragraphs—that follow a standard, familiar structure that enables readers to easily follow their content and locate key information at a glance. If a sentence communicates a complete thought, a paragraph communicates a topic comprised of a few thoughts coherently collected together in an organized sequence. (Paragraphs themselves assemble to form larger units of meaning such as sections in a report or chapters in a book, so paragraphs represent an intermediate level of organization in larger documents.) Whether your message is a long one made of many paragraphs or just one paragraph fired off in an email, organizing paragraphs helps you clarify your thoughts to both yourself and your reader.
4.4.1: Paragraph Size and Structure
The final sentence in a well-organized paragraph follows the standard three-part message structure outlined in §4.1 above. In a paragraph, we call these three parts the:
- Topic sentence
- Body or development sentences
- Transitional or concluding sentence
At minimum, then, a paragraph should have at least three sentences, but ideally 4–5 to allow the development of sentences in the body to explore the topic in detail. If a rule of thumb on sentence length is that sentences should vary in size but average about 25 words long (see §4.3.3 above), then a normal paragraph should be about ten lines on the page when the font is 12-pt. in a document with 1-inch margins. Like sentences, however, paragraphs should vary in length depending on audience needs and abilities as well as the topics being covered. An audience with advanced literacy skills can handle longer paragraphs that would lose an audience reading at a more basic level, which takes us back to our earlier points about adjusting the message to the audience profile. Some topics need more development than others and don’t easily divide in the middle, though a paragraph of ten sentences or more is really pushing it. “Wall-of-text” paragraphs longer than a page are out of the question in professional writing. No matter what the size, however, all paragraphs should follow the standard structure explained below so that readers at any level can easily find what they’re looking for.
1. Topic Sentence
The topic sentence states the main point or thesis of the paragraph and thus summarizes the small collection of sentences following it so the reader can take in the whole before examining the parts. As we saw in §4.1 above, this direct-approach organization caters to the primacy effect in our psychology whereby first impressions are the strongest and most memorable. Readers should thus be able to see how every sentence in any well-organized paragraph expands on something said in the topic sentence. In this particular paragraph, for example, you will see how the second sentence expands on the part in the topic sentence about accommodating the reader. The third sentence extends that idea to expand on the part in the topic sentence about how topic sentences summarize all paragraph parts as a whole. The sentences that follow (including this one) illustrate how that system works with examples. The final sentence wraps up the topic as broached in the first sentence while bridging to the next topic sentence, which in this case is about how to come up with a topic sentence.
For many writers, drafting a topic sentence is typically a search for one while writing the rest of the paragraph first and then discovering it as a concluding summary exercise. When you are just putting ideas down in the drafting stage of the writing process, you may not know yet what your point is at the outset of writing a paragraph. You likely have a general sense of your topic and some points to cover, probably based on information you collected in your research earlier (see Chapter 3 on Stage 2 of the writing process). As you connect that evidence and build sentences around those information points, you begin to see where you’re going with the topic, and the thesis suddenly comes into focus near the end. If you then say “In conclusion, …, ” summarize what you were getting at in a nutshell, and leave it there, however, you will do your reader a disservice by leaving your topic sentence buried under the pile of evidence that should be supporting it. In this case, delete “In conclusion,” highlight the final sentence, copy and cut it (Ctrl + c, Ctrl + x), and paste it (Ctrl + v) at the top of the paragraph so it does what a topic paragraph should do: preview what follows with an at-a-glance summary.
2. Body or Development Sentences
The development sentences expand on every component part of the topic sentence in a sequence of complete thoughts. The sentences that comprise this sequence explore the topic by following an organizing principle through detailed explanations, supporting evidence, illustrative examples, rhetorical counterpoints, and so on. The organizing principle could be any of those listed in Table 4.1.3 above, such as chronology or comparison and contrast. As parts of a logical sequence of sentences, each sentence connects to those around it with pronouns that use effective repetition (referring to nearby points without repeating them word for word; see Table 4.4.2a below) and transitional expressions (see Table 4.4.2b) to drive the topic exploration forward. In the paragraph under “1. Topic Sentence” above, for instance, the pronoun “this” in the first development sentence (the second sentence in the paragraph) represents the topic sentence position referred to in the topic sentence preceding it. In the sentence above this one, the transitional phrase “for instance” signals an illustrative example offered as supporting evidence of the topic sentence thesis on the sentences’ path toward the transitional or concluding sentence.
3. Transitional or Concluding Sentence
The final sentence of a well-organized sentence wraps up the topic exploration by completing the main point stated in the topic sentence, as well as establishing a thematic bridge to the topic sentence of the next paragraph if indeed there is one. As a bridge, the final sentence looks forward to the following topic sentence by previewing some of its terminology, just as the paragraph preceding this one does. As a wrap-up, the final sentence should in no way merely paraphrase the topic sentence, as you were probably taught to do in middle school or junior high, because the repetition of a point read 20 seconds earlier would waste the reader’s time. Any topic summary belongs at the top where it can summarily preview the paragraph’s subject, not buried at the bottom. Rather, the final sentence concludes the topic in the sense that it completes the expansion of topic-sentence points carried by the development sentences, leaving no loose ends to confuse the reader.
Especially in cases of stand-alone paragraphs or final paragraphs in a document, concluding sentences that tie up those loose ends with a clever and memorable turn of phrase cater to the recency principle in psychology. Recall how “recency” means that final impressions have impact similar to first impressions (see §4.1 above), making the concluding/transitional sentence an important one to the overall success of a paragraph in ensuring that the main point broached in the topic sentence is fully understood. With every part of a paragraph fulfilling a purpose toward communicating a larger point, the double duty that the concluding/transitional sentence performs makes it the glue that binds together paragraphs and the documents they comprise.
4.4.2: Paragraph Coherence
Coherence is achieved by paragraphs sticking to the topic summarized in the opening sentence as well as using pronouns and transitional expressions to link sentences together while developing that topic. Paragraphs that grow to the point where they exceed about a dozen lines on the page usually deserve to be broken up into a couple of topics as their internal transitions take them into territory far enough from the topic stated in the first sentence. Generally, a paragraph sticks to just one topic while the one following it covers a related but distinct topic.
Like the organizational principles we explored above, we have a repertoire of recognizable pronouns, transitional expressions, and particular words or phrases that connect ideas in our writing so readers can easily follow our trains of thought. Pronouns such as those in Table 4.4.2a below allow us to represent nouns, phrases, and even whole sentences that came before (called antecedents) without repeating them word for word—as long as the antecedents are clear (Pronouns, Purdue OWL).
Table 4.4.2a: Pronoun Types and Examples
| Pronoun Type | Singular | Plural | Examples in Sentences |
|---|---|---|---|
| 1. Personal subject pronouns | 1st person: I 2nd person: you 3rd person: she, he, it |
we you they |
I wrote the script so that we would be prepared. Would you all prefer if you, Jenny, went first? She said that he could do it first instead. The team members are really quite good at what they do. |
| 2. Personal object pronouns | 1st person: me 2nd person: you 3rd person: her, him, it |
us you them |
The committee awarded the contract to me, but the credit goes to all of us. They could give one to you, as well. The committee sent her the news yesterday, sent it to him today, and wished them all good luck. |
| 3. Personal possessive determiners | 1st person: my 2nd person: your 3rd person: her, his, its |
our your their |
My advice is to deposit your payment in our account now. Indeed, all your payments are late. Her payment came through, but his didn’t. Their payment plan needs updating so that its bad timing doesn’t get them in trouble. |
| 4. Personal possessive pronouns | 1st person: mine 2nd person: yours 3rd person: hers, his, its |
ours yours theirs |
Let’s figure out what’s mine and what’s ours. You’ll get yours. The house is hers, the car is his, but the account is theirs. |
| 5. Reflexive and intensive pronouns | 1st person: myself 2nd person: yourself 3rd person: herself, himself, itself Reflexive: when the subject(s) and object(s) are the same person or people. Intensive: when it can be deleted without being ungrammatical. |
ourselves yourselves themselves |
I gave myself a break and you gave yourself an ache when we threw ourselves in the lake. He perjured himself (reflexive), and she won herself a new car (intensive). Love itself was lost (intensive). Do yourselves a favor. They stopped themselves from falling. |
| 6. Demonstrative pronouns | close by: this remote: that |
these those |
This deal might take some time. Pass me that report over there. These are the kinds of things you can expect when those people get involved. |
| 7. Relative pronouns | subject: who object: whom restrictive: that non-restrictive: which |
The accountant who does our taxes asked whom he should send the funds to. The account that he set up is a trust fund, which can be accessed in five years. | |
| 8. Interrogative pronouns | personal: who objective: what, which possessive: whose |
Who is going to call? What are they going to say? Which company do they represent? Whose number are they going to use? | |
| 9. Indefinite pronouns | one, everyone, no one, none, someone, somebody, anybody, everybody, nobody, other, another, everything, either | all, most, many, several, some, few, others, both, neither | One of us cannot be wrong. Everybody knows somebody. No one can tell anyone else what to do. Everyone has a right to know everything, but many don’t know that. All or most came today. Anybody can play guitar. Some went on, but none came back. Neither showed up, but either could have called, so both are at fault. Someone sent several calls to the others. Few can say that the other sent another. |
While pronouns often look back, transitional expressions drive a topic forward by establishing the relationships between the content of sentences. Table 4.4.2b below collects many such adverbs and conjunctive adverbs, prepositions and prepositional phrases, coordinating and subordinating conjunctions, infinitive phrases, interjections, and so on.
Effectively incorporating transitions often depends upon your ability to identify words or phrases that will indicate for the reader the kind of logical relationships or connections you want to convey. View the chart below or check out this website to see how to use different transitions and conjunctions:
Table 4.4.2b: Meaning and Usage of Commons Transitions
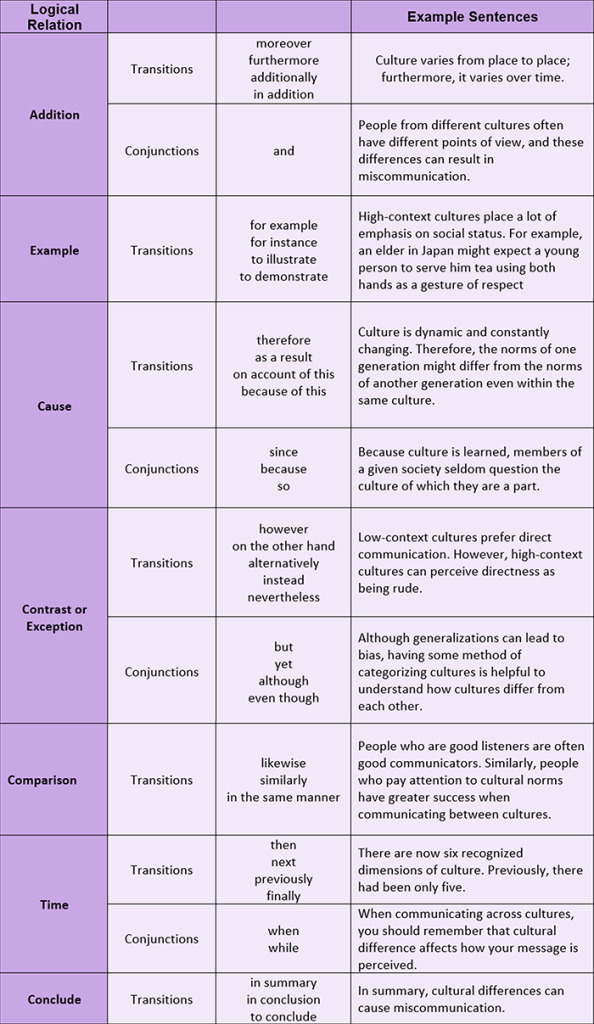
Transition Meaning Usage Chart by Confederation College Communications Department and Paterson Library Commons is licensed CC BY-NC-SA.
Key Takeaway
Collect and connect your sentences into coherent paragraphs that use a three-part structure to provide readers with a means to skim when pressed for time, find appropriate detail otherwise, and follow your train of thought through the effective use of pronouns and transitions.
Exercises
1. Find a professionally written document that contains paragraphs. Copy and paste one paragraph (or transcribe it if it’s from a print source) into a document and separate the sentences so that you put the topic sentence under the heading “Topic Sentence,” development sentences under a heading of their own, and concluding/transitional sentence under a heading of its own, too. Under each development sentence, explain what part of the topic sentence it expands on. If the paragraph lacks coherence, rewrite (1) the topic sentence so it’s a more effective summary of the whole paragraph and (2) each development sentence so its role in extending the topic sentence is clearer.
2. Write a coherent, well-organized paragraph on a topic you recently learned about in another course in your program. Don’t use the textbook or other text that you learned it from as a source to copy from; instead, write from memory and your understanding. Ensure that:
i. The topic sentence explains the whole thing in a nutshell
ii. Each of the development sentences expand on ideas in the topic sentence and flow from one to another using pronouns from Table 4.4.2a and transitions from Table 4.4.2b.
iii. The concluding sentence completes the reader’s understanding of the topic.
3. Write a paragraph on how to make coffee, tea, or another hot beverage. Begin the paragraph with a topic sentence, provide the details in the development sentences, and end with a concluding sentence. Include at least two transitional expressions from the table above.
References
Pronouns. (2016, March 25). Grammarly. Retrieved from https://www.grammarly.com/blog/pronouns/
Purdue Online Writing Lab. Pronouns. Retrieved from https://owl.purdue.edu/owl/english_as_a_second_language/esl_students/pronouns/index.html
Transitional expressions. (2003). Iowa State University. Retrieved from http://www.public.iastate.edu/~jeaune/Horticulture_LC_105/Web/Transitionalexpressions.htm
4.5: Standard Business Style
Section 4.5 Learning Objectives
3. Plan, write, revise, and edit short documents and messages that are organized, complete, and tailored to specific audiences.
Among the most important skills in communication is to adjust your style according to the audience to meet their needs as well as your own. You would speak differently to a customer or manager compared with how you would to a long-time coworker who has also become a friend. In each case, these audiences have certain expectations about your style of communication, and you must meet those expectations to be an effective communicator. This section reviews those style choices and focuses especially on the six major characteristics of good writing common to both formal and casual writing.
4.5.1: The Formality Spectrum
We began looking at the general choice between a formal and informal style of writing based on how you’ve profiled your audience’s position in relation to you. There, we saw how certain situations call for formal writing and others for a more relaxed style and saw in that these styles involve word choices along a spectrum of synonyms from “slangy” to casual to fancy. Here we will review those considerations in the context of the writing process.
1. Formal Style in Writing
Because a formal style of writing shows respect for the reader, use standard business English, especially if your goal is to curry favor with your audience, such as anyone outside your organization, higher than you within your organization, and those on or around your level whom you have never communicated with before. These audiences include managers, customers, clients, B2B suppliers and vendors, regulators, and other interested stakeholders such as government agencies. A cover letter, for instance, will be read by a future potential manager probably unfamiliar to you, so it is a very real test of your ability to write formally—a test that is crucial to your career success. Many common professional document types also require formality, such as other letters, memos, reports, proposals, agreements, and contracts. In such cases, you are expected to follow grammatical rules more strictly and make slightly elevated word choices, but not so elevated that you force your reader to look up rarely used words.
Writing in such a style requires effort because your grammar must be tighter and the vocabulary advanced. Sometimes a more elevated word choice—one with more syllables than perhaps the word that comes to mind—will elude you, requiring you to use a thesaurus (such as that built into MS Word in the Proofing section under the Review menu tab, or the Synonyms option in the drop-down menu that appears when you highlight and right-click a word). At the drafting stage you should, in the interests of speed-writing to get your ideas down nearly as fast as they come, go with the word that comes to mind and leave the synonym-finding efforts for the editing stage. Strictly maintaining a formal style in all situations would also be your downfall, however, because flexibility is also expected depending on the situation.
2. Casual Style in Writing
Your ability to gear down to a more casual style is necessary in any situation where you’re communicating with familiar people generally on your level and when a personable, conversational tone is appreciated, such as when writing to someone with basic reading skills. In a routine email to a colleague, for instance, you would use informal vocabulary, including conversational expressions such as “a lot” instead of the more formal “plenty.” You would also use contractions, such as it’s for it is or it has, would’ve for would have, and you’re for you are. Two paragraphs up from this one, the effort to model a more formal style included avoiding contractions such as you’ve in the first sentence, it’s in the third, and won’t and they’ll in the last, which requires a determined effort because you must fully spell out each word. While not a sign of disrespect, the more relaxed approach says to the reader, “Hey, we’re all friends here, so let’s not try so hard to impress each other.” When an upper-level manager wants to be liked rather than feared, they’ll permit a more casual style of communication in their employees’ interactions with them, assuming that doing so achieves collegiality rather than disrespect.
Incidentally, this textbook mostly sticks to a more casual style because it’s easy to follow for a readership that includes international ESL learners. Instead of using the slightly fancy, three-syllable word “comprehend” in the middle of the previous sentence, for instance, “follow” gets the point across with a familiar, two-syllable word. Likewise, “casual” is used to describe this type of writing because it’s a six-letter, three-syllable word that’s more accessible to a general audience than the ten-letter, four-syllable synonym “colloquial.” These word choices make for small savings in character and word counts in each individual case but, tallied up over the course of the whole book, make a big difference in size, tone, and general readability while remaining appropriate in many business contexts. Drafting in such a style is easy because it generally follows the diction and rhythms that come naturally in common conversation.
3. Slang Style in Writing
As the furthest extreme on the formality spectrum, slang and other informal means of communication such as emojis are generally unacceptable in business contexts for a variety of reasons. First, because slang is common in teen texting and social media, it appears immature, frivolous, out of place, confusing, and possibly even offensive in serious adult professional situations. Say someone emailed a car cleaning company with questions about their detailing service and received a reply that looks like it was texted out by a 14-year-old trying to sound “street,” such as:
Fo sho i set u up real good, well get yr car cleen smoove top 2 bottom – inside + out – be real lit when were done widdit, cost a buck fiddy for da hole d-lux package, so u down widdit erwat
The inquiring customer would have serious concerns about the quality and educational level of the personnel staffing the company and thus about the quality of work they’d do. The customer may even wonder if they’ll get their car back after giving them the keys. The customer will probably just give the company a pass and continue looking for one with a more formal or even casual style that suggests greater attention to detail and awareness of professional communication standards. A company rep that comes back with a response more like the following would likely assure the customer that their car is in good hands:
Absolutely, we can do that for you. Our White Glove service thoroughly vacuums and wet-vacs all upholstery, plus scrubs all hard surfaces with pro-grade cleaners, then does a thorough wash and wax outside. Your autobody will be like a mirror when you pick it up. Please let us know if you are interested in our $150 White Glove service.
Second, the whole point of slang is to be incomprehensible to most people, which is the opposite of the goal of communication discussed above, and especially in situations where you want to be understood by a general audience. As a deviation from accepted standards of “proper” vocabulary, grammar, punctuation, syntax, etc., slang is entirely appropriate in adolescent and subculture communication because it is meant to score points with an in-group that sets itself apart from the rest of polite society. Its set of codewords and nonstandard grammar is meant to confuse anyone not part of that in-group and would sound ridiculous if anyone else even tried to speak it, as when parents try to level with their teens in teen vernacular. Obviously, if slang is used in professional contexts where audiences just don’t know how to accurately translate the expressions, or they don’t even know about Urban Dictionary to help translate “a buck fiddy” in the above example as $150 rather than $1.50, the ensuing confusion results in all the expensive problems brought on by miscommunication.
In terms of the writing process, professionals should generally avoid slang style in almost all business situations, even if it’s what comes naturally, because it leaves the writer too much work in the editing stage. If slang is your style, it’s in your best interests to bring your writing habits up to the casual level with constant practice. Perhaps the only acceptable situation where a slang-heavy style would be appropriate is if you’re on a secure texting or IM channel with a trusted colleague whom you’ve developed a correspondence rapport with, in which case that style is appropriate for the audience because they understand it, expect it, and appreciate it. It can even be funny and lighten up someone’s day.
The danger of expressing yourself in such a colorful style in email exchanges with that trusted friend-colleague when using company channels, however, is that they may be seen by unintended audiences. Say you have a back-and-forth exchange about a report you’re collaborating on and you need to CC your manager at some point so that they are up to speed on your project (or someone else involved does this for you, leaving you no opportunity to clean up the thread of past emails). If your manager looks back at the atrocious language and sees offensive statements, your employment could be in jeopardy. You could just as easily imagine other situations where slang style might be advantageous, such as marketing to teens, but generally it’s avoidable because it tends to deviate from the typical characteristics of good writing.
Test Your Understanding
4. Emojis in Professional Writing?
Though emojis’ typical appearance in social media and texting places them at the informal end of the formality spectrum, their advantages in certain situations require special consideration along with some clarity about their current place in professional communication. Besides being easy to access on mobile device keyboards and favored in social media communication, especially among millennials, emojis are useful for helping clarify the emotional state of the message sender in a way that plain text can’t. They offer a visual cue in lieu of in-person nonverbals. A simple “thumbs up” emoji even works well as an “Okay, got it” reply in lieu of any words at all, so they can help save time for the busy professional. Interestingly, 2,500 years after Egyptian hieroglyphics fell out of use, pictographs are making a comeback! Emojis also go partway toward providing something of a universal language that allows people who speak different languages to communicate in a way that wouldn’t have been possible otherwise.
 However, the lack of precision in emojis can also cause confusion, as they may be interpreted differently if the social and cultural context of the receiver differs enough from that of the sender (Pringle, 2018), not to mention differences in their emotional states. This means that emojis aren’t as universal as some claim they are, especially when used by correspondents who speak different languages (Caramela, 2018). Even between those who speak the same language, a smiley-face emoji added to a lightly insulting text message might be intended as a light-hearted jab at the receiver by the sender but might be read as a deeply cutting passive-aggressive dig by the receiver. The same text message said in person, however, comes with a multitude of nonverbal cues (facial expressions, eye movements, body movements, timing, voice intonation, volume, speed, etc.) that help the listener determine the exact intentions of the speaker—meanings that can’t possibly be covered by a little 2D cartoon character.
You can imagine plenty of other scenarios where emojis could backfire with dire consequences. A red heart emoji added to a business message sent by a male to a female colleague, though perhaps meant in the casual sense of the word “love” when we say, “I love what you did there,” might be taken as signaling unwanted romantic intentions. In the #metoo era, this is totally inappropriate and can potentially ruin professional partnerships and even careers. Be careful with emojis also in any situation involving buying or selling, since commercial messages can end up in court if meanings, intentions, and actions part ways. In one case, emojis were used in a text message signaling intent to rent an apartment by someone who reneged and was judged to be nonetheless on the hook for the $3,000 commitment (Pringle, 2017). As with any new means of communication, some caution and good judgment, as well as attention to notable uses and abuses that show up in the news or company policy directives, can help you avoid making potentially disastrous mistakes.
Though emojis may be meaningfully and understandably added to text/instant messages or even emails between familiar colleagues who have developed a light-hearted rapport featuring their use, there are several situations where they should be avoided at all cost because of their juvenile or frivolous social media reputation. It’s a good idea to avoid using emojis in business contexts when communicating with:
- Customers or clients
- Managers who don’t use emojis themselves
- Colleagues you don’t know very well
- Anyone outside your organization
- College instructors
- Older people who tend to avoid the latest technology
However, in any of the above cases, you would probably be safe to mirror the use of emojis after your correspondent gives you the greenlight by using them first (Caramela, 2018). Yes, emojis lighten the mood and help with bonding among workplace colleagues. If used excessively as part of a larger breakdown of decorum, they suggest a troubling lack of professionalism. Managers especially should refrain from emoji use to set an example of impeccable decorum in communications to the employees they supervise.
4.5.2: Removing Biases in Language
In professional writing, it is important to keep language free from biases based on gender, race, color, disability, ethnicity, and economic and educational backgrounds. Historically, business writing catered to the mainstream elite, which disregarded audience based on color, gender, ethnicity, and disability. In recent times, corporations and academia have become more sensitive in using language that marginalizes a group of people. In fact, younger companies—most especially companies related to Informational technology will reject an application for a job if the writer’s language reveals a bias toward any of these groups. Popularly labeled as being “politically correct,” it is prudent for all business and professional writers to adopt a writing style that is free of any kind of bias. Using bias-free language shows empathy and improves business.
Examples of bias-free writing would be as follows:
Gender Bias: A Chair or a Chairperson rather than a Chairman. A Chair can be either a man or a woman. Traditionally, the title was used for a male; however, the current use reflects merely the title rather than the gender. Similarly, a person could be referred to as a soldier or an engineer regardless of the person’s gender.
Race/Color Bias: An African American rather than a Black person.
Disability Bias: A visually challenged student rather than a blind one.
Ethnicity Bias: A Chinese rather than a generic Asian person.
Removing biases from business language is not only professional but humane. It reveals inclusion of and respect to groups of people who have been marginalized in history.
4.5.3: The 6 Cs of Style
Whether you’re writing in a formal or casual style, all good writing is characterized by the “6 Cs”:
- Clear
- Concise
- Coherent
- Correct
- Courteous
- Convincing
Six-C writing is good for business because it fulfills the author’s purpose and meets the needs of the audience by making communication understandable and impactful. Such audience-oriented writing is clearly understood by busy readers on the first pass; it doesn’t confuse them with ambiguities and require them to come back with questions for clarification. It gets the point across in as few words as possible so that it doesn’t waste readers’ time with word-count-extending filler. Good writing flows logically by being organized according to recognizable patterns with its sub-points connected by well-marked transitions. Six-C writing avoids confusing readers with grammar, punctuation, or spelling errors, as well as avoids embarrassing its author and the company they represent, because it is flawlessly correct. It leaves the reader with a good feeling because it is polite and positive and focuses on the reader’s needs. Six-C writing is persuasive because, with all the above going for it, it exudes confidence. The following sections explain these characteristics in greater detail with an emphasis on how to achieve six-C writing at the drafting stage.
1. Clarity
Clarity in writing means that the words on the page are like a perfectly transparent window to the author’s meaning; they don’t confuse that meaning like the dirty, shattered window of bad writing or require fanciful interpretation like the stained-glass window of poetry. Business or technical writing has no time for anything that requires the reader to interpret the author’s meaning or ask for clarification. To the busy reader scanning quickly, bad writing opens the door for wrong guesses that, when acted upon, result in mistakes that must be corrected later; the later the miscommunication is discovered and the further the mistakes spread, the greater the damage control required. Vague writing draws out the communication exchange unnecessarily with back-and-forth requests for clarification and details that should have been clear the first time. Either way, a lack of clarity in writing costs businesses by hindering personal and organizational productivity. Every operation stands to gain if its personnel’s writing is clear in the first place.
So much confusion from vague expressions can be avoided if you use hard facts, precise values, and concrete, visualizable images. For example:
- Instead of saying “a change in the budget,” “a 10% budget cut” makes clear to the reader that they’ll have to make do with nine of what they had ten of before.
- Instead of saying that a home’s annual average basement radon level is a cause for concern, be specific in saying that it is 5.0 pCi/L (for picocuries per liter of air) so that the reader knows how far above public health guidelines it is and therefore the extent of remedial action required.
- Instead of saying that you’re rescheduling it to Thursday, be clear on what’s being rescheduled, what the old and new calendar dates and times are, and if the location is changing, too. If you say that it’s the 3 p.m. Friday meeting on May 25th being moved to 9 a.m. Thursday, May 31st, in room B349, participants know exactly which meeting to move where in their email program’s calendar feature.
- Always spell out months so that you don’t confuse your reader with dates in the “dd/mm/yy” or “mm/dd/yy” style; for instance, “4/5/18,” could be read as either April 5th or May 4th, 2018, depending on whether the author personally prefers one date form over the other or follows a company style in lieu of any universally accepted date style.
- Instead of saying at the end of an email, “Let’s meet to discuss” and leaving the ball in your correspondent’s court to figure out a time and place, prevent the inevitable time-consuming back-and-forth by giving your available meeting time options (e.g., 9–10 a.m. Thursday, May 31st; 2–3 p.m. Friday, June 1st; etc.) in a bulleted list and suggesting a familiar place so that all your correspondent needs to do is reply once with their preferred meeting time from among those menu options and confirmation on the location.
- Instead of saying “You’ve got a message,” being clear that Tia Sherman from the Internal Revenue Service left a voicemail message at 12:48 p.m. on Thursday, February 8th gives you the precise detail that you need to act on that information.
The same is true of vague pronouns such as its, this, that, these, they, their, there, etc. (see the demonstrative and indefinite pronouns, #6 and #9 in Table 4.4.2a above) when it’s unclear what they’re referring to earlier in a sentence or paragraph. Such pronoun-antecedent ambiguity, as it’s called (with antecedent meaning the noun that the pronoun represents), can be avoided if you can spot the ambiguity that the reader would be confused by and use other words to connect them to their antecedents. If you say, for instance,
The union reps criticized the employer council for putting their latest offer to a membership vote.
Whether the offer is coming from the union, the employer, or possibly (but unlikely) both is unclear because their could go either way. You can resolve the ambiguity by using words like the former, the latter, or a shortened version of one of the names:
The union reps criticized the employer council for putting the council’s latest offer to a membership vote.
When pronouns aren’t preceded by the noun to which they refer, the good writer must simply define them. Though these additions extend the word count a little, the gains in clarity justify the expense.
2. Conciseness
Because the goal of professional writing, especially when sharing expertise, is to make complex concepts sound simple without necessarily dumbing them down, such writing should communicate ideas in as few words as possible without compromising clarity. The worst writing predictably does the opposite, making simple things sound complicated. This is a rookie mistake among some students new to college or employees new to their profession. Perhaps because they think they must sound “smart,” they use expressions that are their attempt at imitating the kind of writing that goes over their head with fancy words and complex, word-count-extending sentence constructions, including the passive voice. Such attempts are usually smokescreens for a lack of quality ideas; if someone is embarrassed by how meager their ideas are, they tend to dress them up to seem more substantial. Of course, their college instructors or professional audiences are frustrated by this kind of writing rather than fooled by it because it doesn’t help them find the clear meaning that they expect and seek. It just gets in the way and wastes their time until they resent the person who wrote it.
If the temptation to overcomplicate a point is uncontrollable at the drafting stage, it’s probably better to vomit it all up at this point just so that you can get everything out while knowing that you’ll be mopping it up by paring down your writing later. By analogy, a film production will overshoot with perhaps 20 takes of (attempts at) a single shot just so that it has plenty of material “in the can” to choose from when assembling the sequence of shots needed to comprise a scene during post-production editing. However, as you become a better writer and hone your craft, you’ll be able to resist those filler words and overcomplicated expressions at the drafting stage from having been so aggressive in chopping them out at the editing stage of the writing process so many times before. Of course, if you make a habit of writing concisely even at the drafting stage, you’ll minimize the amount of chopping work you leave yourself at the editing stage.
3. Coherence and Completeness
Coherence means that your writing flows logically and makes sense because it says everything it needs to say to meet your audience’s needs. The organizational patterns discussed in §4.1, outlining structures in §4.2, and paragraph organization in §4.4 all help to achieve a sense of coherence. The pronouns and transitions listed in Table 4.4.2a and Table 4.4.2b above especially help to connect the distinct points that make up your bare-bones outline structure as you flesh them out into meaningful sentences and paragraphs just as ligaments and tendons connect bones and tissues throughout your body.
4. Correctness
Correct spelling, grammar, mechanics, etc. should not be a concern at the drafting stage of the writing process, though they certainly must be at the end of the editing stage (see Chapter 5). As explained above in the §4.3 introduction above, speed-writing to get ideas down requires being comfortable with the writing errors that inevitably pockmark your draft sentences. The perfectionists among us will find ignoring those errors difficult, but resisting the temptation to bog yourself down by on-the-go proof-editing will pay off at the revision stage when some of those awfully written sentences get chopped in the end anyway. Much of the careful grooming during the drafting stage will have been a waste of time.
5. Courtesy
No matter what kind of document you’re writing and what you can expect your audience’s reaction to it to be, writing courteously so that your reader feels respected is fundamental to reader-friendly messages. Whether you’re simply sharing information, making a sales pitch, explaining a procedure, or doing damage control, using polite language helps ensure your intended effects—that your reader will be receptive to that information, will buy what you’re selling, will want to perform that procedure, or will be onboard with helping to fix the error. The cornerstone of polite language is obviously saying “the P-word” that you learn gets what you want when you’re 18 months old—because saying please never gets old when asking someone to do something for you, nor does saying thanks when they’ve done so—but there’s more to it than that.
Much of courtesy in writing involves taking care to use words that focus on the positive, improvement, and what can be done rather than those that come off as being negative, critical, pushy, and hung up on what can’t be done. If you’re processing a contract and the client forgot to sign and date it, for instance, the first thought that occurs to you when emailing to inform them of the error may go something like the following:
You forgot to sign and date our contract, so you’ve got to do that and send it to me a.s.a.p. because I can’t process it till I receive it signed.
Now, if you were the client reading this slightly angry-sounding, accusatory order, you would likely feel a little embarrassed and maybe even a little upset by the edgy, pushy tone coming through in negative words like forgot, do that, a.s.a.p., and can’t. That feeling wouldn’t sit well with you, and you will begin to build an aversion to that person and the organization they represent. (If this isn’t the first time you forgot to sign a contract for them, however, the demanding tone would be more justified or at least more understandable.) Now imagine you read instead a message that says, with reference to the very same situation, the following:
For your contract to be processed and services initiated, please sign, date, and return it as soon as possible.
You would probably feel much better about coming through with the signed contract in short order. You may think that this is a small, almost insignificant shift in meaning, but the difference in psychological impact can be quite substantial, even if it operates subconsciously. From this example you can pull out the following three characteristics of courteous writing.
a. Use the “You” View
Audience-oriented messages that address the reader directly using the pronouns you and your have a much greater impact when the message is positive or even neutral. Writing this way is a little counterintuitive, however, because when we begin to encode any message into words, we do so naturally from our own perspective. The sender-oriented messages that result from our perspective don’t register as well with readers because they use first-person personal and possessive pronouns (I, me, my, we, us, and our) that tend to come off as being self-involved. In the above case, the contract is shared by both parties, but saying “our contract” is a little ambiguous because it may be read as saying “the employer’s contract” rather than “your and my contract.” Saying “your contract,” however, entitles the reader with a sense of ownership over the contract, which sits much better with them.
The trick to achieving an audience-oriented message is to catch yourself whenever you begin writing from your perspective with first-person personal pronouns like I and my and immediately flip the sentence around to say you and your instead. Simply changing the pronouns isn’t enough, though; in the above case, it involved changing the wording so that the contract is sent by you rather than received by me. Switching to the audience perspective takes constant vigilance and practice even from seasoned professionals but soon leads to an audience-oriented habit of writing that endears you more to your readers and leads to positive results. An added benefit to habitually considering your audience’s perspective is that it makes you more considerate, sympathetic, and even empathetic, improving your sense of humanity in general.
The flipside of this stylistic advice is to use the first-person pronouns (I, we, etc.) as seldom as possible, which is true, but obviously you can’t do without these entirely—not in all situations. When it’s necessary to say what you did, especially when it comes to negative situations where representing your perspective and accepting responsibility is the right thing to do, not using the first-person pronouns will result in awkward stylistic acrobatics. Simply use the audience-oriented “you” view and sender-oriented first-person personal pronouns when appropriate.
b. Prioritize Audience Benefits
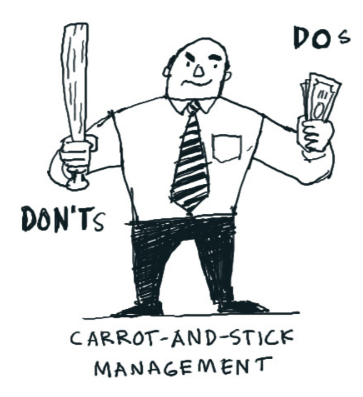 Whenever you need to convince someone to do something, leading with the positive result—what the reader will get out of it for their effort—followed by the instruction has a much better chance of getting the reader on board. Notice in the two example sentences above that the reader-hostile version places the demand before the result, whereas the improved, reader-friendly version places the result before the (kindly worded) demand. This simple organizational technique of leading with the audience benefit works because people are usually more motivated by the carrot (reward) than the stick (consequence), and dangling the carrot attracts the initial interest necessary to make the action seem worthwhile. It’s effective because it answers what we can always assume the reader is wondering: “What’s in it for me?”
Messages that don’t immediately answer that question and instead lead with the action, however, come from a sender-oriented perspective that initially turns off the reader because it comes off as being demanding in tone. Obviously, some situations require a demanding tone, as when being nice gets no results and necessity forces you to switch to the stick. Again, leading with the demand may be what occurs to you first because it addresses your immediate needs rather than your reader’s, but making a habit of flipping it around will give your writing greater impact whenever you give direction or issue instructions.
c. Focus on Future Positive Outcomes
Focusing on what can be done and improvement sits better with readers than focusing on what can’t be done and criticism. In the above case, the initial rendering of the problem focused on blaming the reader for what they did wrong and on the impasse of the situation with the contract. The improved version corrects this because it skips the fault-finding criticism and instead moves directly to what good things will happen if the reader does what needs to be done. The reader of the second sentence will associate you with the feeling of being pleased by the taste of the carrot rather than smarting from the whack of the stick.
The flipside of this stylistic preference involves replacing negative words with positive words unless you have an important reason for not being nice. Being vigilantly kind in this way takes some practice, not because you’re a bad person, but because your writing habits may not reflect your kindness in writing. Vigilance here means being on the lookout whenever you’re tempted to use the following words or their like in situations that aren’t too dire:
- awful
- bad/badly
- can’t/cannot
- crappy
- deny
- disappointing
- don’t
- dumb
- fail/failure
- fault/faulty
- hate
- hopeless
- horrible
- impossible
- lose/loser
- never
- no/nope
- nobody
- not
- poor/poorly
- reject
- sorry
- stupid
- substandard
- terrible
- unfortunate/unfortunately
- won’t
- worthless
Rather than shaming the author of a report by saying that their document is terrible, for instance, calling it “improvable” and pointing out what exactly they can do to fix it respects the author’s feelings and motivates them to improve the report better than what you really want to say in a passing moment of disappointment. Of course, taking this advice to its extreme by considering it a hard-and-fast rule will obviously destroy good writing by hindering your range of expression. You’ll notice that this textbook uses many of the above words when necessary. In any case, make it a habit to use positive words instead of negative ones if it’s clear that doing so will result in a more positive outcome.
On its own, translating a single sentence like the one exemplified above will likely not have a lasting effect; over time, however, a habitual focus on negative outcomes and use of negative language will result in people developing a dislike for dealing with you and, by association, the company you represent. If you make a habit of writing in positive words most of the time and use negative words only in situations where they’re necessary, on the other hand, you stand a good chance of being well liked. People will enjoy working with or for you, which ensures continued positive relations as well as opens the door to other opportunities.
6. Convincing and Confident
When all the other aspects of style described above are working in concert, and when the information your writing presents comes from sound sources, it naturally acquires an air of confidence that is highly convincing to readers. That confidence is contagious if you are rightfully confident in your information or argument, decisive in your diction, and avoid lapsing into wishy-washy, noncommittal indecision by overusing weak words and expressions like:
- almost
- approximately
- basically
- blah
- close to
- could (have)
- -esque
- -ish
- kind of / kinda
- may/maybe
- meh
- might
- probably
- roundabout
- somewhat
- sort of / sorta
- should (have)
- thereabouts
- usually
- we’ll see
- whatever
- whenever
- whichever
- -y (e.g., orange-y)
These timid, vapid words are death to any sales message especially. This is not to say that your writing can’t err toward overconfidence through lapses in judgment or haughtiness. If you apply the same rigor in argument and persuasion that you do in selecting for quality research sources that are themselves well reasoned, however, by considering a topic holistically rather than simplistically for the sake of advancing a narrowminded position, it’s easy to get readers to comprehend your information share, follow your instruction, buy what you’re selling, and so on.
Key Takeaway
Drafting involves writing consistently in a formal, casual, or informal style characterized by the “six Cs”: clarity, conciseness, coherence, correctness, courtesy, and conviction.
Exercises
1. Assemble a six-Cs scoring rubric for assessing professional writing using the descriptions throughout §4.5.3 above. In the highest-achievement column, list in point form the attributes of each characteristic. In the columns describing lesser and lesser levels of achievement, identify how those expectations can fall apart. For help with the rubric form, you may wish to use Rubistar’s writing rubric template.
2. Find examples of past emails or other documents you’ve written that make you cringe, perhaps even high school essays or reports. Identify instances where they are unclear, unnecessarily longwinded, incoherent (lacking both a clear organizational pattern and transitions that drive the argument along), rife with writing errors, rude, and/or unconvincing. Assess and score those specimens using your six-Cs rubric from Exercise 1 above. Begin to think of how you would improve them.
3. Find a professionally written document, perhaps from a case study in another class. Assess it using the same six-Cs scoring rubric.
4. Speed-write a written assignment that you’ve been recently assigned in one of the other courses in your program. If you’re not fast at typing (or even if you are and want to try something new), you may start by recording your message into your smartphone’s or computer’s voice recorder app or program and then transcribe it. Ensure that your style hits five of the six style Cs (clarity, conciseness, coherence, courtesy, and conviction) as you write and most definitely do not correct as you go.
References
Caramela, S. (2018, February 5). Put a smiley on it: Should you use emojis in business communication? Business.com. Retrieved from https://www.business.com/articles/put-an-emoji-on-it-should-you-use-emojis-in-business-communication/
Goodman, S. (2016, November 23). And the most enchanting emoji on Instagram is… Curalate. Retrieved from https://www.curalate.com/blog/the-top-100-most-popular-instagram-emojis/
Gray, D. (2011, November 27). Carrot-and-stick management. Retrieved from https://www.flickr.com/photos/davegray/6416285269/
Me.me. (n.d.). Sometimes I use big words I don’t fully understand in an effort to make my self sound more photosynthesis. Retrieved from https://me.me/i/11273424
Pringle, R. (2017, May 26). Using the wrong emoji can cost you—literally. CBC News. Retrieved from http://www.cbc.ca/news/opinion/emoji-lawsuit-1.4131697
Pringle, R. (2018, March 18). Emojis are everywhere and they’re changing how we communicate. CBC News. Retrieved from http://www.cbc.ca/news/technology/emojis-forever-pringle-1.4577456
4.6: Effective Document Design
Section 4.6 Learning Objectives
3. Plan, write, revise, and edit short documents and messages that are organized, complete, and tailored to specific audiences.
4. Apply the principles of reader-friendly document design to various written formats.
The responsibility of a writer to produce reader-friendly documents extends to layout, design, and organizational elements surrounding the words themselves. If an email or report were simply a wall of undifferentiated text running for several screens or pages, any reader would be daunted by the prospect of having to scale that wall. Fortunately, writers can use document templates that make those design choices for them with established styles so that writing a document becomes a matter of just filling in the blanks; if you work for a company that uses templates for certain documents, of course you will use them also for consistency and your own convenience. Even without templates, however, you can use several techniques to help guide your readers’ eyes across the page or screen to easily find what they’re looking for. Rather than being optional nice-to-haves, such techniques are crucially important to how well your document is received.
- 4.6.1: Titles
- 4.6.2: Headings and Subheadings
- 4.6.3: Font
- 4.6.4: Line Spacing
- 4.6.5: Lists
- 4.6.6: Visual Aids
- 4.6.7: Interactive Elements
- 4.6.8: Balancing Text and Whitespace
- 4.6.9: Making Accessible, ADA-Compliant Documents
4.6.1: Titles
Almost every document that exists as a standalone unit must have a title that accurately represents its contents in a nutshell. It’s the first thing a reader looks for to understand what a document is all about and should thus be easily found centered at the top of the first page of any small document and prominently placed on the cover of larger documents. Though some documents represent exceptions to this rule (e.g., business letters lack titles, and many lack subject lines), any document that brings with it the expectation of a title but omits it confuses the reader. Even emails and memos have titles in the form of subject lines. In whatever document you find it, a title’s following characteristics make it essential to your reader’s understanding of the whole:
- Topic summary: A title is the most concise summary possible of a topic while still making sense. If you glance at a news website or newspaper, for instance, you can get a reasonably good sense of what’s going on in the world just by reading the headlines because they are titles that, in as few words as possible, summarize the narratives told in the articles that follow.
- Conciseness: Aim for a length in the 2- to 7-word range—something that can be said repeatedly in one short breath. One-word titles are appropriate only for art (e.g., for books, films, songs, albums, etc.), but most other professional documents use a reasonable number of words to give a sense of the topic, albeit streamlined to the point of having no words that don’t absolutely need to be there. In scientific papers, titles can be quite long and carry plenty of detail, though you can expect that their audiences will rarely pronounce the full title.
- Capitalization: Capitalize the first word no matter what, as well as all major words (nouns, verbs, adjectives, adverbs, pronouns, etc.) thereafter.
- Don’t capitalize prepositions (e.g., on, to, from, in, out, of), conjunctions (and, but, or, for, nor, so, yet), or articles (the, a, an) unless they’re the first word of the main title or subtitle (Darling, 2014a, 2014b, 2014c).
- When including a hyphenated word (i.e., with a compound-modifier hyphen), leave the second word, the one immediately following the hyphen, lowercase (see the first two examples in the titles listed at the end of this subsection).
- Structure: Use a noun, verb, or adjective phrase rather than a complete sentence.
- Main title: If your title comes in two parts with a main title and subtitle, the main title establishes the general context of the topic, perhaps with catchy or clever phrasing, and ends with a colon ( : ) with a single space after it but none before.
- Subtitle: The subtitle follows the main title with a more specific and detailed summary of the document topic.
- Position: Center the title at the top of the page and include 1–2 empty lines below it to separate it from the opening text.
- Typeface: Use bold typeface to help draw the eye toward the title, as well as color if appropriate.
For examples of titles that are near at hand, see the References sections at the end of most chapter sections throughout this textbook. The following collects a small selection of them:
- “Consensus on Consensus: A Synthesis of Consensus Estimates on Human-caused Global Warming” (Cook et al., 2016)
- “Instagram Ranked Worst for Young People’s Mental Health” (RSPH, 2017)
- “Gray Matters: Too Much Screen Time Damages the Brain” (Dunckley, 2014)
- “Ottawa Severs Ties with Plasco as Company Files for Creditor Protection” (Chianello & Pearson, 2015)
- “Problematic Technology Use: The Impact of Capital Enhancing Activity” (Phillips, 2015)
- The Process and Effects of Mass Communication (Schramm, 1954)
- “Understand How Consumers Use Messaging: Global Mobile Messaging Consumer Report 2016” (Twilio, 2016)
- “Who Multi-tasks and Why? Multi-tasking Ability, Perceived Multi-tasking Ability, Impulsivity, and Sensation Seeking” (Sanbonmatsu et al., 2013)
For more example titles, go to Wikipedia.org and search for articles on any business or technology topic, scroll down to the References section at the bottom, and see an abundance of legitimate titles.
4.6.2: Headings and Subheadings
After the main title of a document, using headings and subheadings as titles for sections and subsections helps guide the reader around a document’s breakdown of topics. Especially in reports, headings and subheadings that stand out in bold typeface flush (or close) to the left margin and follow a consistent numbering system, exactly as you see in this textbook, help a busy reader quickly locate any specific content they seek. Even a routine email that covers a topic in so much detail that it could be internally divided—without being so big that its content should just go into a document attachment—would benefit from bolded headings.
If your drafting process follows the guide in this chapter, then you would have already drafted your headings and subheadings (and possibly numbering if necessitated by the size of the document) in your outline (see §4.2 above). The drafting process of fleshing out that outline may suggest tweaks to those heading and subheading titles. As titles, headings must be properly phrased and capitalized like main titles (see §4.6.1 above).
When using a word processor such as Microsoft Word, you can achieve additional functionality by using “true headings.” From the Home menu tool ribbon, heading styles are available as options in the Styles section. If you prefer to design your own styles of headings, you can click on the downward triangle at the bottom right of the style examples field and select “Create a Style.” Doing this allows you to see your entire document at a glance on the left and quickly jump to any section you wish by clicking on the Navigation Pane checkbox in the Show section of the View menu tool ribbon (or Alt + w, k), then clicking on the heading for the section you want. This is especially useful in larger documents like reports. Additionally, using such headings makes your document accessible to audiences with assistive technologies such as screen readers (see §4.6.9 below on ADA compliance). Manipulating font sizes in headings and sub-headings indicates the relative hierarchy of information conveyed in a document.
4.6.3: Font
Font selection is an important consideration because it determines how the audience will receive a document. Font involves decisions concerning the style of type, size, and even color. Consider the following:
1. Font Type
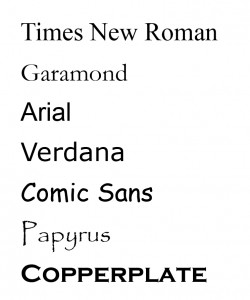 Writers considering typeface must choose between two major style categories depending on how they would like to accommodate their reader. Serif fonts like Times New Roman and Garamond have little perpendicular crossline “feet” or “hands” at the ends of letter strokes, as well as variable thickness in the strokes themselves depending on their horizontal/vertical or curving position, which altogether help readers distinguish between similar letters or combinations of letters, such as m and rn, which almost look like the same letter in a non-serif font. Serif fonts are ideal for printed documents, especially those with smallish font sizes such as newspapers. Without serifs, sans serif fonts like Arial (the one used in this textbook) or Verdana achieve a more clean and modern look, especially on computer screens where serif fonts appear to whither away at the thin part of the stroke and are thus harder to read. In the appropriate format, all the fonts mentioned above make a document look respectable. Comic Sans, on the other hand, is appropriate for documents aimed at children but undermines the credibility of any professional document.
Anticipate that audiences might care about font choices, especially if the font clashes with the content like the example above. To anyone who considers the effects that fonts have on an audience, even going with the Microsoft Word default font of Calibri has its dangers because it comes off looking lazy, being the non-choice of those who never consider the importance of font. At the other extreme, digging around for and using exotic fonts for a document is risky because they can look flakey, such as Papyrus or Copperplate (Butterick, 2013). Even if they look nice, however, the receiver opening the document on the other end may not have that font in their word processor program, requiring that program to substitute it with another font, which may look worse or mangle layouts arranged around that font. The safe bet, then, is always to go with familiar, respectable-looking serif or sans serif fonts like those identified at the top of this subsection.
2. Font Size
Size is another important consideration because readers depend on text being an ideal “Goldilocks” size for readability and are frustrated by font sizes that are bigger or smaller than that. In a standard written document, for instance, a 12-point Arial or Times New Roman is the Goldilocks size. If the MS Word default size when you open a blank document is 11-point, it’s worth increasing it for the sake of those who have slight visual impairment. Increasing the size much past 12-point has a similar effect as using the Comic Sans font type: it makes your document appear to be targeting an audience of children. Of course, situations where you want to increase the font size abound, such as for titles on title pages so that the eye is drawn immediately to them and any time readers are required to read at a distance, such as posters on a notice board or presentation slides.
Occasions for going smaller with your font size include footnotes in a report or source credits under images in a document or PowerPoint presentation. Decreasing font size to 8-point merely to get all your text to fit into a one-page résumé, however, would undermine the document’s purpose because, by frustrating the hiring manager trying to read it, it runs the risk of prompting them to just dump it in the shredder and move on to the next (hopefully reader-friendly) résumé. In such cases, choosing the right font size becomes a major life decision. Whatever the situation, strike a balance between meeting the needs of the reader to see the text and design considerations.
3. Font Color
A choice of color may also enter into document design considerations, in which case, again, the needs of the reader must be accommodated. Used appropriately, a touch of color can draw the eye to important text. Coloring your name red at the top of your résumé is effective if few or no other elements in the document are so colored because your name is essentially the title of your document. Likewise, coloring the title of other documents is effective if there are no expectations of doing otherwise (some style guidelines forbid color).
Any use of color for text must be high-contrast enough to be readable. The gold standard for high-contrast readability is black text on a white background. Gray-on-white, on the other hand, sacrifices readability for stylishness depending on how light the shade of gray is. A light-yellow text on a white background is nearly impossible to read. In all cases, the readability of the text should be considered not just for those with perfect vision but especially for those who find themselves anywhere on the spectrum of visual impairment. For this reason, color should always be used to enhance a document that is already perfectly organized without it; never use color coding alone as an organizing principle in a document read by anyone other than you because you can never be sure if some readers will be color blind or have other visual impairments that render that color coding useless as a cause for confusion.
4. Boldface, Italics, and Underlining
Boldface, italics, and underlining serve various purposes in focusing audience attention on certain words. Boldface type is especially helpful in directing audience eyes toward titles, headings, and keywords as you can see at the beginning of this paragraph and throughout this textbook. Highlighting in this way is especially helpful to anyone who is visually impaired in any degree. Of course, overusing boldface undermines its impact, so it should be used sparingly and strategically. Likewise, italics and underlining have very specific purposes that we will look at under the banner of mechanics in Chapter 5.
4.6.4: Line Spacing
Single-spaced lines are common to most documents because they accommodate the reader’s need to dart quickly to the next line to continue reading a sentence. The gap between 1.0-spaced lines is just enough to clearly separate one line from another so the hanging elements at the bottom of letters like j and g don’t interfere with the tops of uppercase letters on the line below. Some documents such as academic manuscripts are double-spaced to give readers, who are usually the instructors or teaching assistants grading them, enough space to write comments and editorial marks between the lines. Because doubling the line spacing also doubles the number of pages in a print version, avoid double-spacing documents for audiences who don’t explicitly require it.
Frustratingly, some word processors such as Microsoft Word open blank pages with line spacing values other than single (1.0) spacing as their default setting, such as 1.08 or 1.15. In such cases, a couple of adjustments are necessary if you want to single-space a document you’re writing from scratch. Make these adjustments as soon as you open a blank page or by highlighting all (Ctrl + a) if you’ve already started. In MS Word’s Home menu:
- Click on the Line and Paragraph Spacing icon that has four lines representing text with two blue arrows on its left side, one pointing up and one down, in the Paragraph section of the Home menu ribbon (or just type the Alt + h, k keys).
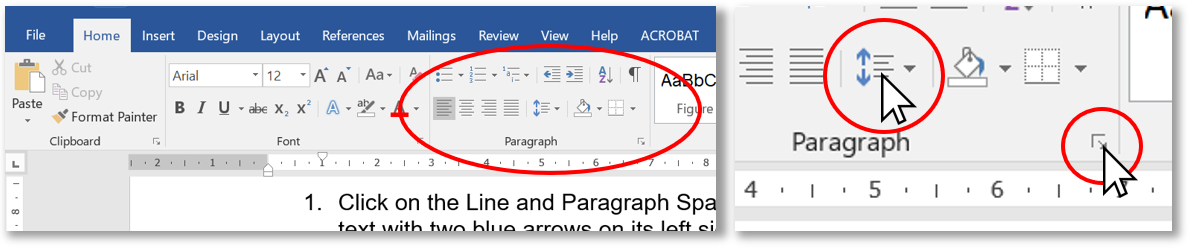
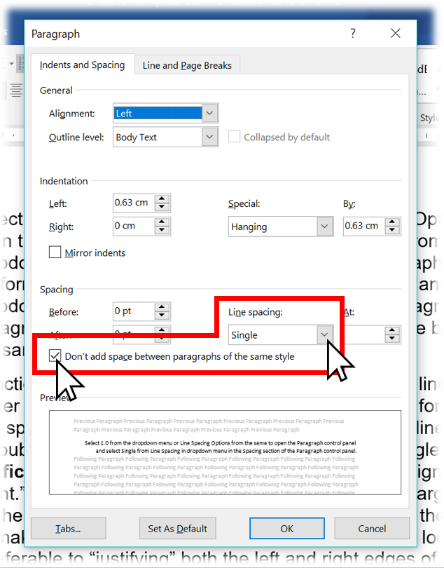 Figure 4.6.4a: Where to click to get line spacing options in the MS Word tool ribbon (above) and Paragraph control panel (right)
 - Select 1.0 from the drop-down menu or Line Spacing Options from the same to open the Paragraph control panel and select Single from the Line Spacing drop-down menu in the Spacing section.
- Perform the same two steps as above to get the Line and Paragraph Spacing drop-down menu and select Remove Space After Paragraph or, from the Paragraph control panel, click on the “Don’t add space between paragraphs of the same style” checkbox and the Okay button at the bottom to apply the style.
The third action above prevents MS Word from adding a full line of space every time you hit Enter at the end of a line. When typing address lines for a letter without the “Don’t add space” checkbox ticked, for instance, the default line spacing will continue to look like double spacing even if you set the line spacing to single.
Justification should ideally be left as the default left-aligned or “Left-justified / ragged right.” This means that all lines are flush to the left margin and the lines end wherever the last full word fits before the right margin sends (or “wraps”) the next word down to the next line, making each line vary in length so the right margin looks “ragged,” as you can see throughout this textbook. This is usually preferable to “justifying” both the left and right edges of the text so that they align perfectly along both the left and right margins, as in the paragraph below. While this may look clean like newspapers often do with their columns, it does so by adding space between the words within each line, and since every line varies in length without justification, every line with it will vary in the amount of space added between words. Some lines that would be short without justification look awkward with it because the space between some words is greater than the span of small words.
To fix the “hockey teeth” gaps resulting from justification, such as what you see in parts of this paragraph, turn on hyphenation in MS Word via the Layout tool ribbon: select Automatic in the Hyphenation drop-down menu in the Page Setup section. This automatically adds hyphens between syllables of long words whose size and position at the end of a line would otherwise send them entirely to the beginning of the next line, decreasing the number of words in the line above and increasing the gap between each. If working in a company document template with justification, keep the justification throughout to be stylistically consistent with other documents produced in that template and ensure that the hyphenation is turned on (unlike this paragraph). Otherwise, left-aligned text is perfectly fine and may even help readers find their place if they lose it momentarily compared with the uniform brick-wall effect of justified text seen here.
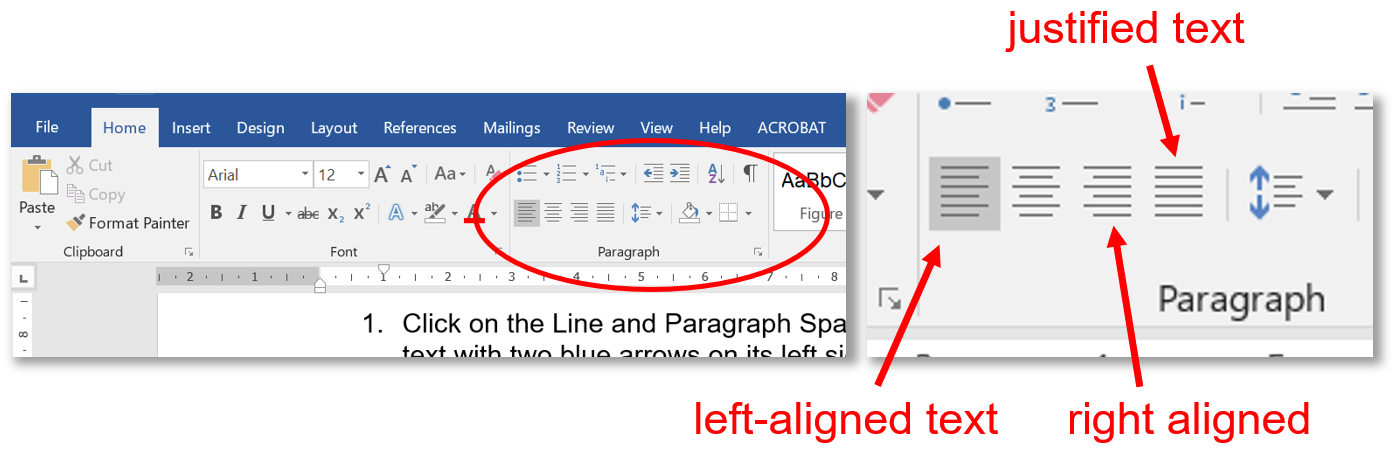
Figure 4.6.4b: Where to click to select text justification or left-aligned (“ragged right”) text in the MS Word Home menu tool ribbon
4.6.5: Lists
Another technique that helps the reader skim and easily find sought-after content is numbered or bulleted lists for a series of discreet but related items. Whether you use numbered or bulleted lists depends on your organizing principle:
| Use Numbered Lists for: | Use Bulleted Lists for: |
|---|---|
|
|
You’ve seen numbered and bulleted lists used throughout this textbook (e.g., the two bulleted lists immediately above and a numbered one in the section prior to this). Whichever list type you use, ensure each has the following:
- A sentence or phrase introducing and explaining the list and ending with a colon (see Colon Rule 1 in Chapter 5) before delivering the list immediately below it as you can see in the sentence that introduces this list
- Capitalization of the first letter in each point
- Periods ending each point only if it is a complete sentence on its own, whether it be in the declarative, imperative, or any other mood; a list of nouns or noun phrases, on the other hand, doesn’t end in periods
- Parallelism in the sense that each point in a list follows the same grammatical pattern, such as only full sentences, only noun phrases, or only verb phrases (or imperative sentences); for instance, each point in the three bulleted lists in this section (including the present one) is a noun phrase (i.e., it begins with a noun) and the numbered list in §4.6.4 above, as a step-by-step procedure, is a sequence of imperative sentences (i.e., each begins with a verb: “Click,” “Select,” “Perform”)
The need for parallelism extends also to lists within a sentence.
4.6.6: Visual Aids
The cliché that a picture is worth a thousand words holds true because images are excellent aids to understanding when placed near the messages they illustrate. Just as the visual elements in this textbook support and reinforce the content, so photos, graphics, charts, and graphs provide readers something that can be understood and remembered at a glance—as long as those visuals are used appropriately. Of course, the main criterion for usability is if the image helps the reader understand the text better. If the image is complementary, it can only help. If it is unnecessary, confusing, or contradicts the text, however, the image isn’t worth the time and effort it takes to add it to your document. When considering using an image, ask yourself:
- Aesthetic considerations:
- Does the image look good?
- Are the colors complementary?
- Technical considerations:
- Is the image resolution of sufficiently high quality?
- Or is it too pixelated to use?
- Legal considerations:
- Does the image’s copyright license permit or forbid use by others?
- Am I using the image for educational or commercial purposes?
- Design considerations:
- Is it big enough to see?
- Is it placed appropriately?
The ideal size depends on the resolution, detail of the content, relative importance, and the use to which the document will be put. The following guidelines help ensure that the images you use will meet aesthetic, design, technical, and legal expectations:
- Aesthetic guidelines:
- Choose images that look like they were produced by professional photographers, illustrators, or graphic designers—the sort you would see in a magazine or professional industry website.
- Professionals usually produce images with a limited palette of colors that work well together.
- Use images that are in focus and well-framed with the central image clearly visible rather than too far in the background or so close that important aspects are cropped out.
- Design guidelines:
- An image or graphic that is crucial to the reader’s understanding and is highly detailed really deserves to stretch across the text block from margin to margin.
- An image that is more ornamental and relatively simple can be inset within the text either on the left or right margin or centered on the page without text on either side.
- Important images, especially those labeled as figures, must be placed as near as possible to the text they support and even referred to in the text (“See Figure 2 for an illustration of . . .”)
- Ensure that the text and corresponding image aren’t separated by a page break if the text is close to the top or bottom of the page. The reader’s eye must be able to move between the image and corresponding text in the same field of view to seal their understanding.
- Technical guidelines:
- Screen resolution must be at least 72 dpi (dots per inch), the internet standard; anything less than 72 may appear pixelated even on the screen, especially if maximized in size across the page.
- Images in documents that will be printed should be 300 dpi to avoid appearing pixelated on paper.
- Preferred image file types include JPEG (.jpg) and PNG (.png). The latter includes the possibility of contouring so that the image doesn’t necessarily have to be a square or rectangle. You can make a PNG image file of your handwritten and scanned signature, for instance, by erasing the white background around the pen strokes in Photoshop and saving the image as a PNG. That way, you can drag and drop your signature onto a signature line in an electronic document and it won’t block out the line underneath if your signature typically sprawls out over lines.
- Legal guidelines:
- To stay on the right side of copyright legislation, searching online for images that are free to use is easy by including licensing status in an advanced Google Image search. From the Google Images search screen:
- Click on the Settings spring-up menu at the bottom right.
- Select Advanced Search.
- Scroll down and click on the “usage rights” drop-down menu at the bottom.
- Select “free to use or share” or whatever licensing status suits your purposes.
- Otherwise, you can acquire the right to use images for commercial purposes by purchasing them from stock photo vendors such as Getty Images, Adobe Stock, or Shutterstock.
- To stay on the right side of copyright legislation, searching online for images that are free to use is easy by including licensing status in an advanced Google Image search. From the Google Images search screen:
With modern word processors, placing an image is as easy as dragging and dropping the image file from a folder into a document (or copying and pasting). Sometimes you will need to be a little craftier with capturing images, however. For instance, if you need to capture a still image of a YouTube video to use as an image such as you see near the end of §4.3.4 above, you can pause the video at the moment you would like to capture and use your computer’s screen-capturing program to get the image.
- On a Windows-based computer:
- Open the included Snipping Tool (Microsoft Support, 2017) to turn the cursor into crosshairs.
- Click and drag the crosshairs to select the desired portion of the screen for capturing; when you release the cursor, the captured image will open immediately in the clipboard. Ensure that you’ve included only the elements necessary, rather than the whole screen, plus a short span of margin on each side.
- Save the image in a folder from the clipboard or add it directly to the document by switching immediately to the document window (Alt + tab) and pasting it (Ctrl + v) wherever you’ve placed your cursor.
- On a Mac, use Shift + Command + 4 and use the crosshairs to select the desired portion of the screen (Apple Support, 2017).
Once your image is in your document, use the layout options to place it where appropriate. Clicking on it may produce a layout icon near the top right that you can click on to open the drop-down menu (alternatively, you can right-click on the image and select the Wrap Text option from the drop-down menu). The default setting left-justifies the image and displaces the text around where you put it, but other layout options allow you to place it elsewhere on the page so that your text wraps around it (“Square,” “Tight,” or “Through”) or so that text doesn’t move around it at all (“Behind” or “In front of text”), which gives you the freedom to move the image anywhere.
4.6.7: Interactive Elements
Another aid to understanding that can benefit readers of an online or electronic document is a weblink that provides them with the option of accessing other online media. Hyperlinking is easy in modern word processors and online applications such as websites and email simply by highlighting text or clicking on an image and activating the hyperlinking feature. Press the control and k keys simultaneously (Ctrl + k), paste the web address into the URL field (copy it by clicking on the web address bar or keying Alt + d, then Ctrl + c), and hit the Okay button (Microsoft Office Support, 2016). Users prefer links that open new tabs in their browser rather than take them away entirely, so seek out that option when hyperlinking. By doing this for an image of a YouTube video screenshot, for instance, you enable readers of a document (including a PowerPoint presentation) to link directly to that video in YouTube (as you can with the YouTube image near the end of §4.3.4 above) rather than embed a large video file in your document. You can additionally link to other areas within a document, as the document version of this textbook does with links to various sections like the one in the previous sentence.
4.6.8: Balancing Text and Whitespace
Another consideration that helps a reader find their way around a page is the balance of text and whitespace, which is simply a gap unoccupied by text or graphic elements. The enemy of readability is a wall of text that squeezes out any whitespace, whereas a well-designed document uses whitespace to usher the reader’s eyes toward units of text. Whitespace margins frame the text in a document, for instance, as well as give readers something to hold on to so that they don’t cover up any text with their thumbs. Margins should be 3 cm or 1″ (2.54 cm), which are the default margin sizes in most word processors’ (e.g., Microsoft Word’s) blank 8.5″×11″ document. Margins also focus attention on the text itself, which makes any crowding of the margins an offense to good design. An attempt to cram more information into a one-page résumé by edging further and further into the margins, for instance, follows the law of diminishing returns: the hiring manager might take your sacrifice of the document’s readability as a sign of selfishness—that you place your own needs above that of your audience, which suggests you would do the same to the customers and management if it suited you.
4.6.9: Making Accessible, ADA-compliant Documents
The Americans with Disabilities Act sets out guidelines for how workplaces can help people with disabilities, including accommodations that extend to document design. Many of the recommendations covered in the sections throughout §4.6 above, such as font size and color, are justified as accommodations to people with even mild visual impairment. Someone with color blindness, for instance, may be confused if you use colored text alone as an organizing principle, which is why you should use color only to enhance text readability while using other means of organization such as boldface type. Not only must you accommodate such individuals, but also those whose severity of impairment requires that they use assistive technologies such as screen readers that convert text to automated voice. The more straightforward your text is presented, as well as formatted with “true headings” that a screen reader can identify as headings, the easier a person with a disability can hear and understand your message when it’s read out by a screen reader.
Once you are done drafting your document, you can begin to check for any accessibility issues and act on them right away. In MS Word, just go to File and, in the Info tab, select the “Check for Issues” button in the Inspect Document section. It will identify accessibility problems in your document as well as suggest fixes (watch the video below for a demonstration). For instance, if you have a photo without alt text, it will prompt you to write a caption by right-clicking on the image, selecting “Edit Alt Text…” from the drop-down menu, and writing a one- or two-sentence description of the image so that users with screen readers will be able to hear a description of the image they can’t see very well or at all. See Create Accessible Documents for more on how to make your documents ADA compliant.
Key Takeaway
Make your document easy to follow at a glance and accessible by using a variety of document design features such as titles, headings/subheadings, lists, visual aids, interactive elements, line spacing, and appropriate font types, sizes, and colors.
Exercises
1. Collect a variety of professional documents, such as reports, memos, and letters. If you have perfect vision, impair your vision, perhaps by dimming the lights at night or using a friend’s or family member’s prescription glasses. What do you notice about the readability of those documents when you’ve limited your eyesight? What organizational elements do you especially appreciate when trying to make sense of the document when you’ve otherwise hindered your ability to read?
2. Take any multi-page assignment you’ve done in MS Word that also includes non-text elements like photos. Run an accessibility check on it using the procedure described in §4.6.9 above and fix the issues identified.
3. Produce a dummy document that follows guidelines in each of the §4.6 subsections above. The content doesn’t matter as much as the inclusion of features. Ensure that it has:
- A proper title
- Some headings and subheadings
- A well-chosen font
- Single-spacing (1.0 with the “Don’t add space” checkbox checked)
- A numbered and a bulleted list
- A properly labeled image
- A hyperlink
- Nicely balanced text
- An accessibility check that you act upon by following the recommended fixes for ADA-compliant whitespace and text
References
Academic Algonquin. (2013, July 29). Using the accessibility checker [Video file]. Retrieved from https://www.youtube.com/watch?time_continue=62&v=mSY2EyA0rH4
Apple Support. (2017, November 20). How to take a screenshot on your Mac. Retrieved from https://support.apple.com/en-ca/HT201361
Butterick, M. (2013). Bad fonts. Practical Typography. Retrieved from https://practicaltypography.com/bad-fonts.html
Microsoft Office Support. (2016, September 7). Create or edit a hyperlink. Retrieved from https://support.office.com/en-us/article/create-or-edit-a-hyperlink-5d8c0804-f998-4143-86b1-1199735e07bf
Microsoft Support. (2017, April 26). Use Snipping Tool to capture screenshots. Retrieved from https://support.microsoft.com/en-ca/help/13776/windows-use-snipping-tool-to-capture-screenshots
Section508.gov. Create Accessible Documents. Retrieved from https://www.section508.gov/create/documents/
