Database Software 1: An Intro to Databases
Database Objects
Jennifer Lavergne

Learning Objectives
- Define what a database is.
- Recognize different database objects.
- Understand how tables are connected.
- Explain the importance of database maintenance.
- Learn to use MS Access effectively.
LEARN IT

A database is an organized collection of data, generally stored and accessed electronically from a computer system. Data stored in databases might include facts about people, events, things, or ideas. This provides information, which generates knowledge. Databases contain objects to store or reference data. The database objects we will focus on are:
- Tables
- Queries
- Forms
- Reports
 Good database design is critical and must be planned out before the database is built. One of the first steps in designing a database is to ask “What questions should this database be able to answer?” The goal of the database should be to store data in a way that makes it easier to answer this question.
The database should be user friendly. Good database design means that the data should be organized in a way that eliminates duplicate records. Redundancy in the data can cause the integrity of the database to be compromised. Another principle of good database design is a focus on accuracy and consistency of the data. Since many different end users might update data in a database, care should be taken to ensure data controls are in place to ensure consistency. When working through the projects in this chapter, it is important to pay close attention to the details. For example, spelling and naming conventions must be precise and consistent. Attention to detail is required when working with databases. Since databases are relational, there is a hierarchy that must be followed.
If a mistake is made when creating the database foundation, it will not function properly. The mistake will need to be corrected before continuing on. If you run into a database error, it is best to re-read the previous steps in the assignment and double-check your work. If you are not able to resolve the error, your instructor can help.
We will focus on relational databases. These types of databases are more robust than flat databases.
Going forward, we will focus primarily on Microsoft Access. If you are using a Mac, you will need a dual boot with Windows to run Microsoft Access.
Since Microsoft Access is widely used in industry, and we are using Microsoft Windows, we will focus on this DBMS going forward. There are many similarities across database systems, so the skills we are learning can be translated to other systems. The following Practice It assignments are designed to be completed using Microsoft Access in Office 365 on a PC with Windows 10 or higher. You may need to download the Professional version of Office 365 (which is free to students) to view Access.
We will use Access to analyze, design, and create a database to extract, sort, calculate, and report business data. Since Access is used for Data Analysis, it is best to use a keyboard and mouse or touchpad rather than a touchscreen.
In Access, data is stored in tables. This is the foundation of the database. Tables can be related to one another to create a relational database, which is a robust database. Each table row contains a record, and each table column is a field.
For our assignments in MS Access, we will use a database template to become familiar with database structure including tables, forms, queries and reports. 
Let’s look closer at what exactly data and tables are in reference to a database. Data is the most important part of our database system. Our job is to organize all of the data we collected into logical storage for easy retrieval. As stated before, using data to create knowledge is one of the most important things your database can do. Some examples of data can be your college transcript, a store’s sales for a month/year/decade, or your personal profile on social media. Typically, when deciding how to organize your data, we begin by looking for nouns.
If we use college transcripts as an example, we have several nouns we can use to group information around:
- Students—yours and your fellow student’s information
- Classes—the classes offered at the university
- Offering—the class you are enrolled in for a given semester and associated grades
- Faculty—the faculty member who taught the offering
- Building—the building your class was taught in
- University—the university you are attending
All of these are examples of possible groupings. There can be more or less depending upon the type and amount of data you have.
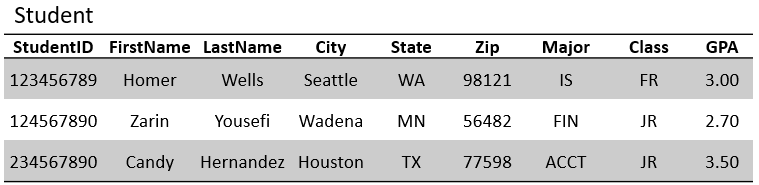
After we determine the groupings we like, we can create database tables based on these groupings. Tables organize the data into Columns and rows for easy retrieval and storage. Columns are typically referred to as fields and rows are typically referred to as records. Here is an example of a student table in a database:

A table consists of 4 different parts: The header, body, rows, and columns. The header includes the name of the table and each of the column names. In the Student table above, the header would be this portion:

The body of a table contains all of the rows in the table. This is where all of our data is stored that is related to this particular table. In the Student table above, the body would be this portion:

The body of a table is separated into horizontal rows. These are also referred to as records. A single row contains all of the information about that item in the table. In the table above, a row contains all of the information about a given student. In your school’s database, you have a row in a table with all of your information. This is an example of a single row in the Student table above. This row contains all of Candy Hernandez’s information:
![]()
Keep in mind that a database table normally has thousands to millions of records. This is why it’s important to make sure the data you enter into a table is correct. Editing a thousand records by hand would be very time-consuming.
Columns are the vertical storage portion of our tables. A single column/field contains all of some value that is associated with the rows in the table. For example, in the Student table above, the First Name column contains all the first names of the students in the table. The GPA column contains all student’s GPAs in the table. Here is the First Name column from the Student table:
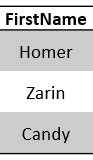
In a database, a column should always be guaranteed to contain the expected information. That is, only store first names in the First Name column. Only store city names in the City column. Etc. The most important column of a table is the ID column. It’s possible that when you log into your account at school, you use some form of ID or username. It’s your unique ID/username that is only assigned to you personally. This is done so that when you want to retrieve your transcript, all you need is your ID/username. This column is called a Primary Key and is required in every table in a relational database. It is required to always be unique, not used for anything else, and can never be empty. In the Student table above, the StudentID column contains the Primary Key for each record/row in the table. It’s desirable to have your database automatically increment a numerical value by one each time a new record is added to the table. So, if our last id was 101, the system would assign an id of 102 to the next record. 
Each column has a data type associated with it. Every value in that column has to have the same datatype. For example, if a column is given the Currency data type, then only monetary values should be stored in that column. We would not store a person’s last name in a column reserved for money. Microsoft Access has several built-in data types. The table below lists the data types that are important to know for our Access chapters.
|
Data Type |
Usage |
|
Short Text |
Alphanumeric data (names, titles, etc.) (formerly known as “Text”) |
|
Long Text |
Larger paragraphs of alphanumeric data (formerly known as “Memo”) |
|
Number |
Numeric data. |
|
Large Number |
Large numeric data. |
|
Date/Time |
Dates and times. |
|
Date/Time Extended |
Dates and times with milli- and nano-seconds |
|
Currency |
Monetary data, with 4 decimal places |
|
AutoNumber |
Unique value generated by Access for each new record; Primary Key |
|
Yes/No |
Boolean (true/false) data zero (0) for false, and -1 for true. |
For the assignments and examples in this book, we will be using these data types.
RELATIONSHIPS
We have mentioned relational databases several times in the previous sections. So why do we call a database relational? In a relational database, every table is related in some way to some other table or tables in the database. When we look for relationships in our databases, we begin by looking for the verbs. For example: A student enrolls in a class offering. Enroll is the verb we are looking for. Also, a faculty member teaches a class. For this example, teaches is our verb. These verbs connect, or form relationships, between our databases. In the relationship diagram below, the boxes represent a table in the database, and the lines between represent the relationships.

By connecting these tables together using the relationships, we can turn data into information. We can calculate your GPA, the percentage of your degree you have completed, etc. All of this information has to be stored in separate tables, or we would have duplicate entries. Duplicating entries is an inefficient way to use a database.
In the database, we connect tables using the Primary Key columns discussed before. Let’s look at the Student and Offering tables. The Offering table has its own Primary Key column called Offering ID. Notice, both tables contain the StudentID column.
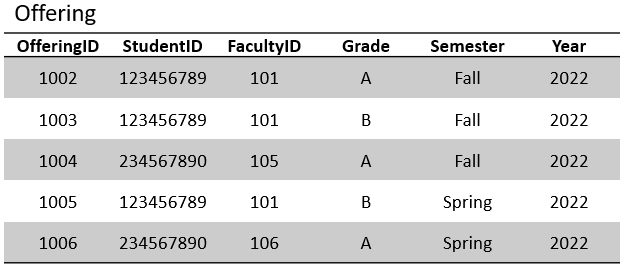
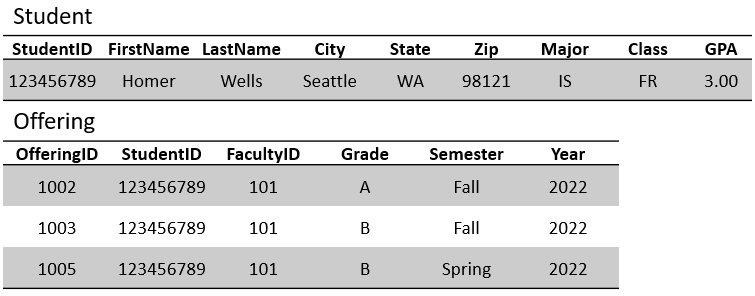
If we look at the Offering table, we can see that Homer’s ID appears 3 times, and Zarin’s 2 times. We can also see when they took the class, the ID of the faculty member who teaches the class, and the grade they were assigned in the class. In a relationship, when a table “borrows” a primary key from another table, we call this a Foreign Key. These keys are only used for linking tables together. The Offering table is “borrowing” both the StudentID and the FacultyID columns, so both of these are considered Foreign Keys. We usually indicate that the column borrowed references a specific table when the table is created. If we retrieve data based upon Homer’s ID, we can create his transcript with the records we retrieve:
There are several types of relationships, but the most common is a one-to-many relationship. This means one record from a table is related to many records in another table. The Offering/Faculty tables relationship is considered one-to-many since only one teacher will teach an offering at a time, but the faculty member could teach many classes each semester. In relational databases, we strive to have only one-to-many relationships, as the other types can cause redundancy issues and data anomalies.
ADDITIONAL RESOURCES
The following are common relational DBMS, or database management systems:
-
- Microsoft Access
- Lotus1-2-3
- DB 4
- SQL Server
- Azure SQL
Examples of non-relational databases for lightweight applications can be seen below:
-
- Firebase
- MongoDB
- MongoDB
- Apache Cassandra
- Redis
- Couchbase
- Apache HBase
DATABASE PRACTICE 1

Prefer to watch and learn? Check out this video tutorial:
Complete the following Practice Activity and submit your completed project.
- Start Access. In the search for online templates box, type Students and then press Enter. If you receive an error message, ensure you are connected to the internet.
- Select the Students template database. Name the database Lastname_Firstname_Access_Practice1. Click the folder icon next to the file name to save the database on your flash drive or in another safe location. After you name the database, click create. Access is different from other software since you must give the file a name before you start entering information.
- It may take a few moments for the database to load. If a Welcome window opens, you can close this. If a yellow bar displays across the top of the database, select Enable Content.
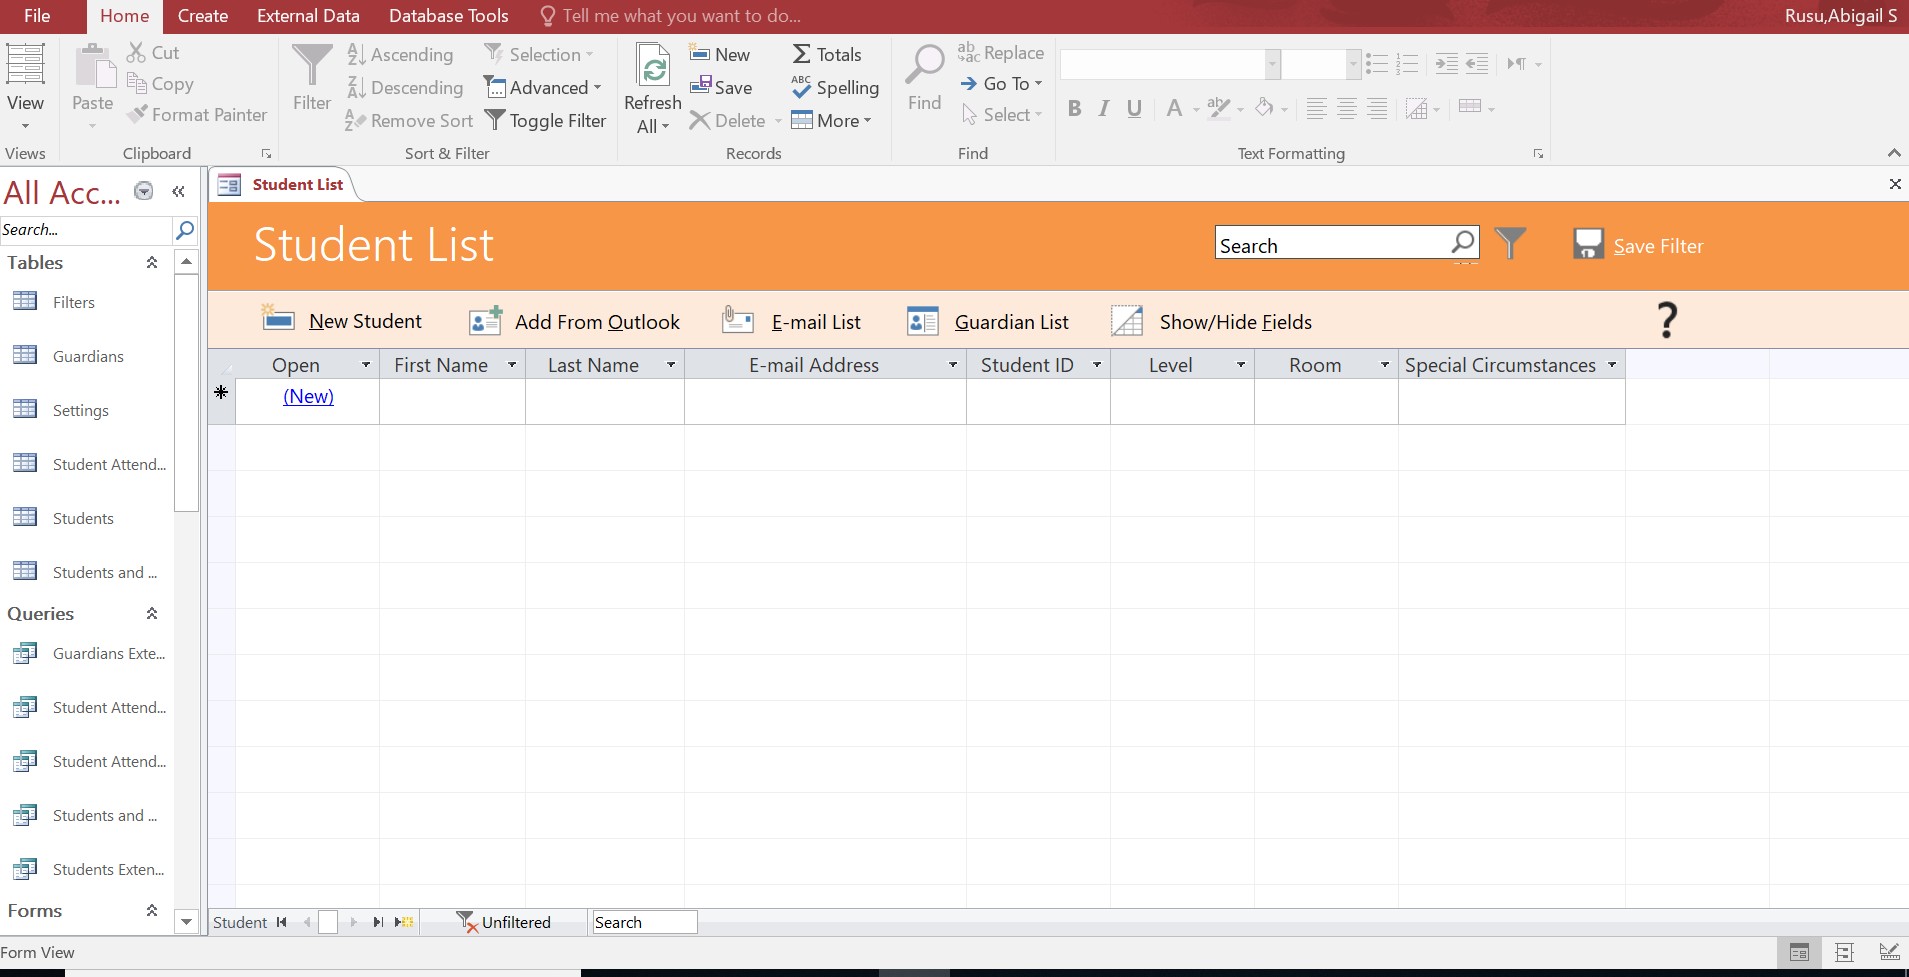
- Once the database is open, take a moment to view the database window.
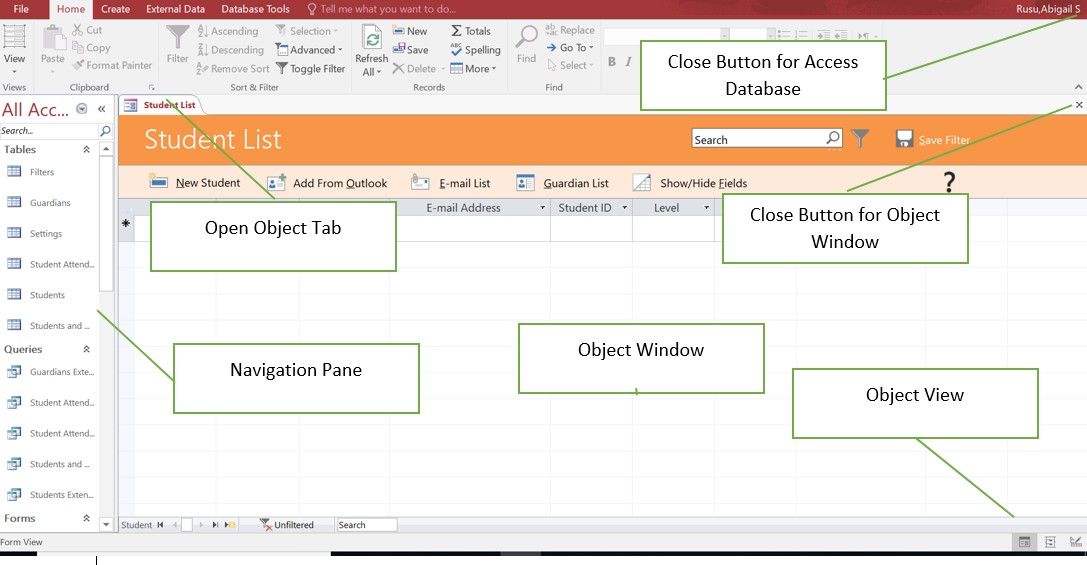
- In the navigation pane, click the shutter bar once to close the Navigation Pane. Click it again to open it. The shutter bar looks like two arrows pointing to the left on the navigation bar.
- In the Navigation pane, click the downward pointing arrow next to All Access Objects. Ensure Object Type and All Access Objects are checked.
- Notice how the Student List is the current open Access Object. On the Home Tab, in the Views Group, choose the arrow below Views. Notice how Form View is selected. Change the view to Layout View, and notice the change in the object window. Then change the view to Design View, and notice the change in the object window. Return view to Form View.
- Close the Student List form by clicking the x in the object window. Take care to not close the entire database, rather only close the open object. The database window should be empty.
- From the navigation pane, under tables, double-click the Students Table. On the Home Tab, in the views Group, click the arrow under View. Notice how the table opened in datasheet view.
- The ID field name has autonumber as the data type. This means that the ID will be automatically assigned, and you do not have the option to type it in. Ensure you are on the Fields tab under table tools.
- The Last Name field has a data type of short text, so you can enter a value here. Under Last Name, type in your last name and then press Tab.
- In the First Name field, type your first name and press Tab. Continue to enter data for the E-mail address, and Student ID. You can make up data for these values. Notice how Level is a drop-down box.
- On the Home Tab, in the Views group, change the table view to Design view. Notice the Fields Names and Data Types. These are the two required attributes to add a new field.
- Close the Students table. Notice how a warning to save did not pop up. Changes to tables in Access save automatically. Double-click the Students table to open it and view the data you just entered. Then, close the table.
- From the navigation pane under Queries, double-click the Students Extended query to run it. The query opens in datasheet view and displays the query results. You should see the record you added on the Students table.
- On the Home tab, in the Views group, change the View of the table to Design View. Notice the Students table in the upper portion and the query grid with fields in the bottom section.
- Close the Students Extended table.
- From the navigation pane under Forms, double-click the Student List form to open it. Notice how it opens in Form View.
- You should see the record you added to the Students table.
- Under the first name field, to the left of (New), enter data for First Name, Last Name, and email. You can enter any data.
- On the Home Tab, in the Views group, change the View of the Form to Layout View. Notice the changes in the Object Window. Then change the view to design view and notice the changes in the Object Window. Close the Students List object.
- From the navigation pane under Reports, double-click the All Students report to run it. You should see three student records you added.
- On the Home Tab, in the Views group, change the View of the Report to Print Preview. Notice how changes to the report cannot be made in this view. Click the red X to Close Print Preview and return to Report View.
- Change the view of the report to Layout View. Notice how if a field is selected, you can move it and rearrange it within the report.
- Change the view of the report to Design view. This is also known as Developer’s view because it is the most powerful view. Anything can be modified in this view. Close the report without saving changes if prompted.
- To exit out of the database, first close any database objects that are open. It is good database practice to only have one database object open at a time. Select the File tab, and take note of where your database is saved. Then select close. Ensure your database is saved in your Access folder. Then, exit out of Access.
- Submit your entire database for grading per your instructor’s instructions.
an organized collection of facts about people, events, things, or ideas related to a specific topic or purpose
Facts about people, events, things, or ideas
data that is accurate, timely, and organized in a useful manner
processed information that is useful when making important decisions
the basic parts of a database that you create to store your data and to work with your data; includes tables, queries, forms, and reports
easy to use and understand; it is a goal to create databases that are easy to use
in a database, information that is duplicated in a manner that indicates poor database design
the person or people that use the database
a sophisticated type of database that has multiple collections of data within the file that are related to one another
a simple database file that is not related or linked to any other collections of data
Placeholders that store and display data, and can perform simple tasks like returning the page number or current date and time
a vertical group of cells in a spreadsheet, indicated by letters
a horizontal group of cells in a spreadsheet, indicated with numbers
a required field that uniquely identifies a record in a table
an association that you establish between two tables based on common fields
