Presentation Software

Learning Objectives
- Define functions of presentation graphics programs as used in business.
- Design, create, and execute an artistic presentation that includes graphics and animation.
LEARN IT


Presentation software is designed to allow the user to present information in an engaging way with text, pictures, sound, and video. It is a way to communicate ideas in a powerful, organized manner. It utilizes sequences of slides that accompany a spoken presentation. The presentation may also be recorded and posted online. The slides are consolidated in virtual files called slide decks. Communication skills are necessary for many careers. Presentation software can help to deliver a message online or in-person to a large audience or small group. The goal is to create a presentation that will leave a lasting impression on the audience, and not distract them from the message you are delivering. The ultimate goal is to create dynamic, interesting presentations that engage your audience.
Common presentation software programs:
|
Presentation Software |
Type |
Key Features |
|
Microsoft PowerPoint |
App |
Available across many platforms including mobile devices for ease of use Arguably the most commonly used presentation software in business Powerful and easy to use Integrates well with Microsoft Office |
|
Apple Keynote |
App |
Included with most Apple devices Real-time collaboration Use Apple Pencil on your iPad to create diagrams or illustrations that bring your slides to life |
|
Google Slides |
App |
Integrates with other Google Apps Unique audience Q&A feature Advanced web publishing features |
Going forward, we will focus primarily on Microsoft PowerPoint.
Since Microsoft PowerPoint is widely used in business, and we are using Microsoft Windows, we will focus on this presentation software. There are many similarities across presentation software, so the skills we are learning can be translated to other systems. Some of the tasks in PowerPoint may seem familiar because they were used in other applications. The following Practice It assignments are designed to be completed using Microsoft PowerPoint in Office 365 on a PC with Windows 10 or higher. You may need to download the Professional version of Office 365 (which is free to students) to access all features.
POWERPOINT PRACTICE 1

Prefer to watch and learn? Check out this video tutorial:
Complete the following Practice Activity and submit your completed project.
We will use PowerPoint to create a presentation that welcomes individuals to coding. We will build upon this presentation over the next 3 practice assignments. Key skills in this practice include creating and editing a new presentation, entering text, adding slides, presentation themes, bullets, adding and formatting pictures, transitions, and printing a presentation.
- Start PowerPoint and select the Design tab. Under Themes, select the Circuit theme. If the Circuit theme is not visible, use the search to locate it.
- Select File, Save As, Browse, and then navigate to your PowerPoint folder on your flash drive or other location where you save your files. Name the presentation as Yourlastname_Yourfirstname_PowerPoint_Practice_1.
- Take a moment to view the PowerPoint window:
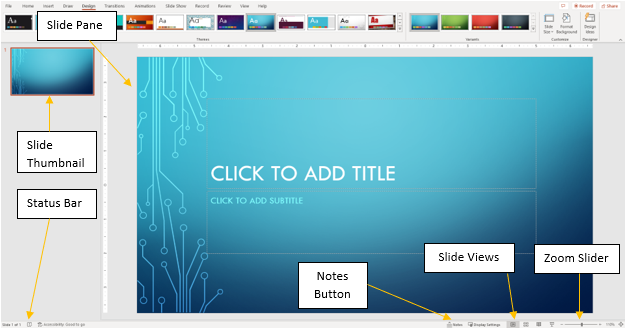
- Notice that the layout of slide 1 is Title and Content. This is a common layout for the Title Slide. All text, graphics, videos, or anything that is on a slide must be in a placeholder. In the “Click to add title placeholder,” type Welcome to Coding! In the subtitle placeholder type Introduction to Python.
- On the Design tab, in the Themes group, ensure under Variants, Blue colors are selected.
- Although we only have our title slide added, most presentations have several slides. When creating your presentation, keep in mind the attention span of your audience, and the allotted amount of time. For this presentation, we have been allotted 10 minutes and will create 5 slides.
- On the View tab, in the Presentation Views, notice that Normal view is selected. This is the most common view when creating your presentation. Other views are
- Outline View
- Slide Sorter
- Notes Pages
- Reading View
- Slide Show
- On the Home tab, in the Slides group, select the arrow next to New Slide and choose the Title and Content layout. In the “Click to add title” placeholder type: Student Life.
- With slide 2 still active, on the Home Tab, in the Slides Group, select the arrow next to Layout and select Two Content. Notice how the layout of slide 2 changed.
- In the first content placeholder on the left, type the following, pressing Enter after each line:
- Coding develops problem-solving skills
- Coding nurtures creativity
- Coding makes math more fun and engaging
- Coding promotes learning by doing
- Coding enables computational thinking
- Format the text as a bulleted list, with the default bullet. Change the font size of the text to 28.
- In the second placeholder, use the placeholder shortcut to insert a stock image. In the Insert Pictures dialog box, use the search bar and search the word Coding. Choose any picture, then return and insert it into the placeholder.
- With slide 2 still active, on the Transitions tab, select Fade.
- On the Home tab, in the Slides Group, select New Slide and choose the Title and Content layout. For the title, type: Coding Jobs. In the Content Placeholder, type the following bulleted list:
- Computer Programmer
- Web Developer
- Software Application Developer
- Computer Systems Analyst
- Computer Systems Engineer
- Front and Back End Developer
- Resize the text to 28 pt and use the default bullet.
- With slide 3 still active, on the Insert tab in the Illustration group, select the arrow next to Shapes. Under Stars and Banners add the Explosion: 8 points shape to the right of the bulleted list. Click and drag the shape onto the slide.
- Inside the shape type: All High Paying Jobs.
- On the Home tab, in the Slides Group, select New Slide and choose Blank Layout. Ensure slide 5 is active.
- On the Insert tab, in the Text Group, select the arrow under WordArt, and select Word Art in the first row, first column Fill: White, Text color 1; Shadow. Type the text: Any Questions?
- Change the font size of the WordArt to 72.
- Change the font color to orange from the standard colors.
- Select the File tab to display Backstage view. Select Print to view the Print Options. Although PowerPoint slides are meant for presentations, there is the option to print slides for the presenter and participants. Under Setting, click Print All Slides.
- Under Slides, select 6 slides Horizontal. Notice how the data and page number display on the slide in Print Preview.
- Save your presentation and take note of where it is located. There should be a total of 4 slides in your slide deck. Compare your presentation to the image below and make any modifications if needed. Close out of PowerPoint and submit your entire presentation per your instructor’s instructions.

POWERPOINT PRACTICE 2

Prefer to watch and learn? Check out this video tutorial:
Complete the following Practice Activity and submit your completed project.

We will continue to work with the PowerPoint presentation we started in PowerPoint Practice 1. You have been asked by the Dean to add additional content to the presentation regarding Computer Science courses that require coding. Key skills in this practice include how to enhance a presentation, insert and format images, manage slides, add speaker notes and animations, and apply effects.
- Start PowerPoint; notice how it opens in Backstage View. Under Open, browse to locate your PowerPoint_Practice_1, and select Open.
- Select File, Save As, Browse, and then navigate to your PowerPoint folder on your flash drive or other location where you save your files. Name the presentation as Yourlastname_Yourfirstname_PowerPoint_Practice_2.
- There should be 4 slides in your slide deck. Ensure your presentation is in normal view.
- With a slide selected, on the Home tab in the slides group, select New Slide and then Duplicate Selected Slides.
- With slide 4 active, change the title to Coding Courses.
- In the Content Placeholder, type the following bulleted list:
- Introduction to Programming I
- Introduction to Programming II
- Data Structures
- Algorithms
- Database Management Systems
- Programming Languages
- Delete the shapes from the slide.
- At the bottom of the screen, click Notes.
- Type the following Presenter Notes: Remember other courses that may not require coding.
- With slide 4 active, move slide 4 above slide 3 in the thumbnail pane making slide 4 become slide 3, and vice versa.
- With slide 3 still active, on the Insert tab, in the Pictures group, select Online Pictures. In the Insert Pictures dialog box, in the search box, type coding course and then press enter. Choose any image you like that represents technology. Insert the image of your choice under the last bullet on slide 3. If necessary, resize the picture so that it fits on the slide without overlapping with the text.
- Select the image you just added. On the Animations tab, in the animation group, select the Wheel entrance effect. Once the animation is applied, notice the number 1 appears next to the image to indicate this is the first animation that will play.
- On the Animations tab, in the advanced animation group, turn on the Animation Pane by clicking it one time. The Animation Pane will open on the right side of the screen. Click the down arrow next to the first animation, Picture 1, and select Effect Options. In the Wheel dialog box, select the Effect tab, and under Sounds choose Applause. Click the speaker icon to hear the applause and ensure your volume is turned up, but not too loud. Select OK to hear the applause sounds you just applied. Close the Animation Pane.
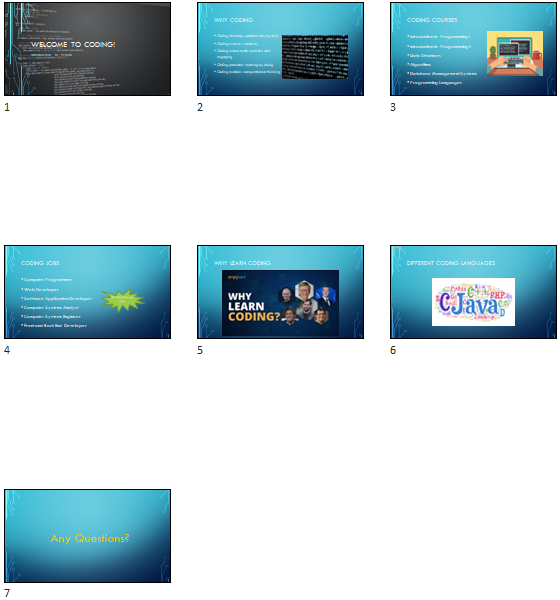
- Save your presentation and take note of where it is located. There should be a total of 5 slides in your slide deck. Compare your presentation to the image below and make any modifications if needed. Close out of PowerPoint and submit your entire presentation per your instructor’s instructions.

POWERPOINT PRACTICE 3

Prefer to watch and learn? Check out this video tutorial:
Complete the following Practice Activity and submit your completed project.

We will continue to work with the PowerPoint presentation from PowerPoint Practice 2. After submitting your presentation to the Dean, she has asked you to make a few enhancements that incorporate multimedia. Key skills in this practice include screenshots, embedding videos, recording audio, and background images.
- Start PowerPoint; notice how it opens in Backstage View. Under Open, browse to locate your PowerPoint_Practice_2, and select Open.
- Select File, Save As, Browse, and then navigate to your PowerPoint folder on your flash drive or other location where you save your files. Name the presentation as Yourlastname_Yourfirstname_PowerPoint_Practice_3.
- Select slide 4 in the thumbnail pane. With slide 4 active, on the Home Tab, in the Slides Group, select New Slide and select Layout and Content.
- There should be 5 slides in your slide deck. Ensure your presentation is in normal view and select slide 5. In the title placeholder type: Why Learn Coding?
- In the content placeholder below the title, click the icon to insert an online video. To insert an online video, you can also use the Insert tab, Media group, video, online video. It may take a few moments for the Insert Video screen to load.
- Use the Search YouTube box by typing in Why Learn Coding? and then selecting the search icon or pressing enter on your keyboard. Scroll through the videos to find the video titled Why Learn Coding? If that video is not available, you can select a different one. Double-click the video or select Insert to add the video to slide 5.
- With the video selected, on the Video Tools, Format tab, resize the video so that it has a height of approximately 5″ and a width of approximately 9.4″. Move the video so that it is centered on the slide if necessary.
- On the Playback tab, select Play to watch the video.
- Another way to add an online video to a PowerPoint slide is by embedding it. Using your web browser, navigate to www.youtube.com. In the search window, type, Why Learn Coding? Locate the video Why Learn Coding? Select the Share icon, and then select embed. Copy the embed code.
- In PowerPoint, on slide 5, select the Insert tab, Media group, Video, Online Video. In the box next to From a Video Embed Code, paste the code you copied from YouTube and then press Enter. It may take a few moments for the video to preview. If necessary, right-click on the video, and then select Preview. You can put the video in the presentation either way.
- Select slide 5 in the thumbnail pane. With slide 5 active, on the Home Tab, in the Slides Group, select New Slide and select Layout and Content.
- With slide 6 still active, on the Insert tab, in the Pictures group, select Online Pictures. In the Insert Pictures dialog box, in the search box, type: computer languages. Choose any image you like that represents technology. Insert the image of your choice. If necessary, resize the picture so that it fits on the slide without overlapping with the text.
- Select slide 6 so that it is the active slide. On the Insert tab, Media group, select the arrow under Audio and select Record Audio. Record a short audio clip (about 20 seconds) and tell me what language you would like to learn.
- After recording your audio and playing it back, name it Coding. Then, close the Record Sound audio dialog box. Notice a speaker icon displays on slide 6. Move this icon to the upper left-hand corner of slide 6. Click the speaker once to play the audio.
- On slide 6, in the Notes pane, add the following note: Remember to play the audio.
- Select slide 1 so that it is the active slide. On the Design tab, customize group, and select Format Background. Under Fill, select the button next to Picture of texture fill. Under insert picture Online Picture, search for any coding picture and select Insert. Be sure to not select Apply to All, as we only want the background image applied to the title slide.
- Close the Format Background dialog box by clicking the x in the upper right-hand corner.
- Save your presentation and take note of where it is located. There should be a total of 9 slides in your slide deck. Compare your presentation to the image below and make any modifications if needed. Close out of PowerPoint and submit your entire presentation per your instructor’s instructions.
MASTER ACTIVITY 1

Complete the following Master Activity and submit your completed project.
All about me using Google Slides

You will need to be logged into your Google account to complete this assignment. Since Google Slides is web based, it changes frequently. The steps outlined here may be slightly different from what you see on your screen. If you do not already have a Google account, you will need to create one. Go to http://google.com and in the upper right corner, click Sign In. On the Sign In screen, click Create Account. On the Create your Google Account page, complete the form, read and agree to the Terms of Service and Privacy Policy, and then click Next step. On the Welcome screen, click Get Started.
 For this assignment, we will use Google Slides to create an “All About Me” Presentation that highlights:
-
- Hobbies
- Family and pets
- Work
- Major
- 1-, 5-, and 10-year goals
- From the desktop, open your browser, navigate to http://google.com, and then sign in to your Google account. In the upper right corner of your screen, click Google apps, and then click Slides.
- Select the template gallery to browse templates. Take a moment to view General templates.
- Select the back arrow to go back to the main Slides page. Select the plus sign to start a new Blank presentation. If necessary, hit ESC on your keyboard to show the toolbar.
- In the Themes dialog box, select the Simple Dark theme.
- Name your presentation Yourlastname_Yourfirstname_PowerPoint_Master1, and save it in your Google Drive or other location as indicated by your instructor.
- With Slide 1 selected, enter your name as the title, and for the subtitle type All About Me.
- On the Slide tab, select New Slide to insert a new blank slide. Type My Hobbies as the slide title. In the textbox below, create a bulleted list with at least 5 hobbies. The bulleted list is found on the main menu, format, in Google Slides.
- On the main menu, select the plus button to add another new slide with the same layout as the previous slide.
- Type My Family and Pets for the slide title. In the textbox below the title, create a bulleted list with information on your family and pets.
- On the main menu, select the arrow next to the plus button to add a new slide with the title and two-column layout, then type My Work and Major for the title. In the textbox to the left create a bulleted list that contains at least 3 bullets about your work life. In the textbox to the right create a bulleted list that contains at least 2 bullets about your major or future career.
- On the main menu, select the arrow next to the plus button to add a new slide with the Section Title and Description layout, then type My Goals for the title, and delete the subtitle textbox. In the textbox to the right, create a numbered list with the following:
- My one-year goal is to…
- My five-year goal is to…
- My ten-year goal is to…
- Complete each sentence with your own personal goals.
- Select slide 1 so that it is the active slide. Ensure the entire slide is selected, not the textbox. On the main menu, select background. In the background dialog box, next to Image, select Choose image. Select the option for Google image search. Find an image that represents you, and add it to the background for the title slide.
- If necessary, change the text color, or move the text so that it stands out against the new background image. To change the text color, select the textbox, and on the main menu, select text color.
- Select slide 2 so that it is the active slide. On the main menu, select the Insert Image button, and select Search the Web. Search for an image that describes your hobbies, and then insert it into slide 2. If necessary resize the image by selecting it and using the resize handles.
- With the image selected, choose Animate on the main menu. Add an Object Animation to Fade in on click. Play the animation to preview it and close the Motion dialog box if necessary.
- Select slide 3 so that it is the active slide. In the empty space next to the bulleted list, add a shape from the Insert tab, then Shapes. Choose any shape to compliment slide 3, and add it to your slide. Then, add text and a fill color to the shape.
- Select slide 4 so that it is the active slide. On the Insert tab, select video, and use the YouTube search to embed a video related to your future career. Trim the video so it is 3 minutes or less. If necessary, close the Format video dialog box.
- Select slide 5 so that it is the active slide. Select the textbox with your goals listed. On the main menu, select a light blue fill color for the textbox. Then, select a darker blue Border Color, with a border weight of 8px. Ensure the solid borderline is selected.
- On the Tools tab, run spell check and make any corrections.
- In the upper right-hand corner, select the arrow next to Present, and then select Present from the beginning. Use the arrows on your keyboard to navigate each slide of the slide deck. When completed, press the ESC key on your keyboard.
- Make any final adjustments to your slide deck, and submit per your instructor’s instructions.
MASTER ACTIVITY 2

Complete the following Master Activity and submit your completed project.

In this assignment, you are working as a Clinical Educator for a local healthcare company. You have been asked to make enhancements to a presentation that will be shared with employees on how to properly wash their hands. You have been asked to make the following enhancements to the presentation:
-
- Change the slide deck theme Droplet Third Variant
- Insert and edit an online video demonstrating proper handwashing
- Add a chart
- Add speaker notes
- Add professional quality images to add visual interest to the presentation
- Add transitions and animations
- Add sources
- Correct bulleted list and fonts
- Run spelling and grammar
- From your data files, open the file Starter_PowerPoint_Master2. If necessary, enable content. In Backstage view, under File, Save As, save the database as Lastname_Firstname_PowerPoint_Master_2 in your assignment files folder.
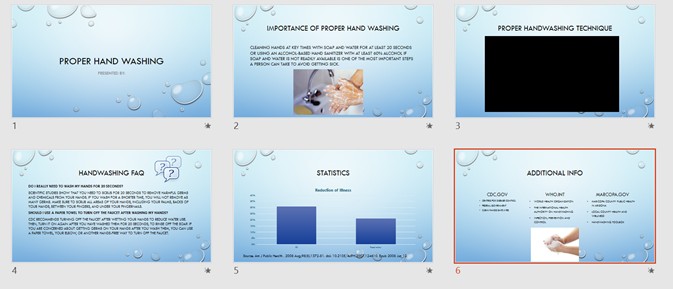
- Change the slide deck theme to Droplet, with the third color variant. The color variant should be light blue. Ensure the theme and variant are applied to all slides in the deck.
- On slide 3, ensure the hand washing video from YouTube is enabled. If not, insert an online video from YouTube from a reputable source that demonstrates the WHO proper handwashing technique.
- Format the video so that the Height is approximately 5″ and the Width is approximately 9″.
- With slide 4 active, insert a new slide with the Title and Content Layout. For the title, type Statistics. In the content placeholder below the title, select the Insert Chart icon and select Clustered Column.
- Enter the following data for the clustered column chart.
|
|
Reduction of Illness |
|
GI |
31% |
|
Respiratory |
21% |
- On slide 5, select the vertical value axis and format the axis so that the minimum bounds is 0.0 and maximum bounds is 0.4.
- Apply Quick Style 6 to the clustered column chart and delete the chart legend.
- Insert a textbox below the chart, and enter the following text: Source: Am J Public Health. 2008 Aug;98(8):1372-81. doi: 10.2105/AJPH.2007.124610. Epub 2008 Jun 12.
- On slide 5, enter the following speaker note:
This data is based on the research study, Effect of hand hygiene on infectious disease risk in the community setting: a meta-analysis, and Improvements in hand hygiene resulted in reductions in gastrointestinal illness of 31% and reductions in respiratory illness of 21%.
- Select slide 2. Delete all of the text starting with “This helps prevent…” and all of the text following it. Remove the bullet from the first paragraph that begins with “Cleaning hands at key times…” and change the font size to 24.
- Under the paragraph, insert an online picture that represents the importance of handwashing. The image selected should be professional. Resize the image and center it under the paragraph. Apply the Drop Shadow Rectangle Quick Style to the picture.
- Select slide 4. With all of the text selected, remove the bullets (do not delete the text). Insert an online picture that represents FAQ, or Frequently Asked Questions. Insert the image in the upper right-hand corner next to the title. Resize the image if necessary so that it fits to the right of the title.
- With slide 6 active, enter the following bulleted text in the textbox below CDC.gov:
- Centers for Disease Control
- Federal Government
- Clean hands save lives
- With slide 6 active, enter the following bulleted text in the textbox below WHO.INT:
- World Health Organization
- The International Health Authority on Handwashing
- Infection, Prevention and Control
- With slide 6 active, replace the text Marcopa.gov with thurstoncountywa.gov. Enter the following bulleted text in the textbox below thurstoncountywa.gov:
- Thurston County Public Health in Washington
- Local County Health and Wellness
- Handwashing Toolbox
- Ensure all text that was just added is a bulleted list and left justified.
- With slide 6 still active, insert an online picture that represents the importance of handwashing. The image selected should be professional. Resize the image and center it under the paragraph. Apply the Drop Shadow Rectangle Quick Style to the picture.
- With the picture on slide 6 selected, add the Shape Animation to the picture.
- With slide 1 active, apply the Reveal Transition to all slides in the slide deck.
- Run spelling and grammar check and make any corrections.
- View your slideshow.
- Save your presentation, and take note of where it is located. There should be a total of 6 slides in your slide deck. Compare your presentation to the image below, and make any modifications if needed. Close out of PowerPoint and submit your entire presentation per your instructor’s instructions.
MASTER ACTIVITY 3

Complete the following Master Activity and submit your completed project.
In this activity, you will create a presentation regarding your plan of study. Your presentation should include:
- 6 slides in the following order:
- A title slide with your major or plan of study
- A slide explaining why you chose this major
- A slide detailing your graduation timeline
- A slide with post-graduation plans such as University Transfer, Jobs, Certifications, etc.
- A slide highlighting your dream job
- A slide that details your biggest influencers or motivators for completing your plan of study
Your presentation should be professional and collegiate and demonstrate effective presentation strategies. It should include the following elements:

-
- Professional quality graphics
- Transitions and animations
- A theme
- A background image on the title slide
- Proper spelling and grammar
- Review your presentation slideshow view.
- Save your presentation as YourLastName_YourFirstName_PowerPoint_Master_3, and take note of where it is located. There should be a total of 6 slides in your slide deck. Close PowerPoint and submit your entire presentation per your instructor’s instructions.

Complete the following Challenge and submit your completed project.

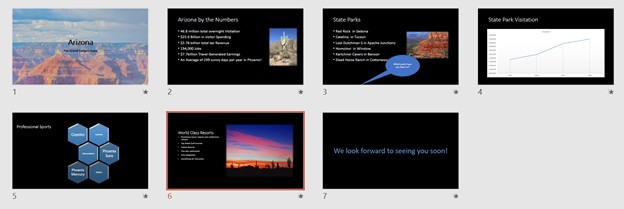
In this challenge activity, you will complete a project that incorporates many of the key skills learned in the Presentation Software unit. For this project, you are the Marketing Director for the Arizona Tourism Office. The goal of the presentation is to educate visitors on all of the wonderful things Arizona has to offer. You will create a PowerPoint Presentation with the following:
-
- Animations and transitions
- Line Graph
- SmartArt
- WordArt
- 7 Themed slides
- Graphics
- Open PowerPoint and select Blank Presentation. In Backstage View, save the presentation in your PowerPoint folder, and name it Lastname_Firstname_PowerPoint_Challenge.
- On the Title Slide, in the Title Content Placeholder, add the following text: Arizona.
- In the content placeholder under the title, add the following text: The Grand Canyon State.
- Change the Font Color to Black, Background 1. Bold all of the text.
- Add a background picture to the title slide only. The background image is found in your data files and titled PowerPoint_Challenge_Step3. Change the transparency of the background picture to 25%.
- Change the Theme to Office Theme, with the third variant.
- Using Reuse slides, add slides 2-6 from the presentation in your data files titled PowerPoint_Challenge_Step_5.
- On Slide 2, insert an online picture of a cactus. Resize and reposition the picture so that it fits to the right of the text. Apply the Soft Edge Rectangle Quick Style.
- On Slide 2, show the speaker notes. In the notes pane, add a period after 2019. And then type the following note: Retrieved online on 1/26/2021 at https://tourism.az.gov
- On slide 3, insert the picture from your data files titled PowerPoint_Challenge_Step8. Resize and reposition the image so that it fits to the right of the text. Apply the Soft Edge Rectangle Quick Style.
- On Slide 3, show the speaker notes. In the notes pane, add the following note: The Grand Canyon is also located in Arizona and is a National Park.
- On Slide 3, insert an Oval Callout shape. Resize the shape so that it has a height of about 2.1″ and a width of about 3.4″. The shape should be located in the bottom portion of the slide, it is ok if it covers a portion of the text or picture. Apply the Colored Fill—Blue, Accent 5 Shape Style. In the shape, type: Which parks have you been to? Apply the Float In animation to the shape.
- On slide 4, insert a Line with Markers Chart. Use the following data:
|
Year End |
Visitors |
|
2015 |
2,660,672 |
|
2016 |
2,788,118 |
|
2017 |
3,076,938 |
|
2018 |
3,191,415 |
- Apply Quick Style 3 to the Line Chart, and delete the Legend.
- In the speaker notes on slide 4, type the following note: Data provided by the Arizona Office of Tourism in collaboration with Northern Arizona University—The W.A. Franke College of Business.
- On slide 5, insert the alternating hexagon SmartArt. In each shape, enter one sports team per shape, in any order. Delete the Add a picture placeholder, and delete the bulleted list of sports teams. Move the SmartArt to the right of the title. Change the colors of the SmartArt to Transparent Gradient Range—Accent 1. Apply the 3-D polished Quick Style to the SmartArt.
- On slide 6, insert an online picture of a desert sunset. If necessary, resize and reposition the picture so that it fits to the right of the text. Apply the Soft Edge Rectangle Quick Style.
- After slide 6, add a new slide with the Blank Layout. Insert a Fill—Blue, Accent 1 Shadow WordArt with the words: We look forward to seeing you soon!
- Apply the Page Curl transition to all slides in the deck.
- Run spelling and grammar check and make any corrections.
- View the slideshow.
- Save your presentation, and take note of where it is located. There should be a total of 7 slides in your slide deck. Compare your presentation to the image below, and make any modifications if needed. Close out of PowerPoint and submit your entire presentation per your instructor’s instructions.