Word Processing

Learning Objectives
- Type letter text
- Apply styles and set grammar and spelling options
- Select and insert text
- Copy, cut, and paste text
- Check spelling and grammar
- Insert synonyms
- Use format painter
- Apply advanced font settings
- Create document footers
- Save documents as PDF files
- Find and replace
- Bulleted and numbered lists
- Set paragraph indents
- Modify line and paragraph spacing
LEARN IT


A word processor is software or a device that allows users to create, edit, and print documents. It enables you to write text, store it electronically, display it on a screen, modify it by entering commands and characters from the keyboard, and print it. Of all computer applications, word processing is the most common.

Word processing has evolved into much more than words typed on a piece of paper. It is a means to communicate with others and create content for websites, graphic design, blogs, and publications of all types.
Modern word processing software and applications are integrated into the cloud. If you save your documents to your cloud-based storage, you can retrieve them from any device and continue to work with and share your documents.
Common Word Processing Software:
- Microsoft Word
- WordPerfect
- Google Docs
- Office 365
- Apple Pages
Since Microsoft Word is widely used in industry, and we are using Microsoft Windows, we will focus on Word going forward. There are many similarities across word processing software, so the skills we are learning can be translated to other software and apps. The following “Practice It” assignments are designed to be completed using Microsoft Word in Office 365 on a PC with Windows 10 or higher.
WORD PRACTICE 1

Prefer to watch and learn? Check out this video tutorial:
Complete the following Practice Activity and submit your completed project.
For our first assignment in Word, we will create a flyer to be printed or posted online. The flyer will advertise a volunteer opportunity for Health Sciences students at Paradise Valley Community College. Key skills in this practice are inserting text, pictures, and textboxes and formatting text and footers.
- Start Word. Click Blank Document.
- Show formatting marks by navigating to the Home Tab, Paragraph Group, and selecting the Show/Hide icon. This is a Toggle Button. This means it has two modes, on and off. To turn it on, click it once; to turn it off, click it again.
- Show the ruler by navigating to the View tab, Show Group, and selecting the Ruler checkbox. A checkbox is a type of input control. A checkbox value is only included in the submitted data if the checkbox is currently checked. In other words, when the box is checked, the value is included.
- Navigate to the File Tab to enter Backstage View. In Backstage View, select File, then Save As. Click the Browse button. In the Save As dialog box, navigate to your flash drive and Word folder. In the Name field, type Yourlastname_Yourfirstname_Word_Practice_1 as the file name, and then save.
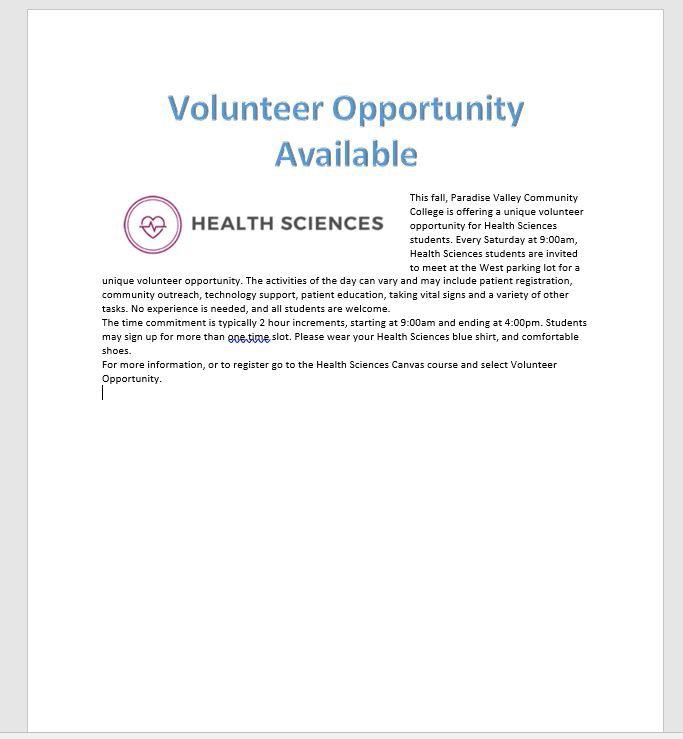
- Type Volunteer Opportunity Available and press Enter twice.
- Type the following text: This fall, Paradise Valley Community College is offering a unique volunteer opportunity for Health Sciences students. Press spacebar.
- Navigate to the Insert Tab, Text Group, and choose the Object arrow. Then choose Text from File. In the Insert File dialog box, browse to your Word data files folder. Select the file Text_Word_Practice1. The text will automatically update your document.
- Select all of the text in the document. On the Home Tab, Font Group, ensure the Font is Calibri and Font size is 11.
- Select the title Volunteer Opportunity Available, including the paragraph mark. On the Home Tab, Font Group, select the arrow next to Text Effects and Topography. In the third row, third column, apply the Fill: Blue, Accent color 5; Outline: White, Background color 1; Hard Shadow: Blue, color 5 text effect.
- With the title still selected, change the font size to 36.
- On the Home Tab, Paragraph Group, choose Center to align the title centered on the page.
- On the Home Tab, Font Group, change the font color to Blue, Accent 1 for the title.
- With the title still selected, on the Home Tab, in the Font Group, choose the arrow next to the Text Effect and Typography icon. Apply a Shadow and under Inner, click Inside: Right text effect.
- Position the insertion point at the beginning of the paragraph that begins with This Fall.
- On the Insert tab, Illustrations group, choose Pictures. Navigate to your data files folder and choose the HSPicture_Word_Practice1 image.
- Be sure the picture is selected, and apply the Square text wrapping option.
- Using the sizing handle at the lower right-hand corner of the picture, drag up and to the left until the bottom of the graphic is aligned at approximately 3.5 inches on the vertical ruler.
- Click Undo to return the picture to its original size. The Undo icon is located in the Quick Access Toolbar in the upper left-hand corner.
- On the Picture Tools, Format Tab, in the size group, change the shape width to 4″.
- On the Quick Access Toolbar, click the Save icon. Then, compare your document to the image below.
Note: You may want to toggle Show/Hide to off so that you can see how the document will look when printed or posted online.
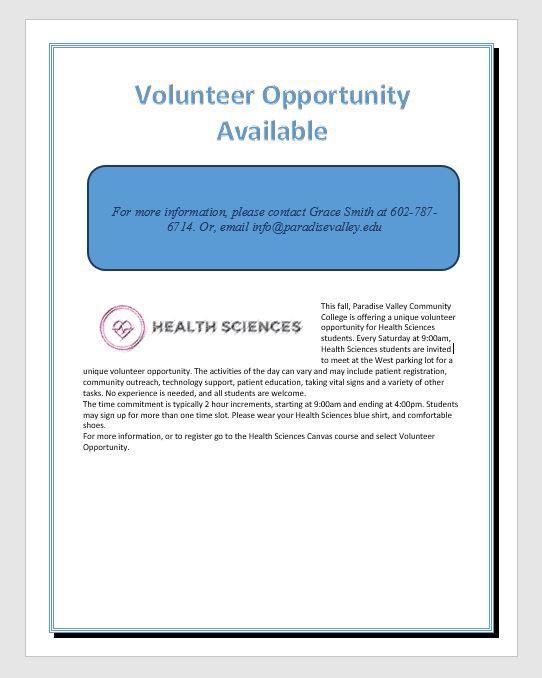
- Ensure the picture is still selected. Display the Layout dialog box by selecting the Layout Options shortcut menu, then choose See more. In the Layout dialog box for the picture, make sure the Position Tab is selected.
- Set the horizontal alignment to Left, relative to Margin.
- Set the vertical alignment to Top, relative to Line. Select OK to close the dialog box.
- With the picture selected, apply the Soft Edges 10 Point picture effect. This is on the Picture Tools Format Tab, Picture Styles group, under Picture Effects, Soft Edges.
- With the picture selected, on the Picture Tools, Format tab, in the Adjust Group choose the Artistic Effects arrow. Apply the Pastels Smooth artistic effect. Deselect the picture.
- On the Design Tab, in the Page Background Group, select Page Borders. Add a page border selecting
- Shadow setting
- Triple Lines style
- Blue, Accent 1 color
- Whole document
- Position the insertion pointer at the blank paragraph below the title and press Enter four times.
- On the Insert Tab, in the Illustrations Group, choose Shapes. Insert a Rounded Rectangle shape at the left margin at approximately 1.5 inches on the vertical ruler. Click once to insert a 1-inch-by-1-inch Rounded Rectangle, or use the drag-and-drop feature.
- On the Drawing Tools, Format Tab in the Size Group, change the shape height to approximately 1.8 and the shape width to 6.4.
- Select the Rectangle shape and type the following text: For more information, please contact Grace Smith at 602-787-6714. Or, email info@paradisevalley.edu
- Italicize the text, change the font to Calibri, and increase the font size to 16.
- With the text still selected, explore the mini-toolbar by clicking the Font Color button arrow, and under Theme Colors, click on Blue, Accent 5, Darker 50%.
- With the shape still selected, go to the Drawing Tools, Format Toolbar, the Shape Styles Group. Select the arrow next to Shape Outline and under Theme Colors, click on Blue, Accent 5, Darker 50%. Change the weight to 3 pt.
Compare your document to the image below.
Note: It is OK if your document does not look exactly like the screenshot below. This is your first attempt at practicing a new skill. You will have the opportunity to make final adjustments, using the skills you learned, at the end of this practice.
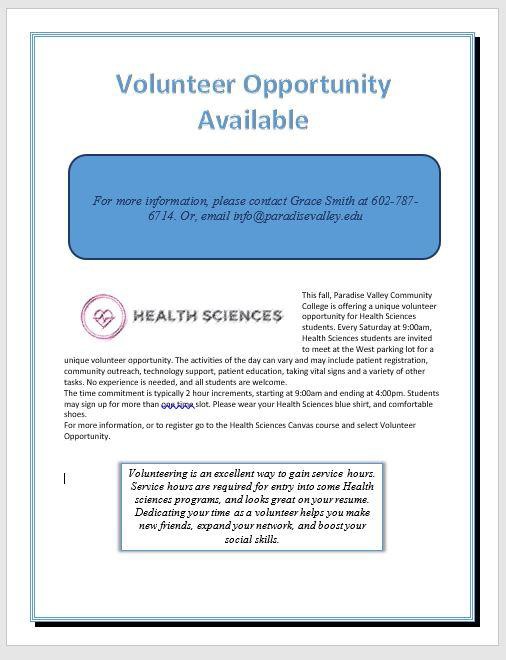
- Using the keyboard shortcut CTRL+END, navigate to the end of your document. If your keyboard does not have these keys, click to put your insertion point after the period after opportunity. Hit enter 3 times.
- Your insertion point should be approximately at the 7″ mark on the horizontal ruler. On the Insert Tab, in the text group, click the arrow next to the textbox and draw a textbox at approximately the 1″ mark on the vertical ruler. Draw a textbox by dragging down to create a textbox that is approximately 1.5 inches high by 4.5 inches wide. Type the following in the textbox: Volunteering is an excellent way to gain service hours. Service hours are required for entry into some Health Sciences programs, and it looks great on your resume. Dedicating your time as a volunteer helps you make new friends, expand your network, and boost your social skills.
- Select and drag the textbox, by clicking and holding on the outer edge, until the horizontal green alignment guide displays above the first blank paragraph mark and the vertical green alignment guide displays in the center of the page. To be more precise,
- In the Layout dialog box on the Position Tab for the textbox set the horizontal alignment to Centered, relative to Margin.
- Set the Vertical alignment by typing .75 in the Absolute position box and selecting Below Paragraph.
- On the Size Tab, type 1.5 in the Absolute Height box and 4.5 in the Absolute Width box. Then click OK.
Note: For a reminder on how to set up the precise layout, review the steps above.
- With the textbox still selected, on the Drawing Tools, Format Tab, in the Shape Styles group, Apply the Colored Outline—Blue, Accent 1 shape style.
- Under Shape Effects, apply the Offset Center outer shadow shape effect to the textbox.
- Select the text in the textbox, change the font size to 14 italics, and center the text.
- Save the document. Compare your document to the image below.
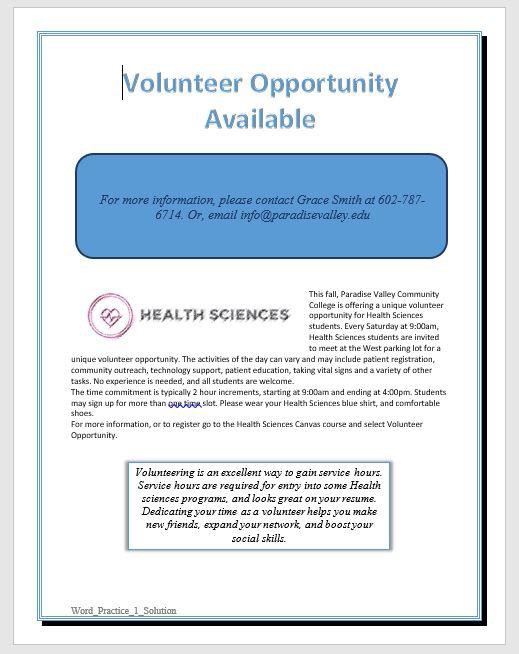
- On the Insert Tab, in the Header & Footer Group, choose Edit Footer. On the Header & Footer Design Toolbar, in the Insert Group, choose Document Info. Use Document Info to insert the file name in the footer. Select the File Name Field. The File Name should display in the lower right-hand footer of the document. Do not type it in; rather use the Document Info Field.
- In Backstage view, click on Show All Properties, and type the following:
- In the Tags box: trainee, flyer, internship
- In the Subject box: your course name and section number
- In the Author box: your first and last name
- Turn off formatting marks. As a reminder, formatting marks are on the Home Tab, Paragraph Group.
- Take a moment to compare your document to the image below and make any modifications based on what you have learned.
- Using Find and Replace (Home tab, Editing, Replace), change all instances of PVCC and Paradise Valley to SPSCC or South Puget Sound.
- Zoom in to view the document in a larger size. Zoom is located in the lower right-hand corner of the Word window.
- Save again, and ensure you have your file saved in a safe location. Take note of that location because you will need to find your file to upload it for grading.
- Submit the file for grading per your instructor’s instructions.
WORD PRACTICE 2

Prefer to watch and learn? Check out this video tutorial:
Complete the following Practice Activity and submit your completed project.

For Word Practice 2, we will use Word to create a document to inform potential applicants of a trainee program at South Puget Sound Community College’s Fine Arts Division. Key skills in this practice are creating lists, tab stops, and SmartArt.
- Start Word and open Starter_Word_Practice2 from your Data files folder. Save the file as Yourlastname_Yourfirstname_Word_Practice_2 in your Word folder. Show the formatting marks and turn on the ruler.
- On the Layout Tab, in the Page Setup Group, Choose the arrow under Margins. Choose Custom Margins. In the Page Setup Dialog Box, change the left and right margins to 1″.
- On the Insert Tab, in the Header and Footer group, choose Footer, then Edit Footer. In the Header and Footer Toolbar, Design Tab, in the Insert Group, choose the arrow under Document Info. Add the file name to the footer.
Note: Another way to get to the Footer is to double-click in the lower margin portion of the document. To exit the footer, double-click anywhere above the footer or below the header. It is preferable to find white space to click in.
- Starting at the top of your document, select all the text in the document. On the Home Tab, in the Paragraph group, select Align left.
- Move your insertion point to the top of the document.
- Select the title only: SPSCC (change PVCC to SPSCC if necessary) Fine Arts Division. Using the mini-toolbar, change the font size of the title text to 36.
- Using the technique you just learned, change the font of the second paragraph “Trainee Program” to 24.
- Select the first two paragraphs, and center align them. Compare the first page in your document to the screenshot below.
Note: Another way to select the two paragraphs is to use the CTRL key on your keyboard. This is especially helpful when the sections are nonadjacent.
- Select the entire document. On the Home Tab, Paragraph group, select the arrow next to Line and Paragraph Spacing. Change the line spacing for the entire document to 1.5 and save the document.
- Set the indentation for the paragraph that begins, “Our trainee program’s primary…” to First Line Indent. This is done by launching the Paragraph dialog box on the Home Tab. In the Paragraph dialog box, on the Indents and Spacing Tab, under Indentation, set the Special Box to First Line by .5″. Click OK. Notice on the ruler, a marker has been set at the .5″ mark.
- In the next paragraph, which begins, “As a trainee,” drag the First Line Indent marker to the 0.5 mark on the Horizontal ruler.
- Using either method, apply a first line indent of .5″ to the paragraph beginning with “Here is a partial…”
- Select the entire document. Launch the Paragraph dialog box on the Home Tab. In the Paragraph dialog box, on the Indents and Spacing Tab, change the After Paragraph Spacing for the entire document to 6 pt. Click OK.
- Select the two subheadings, “Requirements” and “Upcoming Trainee Programs” and change the Before Paragraph Spacing for the selection to 12 pt. To select two nonadjacent headings, use the CTRL key on your keyboard. Select the first heading, hold down the CTRL key, and then select the second heading.
- Select the paragraph starting with Educational and the next 2 paragraphs and apply bullets. Bullets are located on the Home Tab, Paragraph Group, Bullets. Choose the first bullet option.
- Select the three trainee positions and apply bullets. Use the same bullet style that you applied in the previous step.
- Apply the same bullets to all four paragraphs that have October meeting dates.
- Position the insertion point at the end of the paragraph starting with “Our requirements” following the colon and press Enter one time.
- If necessary, on the ruler, drag the first line indent marker to the left so that it is positioned directly above the lower button and type the following lines:
- “Be enrolled in an accredited video program,” and press Enter.
- “Be available during the entire production process,” and press Enter.
- “Submit three faculty letters of recommendation.”
- Select and format all three lines as a bulleted list.
- Select all four of the October meetings. Use the mini-toolbar and select the check mark symbol as a bullet.
- Use Format Painter and change the bullets for the two bulleted lists on Page 1. The Format Painter is on the Home Tab, Clipboard group. To use the format painter, select the area first. Then, click the format painter icon once to activate it. Then, select the area that you would like to “paint.” This will apply the format you originally selected.
Note: If you double-click the format painter, it will “hold” the format so that it can be applied to multiple selections.
- Select the bulleted list of October meeting dates on Page 2.
- Ensure the tab indicator to the left of the horizontal rule is set to Left Tab. You can verify this by hovering your mouse over the tab indicator. If you click once, it will change the indicator.
- Using the horizontal ruler, set a left tab at the 4-inch mark. The Left Tab is set by clicking once on the 4-inch mark on the horizontal ruler. You will see the Left Tab indicator show up on the ruler.
- Drag the new tab marker at 4 inches to 4.5 inches on the Horizontal ruler, and then double-click it to launch the Tabs Dialog Box.
Note: If the Tabs Dialog box does not display, launch the Paragraph Dialog Box, then click Tabs.
- In the Tabs Dialog Box, ensure the 4.5″ tab stop is highlighted. Change alignment to Left.
- In the Tab Stop Position, replace the 4.5 with 3.5.
- Select the 3 leader option. Select set.
- Clear the 4.5″ tab stop position by selecting it, then clicking Clear. Repeat this process with all tab stops until the only one displayed is the 3.5″. Select OK to close the Tabs Dialog Box. Compare your bulleted, leader list to the image below.

- In the bulleted list with dot leaders, position the insertion point at the end of the line starting with Filming and ending with Studio A. Enter a new blank bullet item, type Set Creation Press Tab, and type October 11, 7:00 p.m., Cafeteria. Save your work.
- At the top of the document, move the insertion point to the blank space above “Trainee Program” and hit enter one time.
- On the Insert Tab, Illustrations group, insert a Circle Process SmartArt graphic. This is under the Process grouping.
- In the first blue circle of the SmartArt graphic, type Apply.
- In the placeholder in the middle row, type Interview. Notice how the SmartArt shape automatically resizes the text you enter for the best fit.
- In the third circle, type Learn.
- Click the outer border of the SmartArt to ensure the entire graphic is selected.
- On the SmartArt Toolbar, Format Tab, Size group, change the SmartArt height to 2 and the width to 6.5.
- With the SmartArt still selected, on the Smart Art Toolbar, Design Tab, in the SmartArt Styles Group, change the color to Colorful—Accent Colors.
- Ensure the SmartArt is still selected, on the SmartArt Toolbar, Design Tab, in the SmartArt Styles Group Apply the 3D Cartoon SmartArt style.
- Scroll to the end of the document, or use the shortcut keys CTRL+END. Press Enter and drag the first line indent back to the left margin.
- On the Insert Tab, Media Group, choose Online Video.
- In the Search Box next to YouTube, type “PVCC Fine Arts” to search for a video to embed. Select the video, and then click Insert. If you do not have the YouTube search box, you can find PVCC Fine Arts on YouTube by following this link: https://www.youtube.com, and searching for PVCC Fine Arts.
- With the embedded video selected, on the Picture Tools, Format Tab, in the Size group, change the Height and Width of the picture to 2″.
- On the Home Tab, Paragraph Group, Center the video icon.
- Save your document, and compare it to the screenshot below.
- Submit the file for grading per your instructor’s instructions.
WORD PRACTICE 3

Prefer to watch and learn? Check out this video tutorial:
Complete the following Practice Activity and submit your completed project.

For Word Practice 3, we will use Word to create a resume that will be used to apply for a Help Desk position at the SPSCC Help Desk. Key skills in this practice are creating and modifying tables and sharing documents online.
- Launch Microsoft Word. Click Blank Document.
- Show formatting marks and show the ruler.
- Save the document as Yourlastname_Yourfirstname_Word_Practice_3 in your Word Folder.
- On the Insert Tab, in the Header and Footer group, Choose Footer, then Edit Footer. In the Header and Footer Toolbar, Design Tab, in the Insert Group, choose the arrow under Document Info. Add the file name to the footer. Exit the footer.
- At the top of your document, Insert a 2 X 4 table. To insert a table, navigate to the Insert Tab, Tables Group, and drag your cursor in the grid to create a table with two columns and four rows.
- Beginning with the first cell in the table, type each of the following, pressing Tab at the end of each item:
- PROFESSIONAL OBJECTIVE [Press Tab]
- Desire a Help Desk Assistant position where I can use my expertise in providing desktop and application support to users. [Press Tab]
- QUALIFICATIONS [Press Tab]
- A results-oriented help desk specialist experienced in providing in-depth customer support. [Press Enter]
- Demonstrated ability in diagnosing problems. [Press Enter]
- Extensive end-user training experience. [Press Enter]
- Capable of working with a diverse customer base. [Press Enter]
- Experienced in different operating systems and applications. [Press Tab]
- In the third row, type WORK EXPERIENCE and press Tab.
- Using the Insert Text from File function, insert the text from Text_Word_Practice3.
Check to see if the Resume Assistant displays on the Review tab. If not, go to the next step. If so, click Resume Assistant and add the role Help Desk Assistant, add the technology industry, and then click a related service. Scroll down to view more resumes, interesting articles and a link to get started on LinkedIn. Close the Resume Assistant.
- Remove the blank line at the end of the inserted text.
- In the fourth row, in the column to the left, type EDUCATION AND CERTIFICATIONS and press Tab.
- Type the following, pressing Enter at the end of each line except the last one:
- University of Youngstown, Youngstown, OH
- Bachelor of Science degree in Computing, 2020
- Microsoft Certified Solutions Expert (MCSE)
- CompTIA A+
- CompTIA Network+
- CompTIA Security+

- Select all the text in the cell to the right of QUALIFICATIONS, apply bullets, and decrease the indent. The bullets and decrease indent are located on the Home Tab, Paragraph Group.
- Use the Format Painter to copy the bullets and decrease the indent to the description of the work experience.
- In the text next to EDUCATION AND CERTIFICATIONS, apply bullets to the list. Increase the indent for the Bachelor of Science Degree.
- Drag the table vertical border between the two columns until the white arrow is at approximately 1.5 inches on the horizontal ruler.
- Select the text in the first column. Ensure all of the text in the first column is left aligned.
- On Table Tools, Layout Tab, Cell Size group, using the Width box down spin arrow, set the column width to 1.4 for the first column.
- Click Auto-fit and select Auto-fit Window.
- Use the one-click Row/Column insertion button to insert a new row above EDUCATION AND CERTIFICATIONS.
- In the left cell of the new row, type TECHNICAL SKILLS and press Tab. If necessary, turn off the bullets.
- In the second column, type the following, pressing Enter at the end of each line, except the last one:
- Platforms: Windows 10, MacOS, Unix
- Applications: Microsoft Office 365, Norton/McAfee Anti-Virus, Norton Internet Security, Photoshop
- Strong knowledge of LAN and WAN technologies
- Solid knowledge of Oracle Help Desk system
- In the top row of the table change the top and bottom cell margins to 0.04. Cell margins are on the Table Tools Layout Tab, Alignment Group. Remove any extra spaces or lines in the first row of the table.
- At the top of the document, insert a row above the first row. On the Table Tools Layout Tab, in the Rows & Columns Group, choose Insert Above.
- Select the entire first row that you just added. On the Table Tools Layout Tab, Merge the two cells in the top row.
- In the first row of the table type:
- Matt Smith [Press Enter]
- (867) 555-1012 [Press Enter]
- 1254 Success Way Phoenix AZ 85320 [Press Enter]
- msmith@pacifica.net[Press Tab]
Note: Pressing Tab would move to the next cell, whereas pressing CTRL + Tab moves within the cell.
- Select Matt Smith and use the mini-toolbar to bold and italic and change the font size to 14.
- Select all of the text in the first row, and set Spacing Before and After to 0 pt. Remove any extra line spacing.
- With all of the text still selected in the first row, center all of the text.
- Beginning in the second row, italicize and bold all of the headings in the left-hand column.
- In the cell to the right of WORK EXPERIENCE, italicize and bold the job title “Help Desk Technician.”
- In the cell to the right of EDUCATION AND CERTIFICATIONS, bold University of Youngstown. Change the Spacing After to 12 pt. for the line beginning with Bachelor.
- In the cell to the right of WORK EXPERIENCE, select Help Desk Technician and set the spacing to 12 pt. after.
- Select the entire table and remove all the borders. There are a few ways to do this:
- Click the crosshair indicator in the upper left-hand corner of the table
- Start at the top of the table and click and drag to select the entire table
- Use the shortcut key CTRL + A
- On the Table Tools, Design Tab, in the Border Group, select No Border.
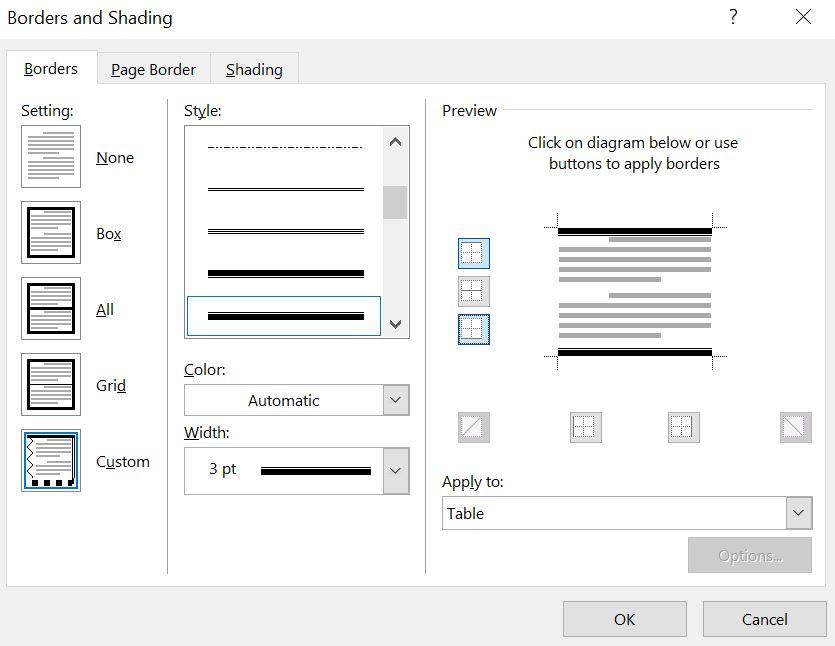
- With the table still selected, in the Table Tools, Design Tab, in the Border Group, select Borders and Shading. In the Borders and Shading dialog box, apply the thick upper line and thin lower line table style to the top of the table and the thin upper line and thick lower line to the bottom of the table.
- In the line beginning with Matt Smith, change the Spacing Before to 12 pt.
- In Backstage View, display the print preview under Print. If necessary, exit Backstage View and make modifications. Compare your documents to the image below.
- In Backstage View, under Info, show advanced properties and type in the keywords box “resume.”
- Type your course name and section number in the Subject box and be sure your name is in the Author box.
Note: For this activity, you will have to use a second account or work with a partner who is available to view your presentation.
- In Backstage View, click Share, Present Online.
- Share the document using Present Online. Select one of the two methods for using the link or sending the link to your partner or instructor.
- Click Start Presentation, and when you are finished, end the presentation. Save the document and before closing Word, verify where your document is saved. Close Word.
- Submit the file for grading per your instructor’s instructions.
WORD PRACTICE 4

Prefer to watch and learn? Check out this video tutorial:
Complete the following Practice Activity and submit your completed project.

For Word Practice 4, we will use Word to create a cover letter to accompany your resume that you created in Word Practice 3. Key skills in this practice are creating a letterhead, finding and replacing text, drag and drop, table styles, and editing and checking your document.
- Start Word and display a new blank document. Display the formatting marks and rulers.
- Save the file as Yourlastname_Yourfirstname_Word_Practice_4 in your Word folder.
Note: On the Design Tab, in the Document Formatting group, you will see Styles. Click the down arrow to view the Default and No Paragraph style and examine the screen tips. Leave the Default style set.
- Type the following, pressing Enter once after each line.
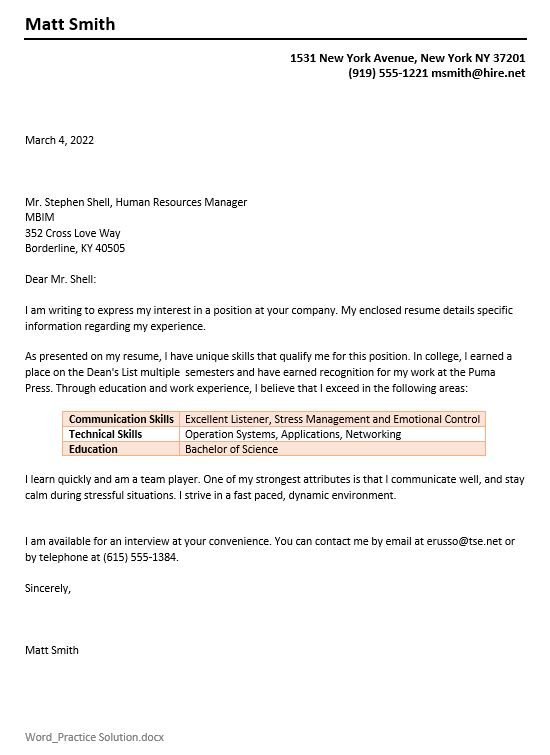
Matt Smith
1531 New York Avenue, New York, NY 37201
(919) 555-1221 msmith@hire.net
Note: If the email address automatically converts to a hyperlink, remove it by right-clicking and selecting Remove Hyperlink.
- Select the name Matt Smith and change the font to 18 and apply bold.
- Select the second and third paragraphs that contain the address and contact information. Change the font to 12, apply bold, and Align right.
- With the second and third paragraphs selected, change the line spacing options to single, and check the box to not add a space between paragraphs of the same style.
- Click in the first paragraph with the name, and insert a solid 2 ¼ pt. single line border below the paragraph. To launch the borders and shading dialog box, go to the Home tab, Paragraph group, click the arrow next to the borders icon, and launch borders and shading at the bottom of the list.
- Using Document Info, add the file name to the footer.
- Move the insertion point to the blank line below the letterhead and press Enter three times. Ensure the alignment is set to align left.
- Using Insert Date & Time, insert the date using the third date format and press Enter four times. Insert Date & Time is located under the Insert tab, Text Group, Date & Time.
- Type the following address, pressing Enter after each line, except the last line:
Mr. Stephen Shell, Human Resources Manager
MBIM
352 Crosslove Way
Borderline, KY 40505
- Press Enter two times.
- Right-click on the word Borderline. Choose the first option to correct the word to Borderline.
- Select the entire inside address. Change the Spacing After for the inside address to 0, and remove the space before and after the paragraph if necessary.
- Type Dear Mr. Shell: and press Enter two times.
- Type exactly as shown:
I am writing to express my interest in a position at your company. My enclosed resume details specific information regarding my background.
- Press Enter two times.
- Using the Text From File command, insert the text from the Text_Word_Practice_4 file.
- Press Enter one time and type:
Sincerely, [press Enter four times]
Matt Smith
 Note: If you were going to print and deliver the resume and cover letter, you would want to type “Enclosure” below your signature.
- Select the text beginning with the date and through the end of the document and change the spacing after to 0.
- Position the insertion point at the beginning of the document. On the Home Tab, in the Editing Group, choose Find. The Navigation Pane will open on the left-hand side.
- In the search document box, type “background” and hit Enter. Notice how this word is now highlighted in your document, and a preview displays below in results.
- Click the arrow next to the search document box, and click replace. The Find and Replace dialog box will appear. In the “Replace with” box, type “experience.” Replace the first instance, and then close the dialog box.
- In the paragraph that begins “As shown on,” select and drag the word skills to the right of the word unique. Use the drag-and-drop technique by selecting the text, holding down the mouse or cursor, and moving the text to the new location.
- In the paragraph that begins with “You can contact,” drag the first sentence to the end of the paragraph. Use the drag-and-drop technique by selecting the text, holding down the mouse or cursor, and moving the text to the new location.
- Position the insertion point in the blank paragraph above the paragraph beginning with “You can contact me.”
- On the Insert tab, tables group, Insert a 2 x 3 table.
- In the first cell of the table, type Communication Skills.
- Complete the table using the following information:
|
Communication Skills |
Excellent Listener, Stress Management and Emotion Control |
|
Technical Skills |
Operating Systems, Applications, Networking |
|
Education |
Bachelor of Science |
- Ensure the table is selected. To autofit the contents of the table, on the Table Tools Layout tab, in the cell size group choose Autofit, contents.
- On the Table Tools Design tab, on the Table Styles group, apply the Grid Table 4—Accent 2 table style. Ensure the Header Row checkbox is not checked.
- Center the table between margins.
- On the Review tab, in the Proofing group, choose Spelling & Grammar.
- Beginning at the top of the document, perform a spelling and grammar check, correcting all errors. Ignore spelling errors related to names. Delete any repeated words.
- In the paragraph that begins “As shown on,” use the Thesaurus to change shown to presented. Select the word shown, right-click, and select synonyms. If the word presented does not display, launch the thesaurus for other options.
- Save your document and display Backstage view.
- In Backstage view, show all properties. Type cover letter in the Keywords box, your course name and section number in the Subject box, and be sure your name is shown in the Author box.
- View the Print Preview in Backstage View. The document should fit on one page. If not, make adjustments to ensure your cover letter is one page. Compare your document to the image below.
- Submit the file for grading per your instructor’s instructions.
WORD PRACTICE 5

Prefer to watch and learn? Check out this video tutorial:
Complete the following Practice Activity and submit your completed project.

For Word Practice 5, we will use Word to create a research paper. Key skills in this practice are formatting a research paper, footnotes and endnotes, citations and bibliographies, and advanced properties.
- Start Word, and open the file Starter_Word_Practice5 from your data files folder on your flash drive. Save the document as Yourlastname_Yourfirstname_Word_Practice_5 in your Word Folder.
- Select all of the text in the document. For the entire document, change the line spacing to 1.5 and the Spacing After to 0 pt.
- Create a blank paragraph at the top of the document. After placing the insertion point in the blank paragraph, type the following, pressing Enter at the end of each line except the last:
- Emily Sophia
- Dr. Michelle Carter
- HTM Research Capstone
- April 20, 2020
- Technology and Your Health
- Center the text in the last typed line: Technology and Your Health.
- On the Insert Tab, Header & Footer group, select Header, then Edit Header. In the Header on the first page, type Sophia and then spacebar.
- On the Header & Footer toolbar, Design tab, in the Header & Footer Group, choose Page Number. Add a Simple Plain Number page number in the current position and right-align the header.
- Select all the text beginning with “The Idea of” to the end of the document. With the text selected, on the Home Tab, Paragraph Group, click the arrow next to the Line and Paragraph Spacing icon and choose Line Spacing Options. Under Indentation, apply the First line indent. Confirm that the By: box is set for 0.5″. Click OK. Deselect the text and notice how the first line of every paragraph is indented by half an inch.
- On the Insert Tab, Header & Footer group, Edit the Footer. Use Document Info to add the filename to the footer. Double-click in the white space in the document to exit from the Footer view.
- In the paragraph that begins with “Self-quantifying,” position the cursor in the second line of the paragraph to the right of the period after “self-trackers” on page 2.
- On the References Tab, Footnotes group, choose Insert Footnote. Notice how the insertion point moves to the bottom of the page, and a “1” is inserted. To add the footnote, type “The Department of Health & Human Services is researching methods to improve healthcare.” A footnote indicator was automatically added to self-trackers[1].
- Select the entire text of the footnote at the bottom of the page, including the “1.” Right-click within the gray highlighted area, and choose Style. Choose Modify to modify the current style. Modify the style of the footnote at the bottom of Page 2 by
- Changing the font size to 9
- On the bottom left side under Format, choose Paragraph. Set the First Line indentation to .05″
- Select Double line spacing
- To apply your changes and back out of these screens, select, OK, OK, and Apply.
- On the References Tab, in the Citations & Bibliography group, in the Style Window, set the bibliography style to MLA 7th Edition.
- Position the insertion point to the right of the period at the end of the paragraph that begins “To see how” on Page 2. To add a citation, go to the References Tab, Citations & Bibliography group, and choose Insert Citation, Add a new Source. Add the following book citation:
- Author: Henderson, Robert
- Title: Living with Technology
- Year: 2016
- City: Chicago
- Publisher: Grant Publishing
- Medium: Print
- Click OK to add the citation. Notice how an in-text citation automatically populated at the end of the paragraph.
- Select the in-text citation, and right-click and choose Edit Citation. Edit the citation by typing 4 in the Pages box.
- Type a period to the right of the citation and delete the period to the left of the citation.
- On Page 2, at the end of the paragraph that begins “He found that drinking,” position the insertion point after the letter e in ignore and to the left of the period and add the following book citation:
- Author: Johnson, Ralph A. and Mary Martin
- Title: Impact of Technology on Mental Health
- Year: 2015
- City: New York
- Publisher: The IT Press
- Medium: Print
- Edit the citation by typing 25 in the Pages box.
- At the end of the next paragraph that begins “Many of the 250,” position the insertion point after the letter e in balance and to the left of the period and add the following website citation:
- Author: Jones, B. E.
- Name of Web Page: NIH 2014-April Brief
- Year: 2017
- Month: April
- Day: 29
- Year Accessed: 2018
- Month Accessed: May
- Day Accessed: 15
- Medium: Web
- At the end of the document, insert a manual page break. On the Layout tab, Page Setup Group, choose Page Breaks, Page.
- On the new blank page, set the paragraph indentation to None.
- On the References Tab, Citations & Bibliography Group, choose the arrow next to Bibliography and select the text Insert Bibliography.
- Above the first line of the bibliography (you may need to hit Enter to create space for the title), type Bibliography.
- Select the title Bibliography. Change the font to Arial Black, the font size to 14, the font color to Black, Text 1, and then center the text.
- Select the three references but not the blank paragraph and change the paragraph line spacing to 2.0 and the spacing before and after to 0 pt. Select OK.
- On the References Tab, in the Citations & Bibliography group, select Manage Sources to launch the Source Manager. Using the Source Manager, in the Master List, change the H in Henderson to B. Click Yes to any messages that populate, then click OK.
- Select the three sources under Bibliography. Right-click in the gray box, and choose Update Field. Notice this updates the citations and bibliography to reflect this change.
- In Backstage View, add the following document properties:
- Document title: Technology and Health
- Keywords: technology, research paper
- Comments: Draft of class report
- Subject box: your course name and section number
- Company: SPSCC HTS Program
- Manager box: Dr. Michelle Carter
- Author: your first name and last name
Note: Use the Summary tab on the Advanced Properties dialog box, to display the document properties and the Statistics tab to show document statistics.
- Select Quantified Self on page 1, fourth paragraph, and click Smart Lookup on the Review Tab. If necessary, click Got It, and show any additional information source. Choose one or two sites to view, and then close the Smart Lookup Pane.
- Move to the top of the document and display the document in Read Mode by going to the View tab, in the View Group choose Read Mode.
- Click Tools from the upper left corner. Click Find and in the search box type Benderson. Notice how the results display in the Navigation Pane and are also highlighted in the text of the document.
- Click View in the upper left-hand corner.
Click Edit Document to return to Print Layout view. Close the Navigation Pane if necessary.
- Take a moment to Save your file, and ensure you know the location where it is stored. Most likely this is in your Word Folder on your flash drive.
- In Backstage View, select Save As Adobe PDF, then Save. Your file location should default to the same location. If not, make note of where your file is being saved. It may take a few minutes to convert your document to a PDF. View your file once it is converted, and then close it.
- Using Windows Explorer, open a new folder and navigate to where your PDF file is saved. Do not open your file. Instead, right-click on the file icon, choose Open with, Word 2016. The PDF file will start to convert back to Word. Click OK. Take note of any changes that might have occurred during the file conversion process.
- Submit the file for grading per your instructor’s instructions. Be sure to submit your Word Document, not the PDF file.
WORD PRACTICE 6

Prefer to watch and learn? Check out this video tutorial:
Complete the following Practice Activity and submit your completed project.
For Word Practice 6, we will use Word to create a newsletter for Health Sciences students at SPSCC. Key skills in this practice are formatting text as columns, editing pictures, and inserting screen clips, symbols, and special characters.
- Start Word and open Starter_Word_Practice6. Save the file as Yourlastname_Yourfirstname_Word_Practice_6 in your Word folder.
- Using Document Info, insert the file name in the footer.
- Select the first paragraph that begins with Paradise Valley and change it to South Puget Sound and apply Bold text and change the font color to Blue-Gray, Text 2.
- With the title still selected, go to the Home Tab, Paragraph Group, select the arrow next to Borders and choose Borders and Shading to launch the Dialog Box. Add a Blue-Gray, Text 2Darker 25%, 2¼ pt. solid line bottom border.
- Select all the text beginning with Health Sciences Newsletter down to the end of the document excluding the final paragraph.
- On the Layout Tab, Page Setup Group, Set the columns to two. Compare your screen to the image below:
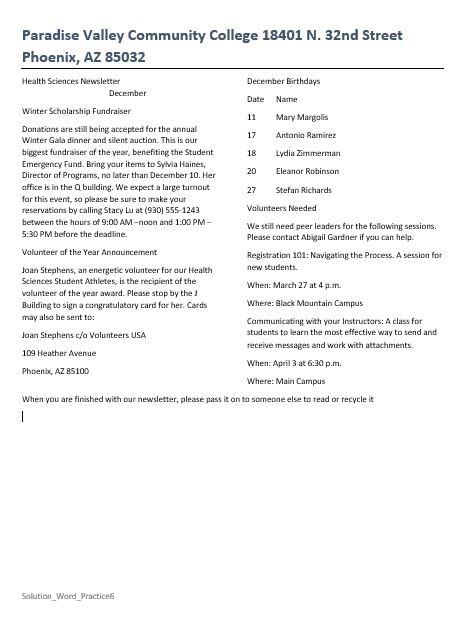
- With the two columns of text still selected, change the spacing after to 6 pt. and Justify the text.
- Position the insertion before December Birthdays and insert a column break on the Layout tab, breaks group, and select column. This will ensure the column of December Birthdays is a new column.
- Position the insertion point at the end of the document in the empty space after the paragraph that begins with “When you are finished…”
- On the Insert tab, Illustrations Group, Select Pictures. Browse to where your data files are stored and insert the Health Sciences Logo named Word_Practice_6_Image1.
- With the picture selected, on the Picture Tools, Format toolbar, set
- The picture height to 2.0″.
- The text wrapping layout to Top and Bottom.
- The horizontal alignment to Centered, relative to Column.
- The vertical alignment to Bottom, relative to Margin.
- Select OK.
- With the picture selected, on the picture tools, Format toolbar, in the Size group, choose the arrow under Crop.
- Using the Cropping handles on the picture, crop the picture by using the far right crop handle, dragging to the left until only the circle heart logo is visible. Everything in the gray area will be cropped. The cropped image should look something like this:

- With the image still selected, choose layout options. Use the Text Wrapping tab to change the layout text wrapping to Square. Choose more. Under options, choose Lock Anchor.
- Use the Position tab to set the horizontal alignment to Centered, relative to Page.
- With the image still selected, zoom to 200%.
- On the Picture Tools, Format Toolbar, Adjust Group, choose the arrow next to Corrections. Under Sharpen/Soften, choose Sharpen 50%.
- Under Color, choose Saturation 400% for the Color Saturation.
- Under Corrections, set the Brightness/Contrast to Brightness: +20% Contrast +20%.
- With the picture still selected, set the Zoom back to 100%.
- Resize the picture to 2.17″ for the height and 2.65″ for the width.
- With the picture still selected, on the Picture Tools, Format toolbar, in the Size Group, choose the arrow next to Arrange. Choose the arrow next to rotate and then choose Flip Horizontal.
- Near the top of the document in the left column, delete the word December. Position the insertion point in the blank paragraph under Health Sciences Newsletter.
- Redisplay the newsletter, and ensure the insertion point is in the paragraph below Health Sciences Newsletter. On the Insert tab, click Screenshot, and then click Screen Clipping. Drag from the upper left corner of the browser below the address bar to the lower right corner above the taskbar. Your screen clip may vary based on the resolution and web browser utilized.
- With the Screen Clip selected, resize height to .8″ and the width to 3.12.
- With the picture still selected on the Picture Tools Format tab, choose Quick Styles and select the first Style: Simple Frame White.
Note: After inserting the screen clip, you may need to readjust the position of the logo at the bottom of the document. Since the Text Wrapping is set to Square, you can manually adjust it by selecting and dragging it.
- Near the top of the document, select the text Winter Scholarship Fundraiser and
- Change the font color to Blue Gray Text 2.
- Apply Bold.
- With the text still selected, launch the Font dialog box. Under effects, choose the checkbox next to small caps.
- Using Format Painter, apply the same formatting to each of the heading paragraphs. To use the Format Painter, select the text. Then select the Format Painter icon on the Home Tab, Clipboard Group. Then select the text that you would like to apply formatting to.
- In the paragraph under the heading Winter Scholarship Fundraiser, delete the comma and space between Sylvia Haines and her title and insert an em dash. This is a special character located on the Insert Tab, Symbols Group, Symbol, More Symbols, Special Characters, Em Dash.
- Select the title of the document that begins with Paradise and ends with 85032. Change this content to South Puget Sound Community College and insert the college’s address from the SPSCC website.
- Apply a Blue Gray Text 2, 1½ pt. shadow border.
- Apply a Blue Gray Text 2 Lighter 60% shading.
- Center the text.
- Position the insertion point in the second column, towards the bottom of the document under Main Campus. On the Insert Tab, Text Group, select the arrow next to Word Art. In the second row, the second column choose the Word Art Style Gradient Fill-Blue, Accent 1, Reflection.
- With the Word Art still selected, use the drag and drop technique to position it so that it is centered in the column. Ensure the font size of the WordArt is 28. In the WordArt type: We appreciate you!
- On the Design Tab, Choose Page Borders. In the Page Borders Dialog Box, choose the Box Border, the style with a thick upper line and thin bottom line, Automatic color, 3pt width, to the whole document.
- In Backstage view, add “newsletter, March” to Keywords, course name and section number to Subject, and make sure your name displays as Author.
- Save the document and compare it to the image below. Make any adjustments before submitting per your instructor’s instructions.
MASTER ACTIVITY 1

Complete the following Master Activity and submit your completed project.
Google Docs

During the first chapter, you should have already created a Google Account. You will need to be logged into your Google account to complete this assignment. Since Google docs is web based, it changes frequently. The steps outlined here may be slightly different from what you see on your screen. If you do not already have a Google account, you will need to create one. Go to http://google.com and in the upper right corner, click Sign In. On the Sign In screen, click Create Account. On the Create your Google Account page, complete the form, read and agree to the Terms of Service and Privacy Policy, and then click Next step. On the Welcome screen, click Get Started.
- From the desktop, open your browser, navigate to http://google.com, and then sign in to your Google account. In the upper right corner of your screen, click Google apps, and then click Drive. If you are already logged into your South Puget Sound Google Apps Account, click Apps, then Drive.
- To create a folder in which to store your web projects, click New, and then click Folder. In the New folder box, type BPC110 and then click Create to create a folder on your Google Drive. Double-click your folder to open it.
- In the left pane, click New, and then click Google Docs to open a new tab in your browser and to start an Untitled document. At the top of the window, click Untitled document and then, using your own name as the file name, type Lastname_Firstname_WordMaster1 and then press Enter to change the file name.
- To the right of the file name, point to the small file folder to display the ScreenTip Move to. Click the file folder and notice that your file is saved in the BPC110 folder.
- Click in your document to close the Move to folder dialog box and to position the insertion point at the top of the document. Type Internship Opportunity and then press Enter two times. Type: Interviews will be held Friday and Saturday, January 14 and 15 in the Career Services Office.
- Select all of the text. Click the Font size arrow, and then click 24. With the text still selected, click Center.
- Select the title Internship Opportunity and then click Text color. In the first column, click the last color, and then apply Bold.
- Select Enter two times to create empty space after the text. Click Insert, and then click Image, then Search the Web. In the search box type Social Media and insert any image that represents social media.
- Click the picture to select it, and then point to the square sizing handle at the upper left corner of the picture. Drag down and to the right until the sizing handle aligns with approximately 3 inches on the ruler.
- If necessary, scroll up to view the image and the text above it. Click directly under the picture and insert a 2 x 2 table by selecting the Insert Tab, then Table. Type Join our team as a social media coordinator in the first cell of the table. Select the entire first row of the table, right-click, and choose Merge. Then, center the text. In the second row of the table in the first cell, type: Interviews will be conducted on the spot.
- In the last cell, type: We are hiring two interns!
- Select all of the text in the table, change the font size to 14, and change the color to any color that coordinates well with your image.
- If necessary, select the ellipses in the Toolbar (three dots) to view the table border width, and select zero so that no borders are displayed.
- Click Insert, Headers and Footers, and then Footer.
- In the Footer, choose the arrow next to options. Enter a page number and center it on the page.
- Click Tools, Spelling and Grammar, Spelling and Grammar Check. Verify Spelling and Grammar are correct.
- Take a moment to preview your document, and make any adjustments as necessary. Ensure your document fits to one page only.
- Your document will be saved automatically. Submit as instructed by your instructor
MASTER ACTIVITY 2

Complete the following Master Activity and submit your completed project.
In this activity, you are working for an employment agency and have been asked to fix a resume before sending it to potential employers. Follow the guidelines below to correct the resumes, ensuring it is professional, organized, and easy to read without changing the content.
- From your data files, open the file Starter_Word_Master2. Rename the file as Lastname_Firstname_Word_Master2.
- Merge the first two cells in the first row of the table.
- Center the text in the first row.
- Change the font, font color, and font size of the text in the first row.
- Change the font of the remaining text to ensure it coordinates with the heading.
- Apply bullets, indenting, and modify the Font to the text in the second column to make it easier to read.
- Resize the table, and ensure the resume fits to one page only.
- Hide table borders.
- Apply a border to the first row only, to ensure the name and contact information stand out.
- Ensure font, font size, and paragraph spacing are consistent.
- Run spelling and grammar check and make all necessary corrections.
- Submit as instructed by your instructor.
MASTER ACTIVITY 3

Complete the following Master Activity and submit your completed project.
In this activity, you will research a topic that is interesting to you and write a one-page, three-paragraph research paper. If you have a research paper from another course, you may use that for this assignment. Your research paper must include the following elements:
- A running header in MLA seventh edition style
- At least two footnotes
- At least two citations
- A bibliography (this should be on a separate page, for two pages total)
Use PDF reflow to save your research paper as a PDF file
Submit as instructed by your instructor.
CHALLENGE IT

Complete the following Challenge and submit your completed project.

In this challenge activity, you will complete a project that incorporates all the key skills learned in the Word unit. As the Director of Career Services, you have been asked to prepare and present documents to the Board of Directors regarding an upcoming National Convention. You have been asked to prepare
-
- A letter to the board explaining the upcoming convention
- A newsletter to employees with information on the convention
- An essay on why internships matter
- A Resume for the Keynote Speaker
- An online Flyer to advertise the event
- Open the Word document Starter_Word_Challenge. Be sure that the rulers and formatting marks display.
- Rename your file as Lastname_Firstname_WordChallenge and save it.
- On the letter on Page 1, select the first paragraph—Paradise Valley Community College, Career Services—and increase the Font Size to 28 pt. Change the Font Size of the next four paragraphs—the address lines and website—to 12 pt.
- Select the first five paragraph lines that you just formatted, change the Font to Arial, and then with the text selected, display the Borders and Shading dialog box. Create a 6 pt., Automatic-colored border on the left side of the selected text.
- In the paragraph that begins “If you have any,” select the second sentence and move it to the beginning of the paragraph. Adjust spacing as necessary so that there are no extra blank spaces at the end of the paragraph. Remove any extra spaces as necessary to ensure the letter fits on one page.
- On Page 2, in the newsletter, select the second paragraph of text, which begins with “All Employee Newsletter.” Display the Borders and Shading dialog box, and then add an Automatic-colored, 3 pt. line below the paragraph.
- Starting with the paragraph that begins “All Employee Newsletter,” select all of the text from that point to the end of the page, including any paragraph marks for that page only. Do not select the Page Break. Change the Spacing After to 6 pt., format the text in two columns, and apply the Justify alignment.
- At the top of the first column, select the paragraph Annual National Convention Special Edition. From the Font dialog box, change the Font Size to 20, apply Bold, and add the Small caps effect. Then Center the paragraph. Apply the same formatting to the other headings on the newsletter.
- On the same page, in the blank line above the last paragraph of the newsletter, insert the picture from your downloaded files “Word_Challenge_Step8.”
- Set the Height of the picture to 1.2″ and the Width of the picture to 3.2″ and apply the first Picture Style, Simple Frame, White.
- Under the image, type:
For more information, please visit our website at www.maricopa.edu. Click on the link for the Annual National Convention. Here you will find additional information on the agenda, which will be updated daily. You can also message conference organizers with any questions you might have prior to and during the conference. Housing, meals, and additional safety protocols will be announced here.
- At the bottom of the newsletter, insert an online recycling image using the Bing image search, and center it at the bottom of the page.
- Ensure the headings on the newsletter are 20 pt., and the text underneath is 12 pt.
- Apply a page border to the newsletter only using the following:
- Box
- Thick upper line, thinner lower line
- Automatic Color
- 3 pt
- Ensure the page border is applied to the newsletter only
- In the blank paragraph at the top of Page 3, insert a 2 × 3 table. In the first cell of the table, type the following four lines, pressing ENTER after each line:
- Jana Jones
- 123 Maple Drive
- Ajo, AZ 81657
- www.janajoneskeynote.com
- In the second row of the table, in the first cell, type Career Highlights, and then press Tab.
- In the second cell of the second row, insert the text from the downloaded file Text_Word_Challenge.docx and then press BACKSPACE to remove the blank line at the bottom of the inserted text. If necessary, ensure there is a blank line after each entry.
- In the third row of the table, in the first cell, type Education, and then in the cell to the right, type Ms. Jones’ educational information as follows, pressing ENTER after each line:
- Northern Arizona University
- Ph.D. in International Women’s Studies
- University of Florida
- M.S. in Organizational Psychology
- University of Indiana
- B.S. in Psychology
- Insert a new row at the bottom of the table. In the first cell of the new row, type Professional Experience, and then in the cell to the right, type the following, pressing ENTER after each line:
- Women in IT Corporation
- NASA Consulting Agency
- National Science Foundation
- National Council on STEAM
- Apply Bold to each of the headings: Career Highlights, Education, and Professional Experience.
- Drag the vertical border between the two columns to the 1.5-inch mark on the horizontal ruler.
- In the first row, merge the two cells, and then Center the text. Select the name Jana Jones, increase the Font Size to 24 pt., apply Bold, and then add 24 pt. space before the text. Select the web address and add 18 pt. space after the text. Select the address and web address and increase the font size to 14.
- Create a bulleted list, using solid round black bullets, for the items to the right of Career Highlights and also for the items to the right of Professional Experience. Decrease both bulleted lists one time. Ensure both bulleted lists are set to 2.0 line spacing and remove any extra lines if necessary.
- Apply Bold to the name of each university, and then apply 12 pt. spacing after to the name of each college degree.
- Select the headings Career Highlights, Education, and Professional Experience and apply small caps and font size 14 pt.
- Select the table, and then remove all borders. From the Borders and Shading dialog box, add a 3 pt. solid border to the top and bottom of the table.
- Near the top of Page 4, in the paragraph that begins Internships, position the insertion point to the right of the period following world, and then insert the following footnote: A recent study from Georgetown University found that, on average, college graduates earn $1 million more in earnings over their lifetime.
- Modify the footnote style by changing the Font Size to 11 pt., Calibri; add a First Line Indent of 0.5″; and set Line spacing to 2.0 (double).
- In the paragraph that begins According to, position the insertion point to the left of the period at the end of the paragraph. Using MLA format, add the following website citation:
- Indeed
- June 5, 2020
- On Page 6, in the blank line after Internships matter, insert a page break. In the blank line below the Works Cited title, insert the built-in Bibliography. Center the Bibliography title and delete Works Cited. If necessary, insert another page break, which will be page 7.
- On Page 7, select the title National Convention and center it, bold, Font size 28, and apply small caps.
- Select the two paragraphs below the title that begin Friday and Saturday, and then change the Spacing After to 0.
- Select the three paragraphs below the title—the dates—and then from the Borders and Shading dialog box, apply a Box border using theme color Blue, Accent 1 (fifth column, first color), and a 3 pt. border. Click the Shading tab, and add Shading using theme color Blue, Accent 1, Lighter 80% (fifth column, second color). Ensure the text is centered.
- Click after the period after the word experience and hit enter. Insert an online video from YouTube about Internships. Change the Height of the picture to 3″, the Width to 4″, and then set the wrapping to Square. If necessary, drag the video image to the right until it aligns with the right margin.
- Apply the Simple Frame White Picture Style.
- At the bottom of the flyer, click in the second blank paragraph below the last paragraph of text. Insert a Basic Cycle SmartArt. Click the outer rectangle surrounding the SmartArt to select it, and if necessary, change the wrapping style to Square. On the Format tab, set the Height of the SmartArt graphic to 1.4″ and the Width to 5″. Add the following text, in order, to the three shapes:
- Register
- Attend
- Succeed!
- To the SmartArt graphic, change the colors to Colorful-Accent Colors 2-3 and apply the White Outline style.
- Your final document should be 7 pages. Ensure your file is saved.
- Run spelling and grammar check and make all necessary corrections.
- Submit as instructed by your instructor.
Software or a device that allows users to create, edit, and print documents
A regularly updated website or web page, typically one run by an individual or small group, that is written in an informal or conversational style
Characters that display on the screen but do not print, indicating where the Enter key, the Spacebar, and Tab key were pressed, also called non printing characters
A button that can be turned on and off by clicking it once to turn on, and clicking again to turn it off
A centralized space for file management tasks such as opening, saving, printing, or sharing a file
Allows the user specify the drive, directory, and name of a file to save their file
Located above the Ribbon (top-left) and provides access to commonly used features and commands, such as Save and Undo/Redo, and is customizable
Appears whenever you right-click text in Word, Excel or PowerPoint and provides a quick-access version of the Font group on the Home tab, plus a few extra buttons from other groups
One or more keys used to perform a menu function or other common functions
a moveable, resizable container for text or graphics
a graphical tool that adds visual interest
The bottom margin of each page
Appears whenever you right-click text in Word, Excel, or PowerPoint and provides a quick-access version of the Font group on the Home tab, plus a few extra buttons from other groups
Specifies the distance between where the lines in a paragraph start in relation to the left or right margins
A list of items in no particular order that are preceded by a bullet for emphasis and organization
Allows you to copy formatting from one item and apply it to another
Horizontal position which is set for placing and aligning text on a page
The space between tab stops can show a line, dots or dashes to line up information and guide the reader
The intersection of a row and column in a table
A feature in Word where you can see suggestions from LinkedIn to enhance your resume
A feature in Word tables that allows users to insert a new row or column by pointing to the desired location and then clicking once
A Word feature that allows you to share your documents online using a web browser
A letter of introduction that highlights key points in the resume that follows
The heading at the top of a sheet of letter paper that typically includes name and address or company logo.
The name and address of the person of business received the letter, positioned below the date line
Identifies spelling and grammatical errors and provides suggestions for correction
Allows you to capture an image from your screen
Normal characters that don't appear on standard keyboards; but once inserted into a Word doc, they look the same as keyboard characters
A feature in word that allows you to move your image to any position on the same page as the anchor paragraph which forces the object to stay in that position
An efficient way to add effects to a picture such as shape, border, and other effects
Allows you to capture an image from your screen
A punctuation symbol that indicates and explanation or emphasis
Informally as dot-dot-dot, is a series of dots that indicates an intentional omission of a word, sentence, or whole section from a text without altering its original meaning. When selected, additional options appear
