Database Software 2: Database Objects and Querying a Database
Querying a Database
Jennifer Lavergne

Learning Objectives
- Create databases.
- Understand how to create tables using datasheet view.
- Practice entering data into datasheets.
- Master the skill of importing data into tables.
- Explore filtering and sorting options in datasheets.
- Learn how to preview and print datasheets.
- Create queries using the simple query wizard.
- Create queries in Design view for more advanced functionality.
LEARN IT

INTERACTING WITH A DATABASE: DESIGNING AND CREATING TABLES
Now that we have grouped our data into tables, we can begin planning how to add the data into the tables. Important things to decide at this point are:
- plan what columns/fields will be in the table and what we should name them
- plan the data types we plan to associate with each column/field
- plan what data will be added to the tables themselves
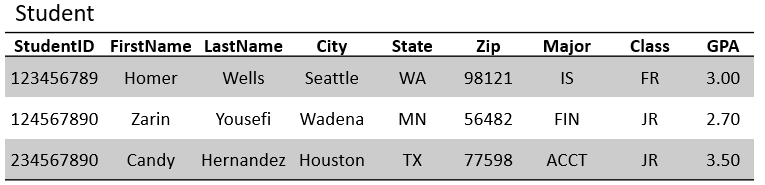
Let’s plan the student table we used in the previous chapter. This table will contain all of the information about the students attending this school. Each row will contain the information for one student. In the table below, we decide what data type we plan to use for the column/fields in the Student table:
|
Column Name |
Data Type |
|
StudentID |
AutoNumber |
|
FirstName |
Short Text |
|
LastName |
Short Text |
|
City |
Short Text |
|
State |
Short Text |
|
Zip |
Number |
|
Major |
Short Text |
|
Class |
Short Text |
|
GPA |
Number |
For our ID, we can select the AutoNumber data type so that MS Access will automatically update this column for us whenever we add a new record. This is preferable since we don’t want to duplicate a Primary Key value. Next, we have our First Name, Last Name, City, State, Major, and Class columns. These will all contain a string of letters, making a word. Our word is not likely to exceed 255 characters, so we can use the Short Text data type. Long Text is used more for long descriptions or messages, not a few words. Finally, we have our Zip and GPA columns. These will be numerical, i.e., contain numbers, so we will assign those columns as the Number data type.
When we create the student table, we use the above design to add the fields with these names, and then assign them datatypes. Now let’s plan the Offering table. We will once again use the same table from our previous example.
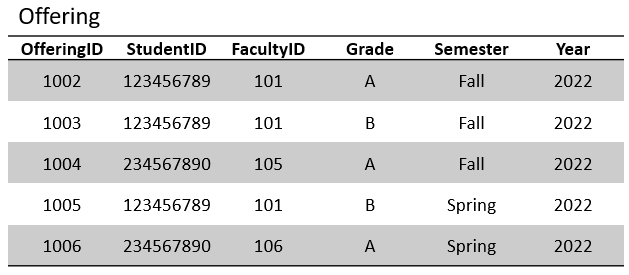
This table will contain all of the information about the course offerings offered at this school for a given semester and year. Each row will contain the information for one offering. In the table below, we decide what data type we plan to use for the column/fields in the Offering table:
|
Column Name |
Data Type |
|
OfferingID |
AutoNumber |
|
StudentID |
Number |
|
FacultyID |
Number |
|
Grade |
Short Text |
|
Semester |
Short Text |
|
Year |
Number |
Since OfferingID is the Primary Key field for this table, we will assign it the AutoNumber data type. Next, we need to address our two “borrowed” fields, also known as our Foreign Keys. Since in this table they are not Primary Keys and they must match values in the originating table, we will assign the Number data type to them. We cannot use AutoNumber since we need to match values in a meaningful way. Also, it’s possible to have more than one of the same StudentID or FacultyID in the Offering table. One student can take as many class offerings as they want. A faculty member can teach as many offerings as they are allowed to. When assigning a data type to a Foreign Key, make sure you match the data type. AutoNumber creates Number values. So, we can use the Number type to match Primary Keys to Foreign Keys in this example.
ADDING DATA TO TABLES
Now that we have designed and created our tables, we can add our records. When a record is added to a table, it is typically appended to the bottom of the data already inside a table. This happens since the records are added one at a time either by hand or via an outside source. These outside sources can be an Excel spreadsheet, an entry Form, a webpage, and more. The records added to the tables from outside sources will be added in order of appearance, with no sorting considered.

Excel Spreadsheet Example for non-AutoNumber IDs
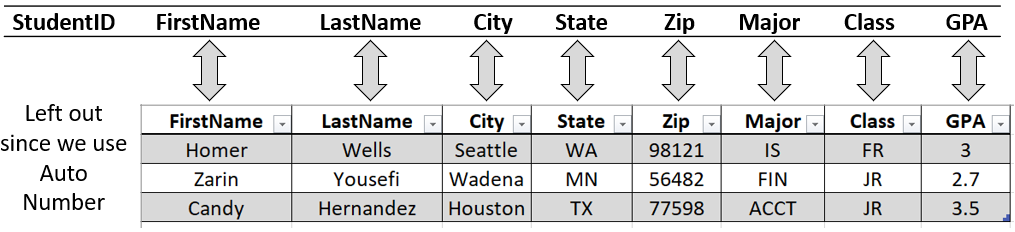
In our tables with the AutoNumber for our Primary Key fields, we do not need to enter a value for that field. Observe the differences between the Excel spreadsheet example above and below. In the one below, we do not have a column for StudentID. MS Access already knows to auto-populate the StudentID because of the data type we assigned it.

Excel Spreadsheet Example for AutoNumber IDs
It’s absolutely vital that, when you create an Excel sheet to import data into a database, the headers of the table in the spreadsheet match exactly the location and names of the corresponding table in the database. In the figure below you can see the lineup between the headers in the database at the top and the headers for each column in the spreadsheet.
When adding to a Foreign Key field, make sure the value you are adding has a match in the originating table’s Primary Key field. For example, make sure when adding a StudentID into the Offering table that the StudentID exists in the Student table. Students who are not in our database are not allowed to enroll in a course offering. This would create a data anomaly since we would have a phantom student enrolled in an offering. We also cannot have imaginary faculty members teaching offerings. All FacultyIDs in the Offering table must match a FacultyID in the Faculty table.
QUERYING TABLES
When we say we are querying the database, it means we are asking the database a question. Examples of such questions are:
- How many students are enrolled in the honors program?
- How many students are enrolled in the History, English, or Biology programs?
- How many students have declared Health Sciences as their Field of Interest?
- What is the total amount awarded to students with a scholarship?
- What faculty teach in the honors program and teach History?
Asking a database a question results in information. We can take that information and turn it into actionable information. For example, if we ask the database “How many students have declared Health Sciences as their Field of Interest?” and the answer is significantly larger than in previous years, we may need to hire new faculty members. Another example is asking the question “What is the total amount awarded to students with a scholarship?” If the answer is larger than our current budget, we may need to find another revenue stream to cover it. This is actionable information, or information we can make logical changes based upon.
When planning a query for a database, you first need to decide what table or tables you will need. Next, we need to decide what fields we want to return and if we want to do any calculations. Finally, we need to decide if we need to filter the results with conditions. Conditions evaluate to true or false depending upon what they are checking. For example, if we only want students who are freshmen, the condition will evaluate true if class = FR, but not for any other classes. Results will only be displayed when the conditions evaluate to true.
Let’s plan the query for “What faculty teach History?” First, we have determined that all of the information we need is in the Faculty table. we need to decide what fields we want to display. The query asks for a list of faculty members who teach History. Do we want their first names? Last names? Etc. Ask your user/professor what needs to be returned. A better query would be: “Display the first and last names of all faculty members who work in the History department.”
Completing this query will display results using the requested fields and the conditions. First, all faculty who are not in the History department will be ignored. This does not affect the table in the database itself; it’s only for the copy of the results we display to the user. In the table below, we show the records that we will not be ignoring.
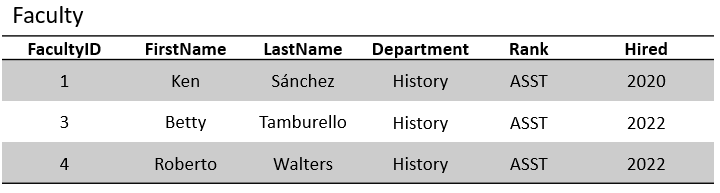
Finally, we ignore the columns/fields not listed in the query. The request was only for the first and last names. As above, this does not affect the table itself, only the results copy. The table below shows the final results of the query when the columns are ignored.
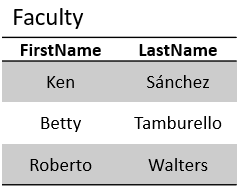
This table represents the first and last names of all faculty members who are in the History department. This is not an actual table in the database; it’s only a copy we display for results. If you close it, it will go away.
DATABASE PRACTICE 2

Prefer to watch and learn? Check out this video tutorial:
Complete the following Practice Activity and submit your completed project.
For Practice 2, we will create an access database that manages student and faculty data in the Honors program at South Puget Sound Community College. For this practice, we will focus on creating the table structure for the database.
- Open Access, and select Blank Desktop Database. You might have to click on New in the red left-hand pane. Name the database Lastname_Firstname_Access_Practice2, and save it to your flash drive or another safe location. Select Create.
- The database will open with a table named Table1 open in datasheet view. If it does not, you may need to select Create, then Table. We will use this table to track Student data in our database. Click the down arrow next to Click to Add and choose Short text as the data type. Rename Field1 to Last Name and press Enter. Remember that in Access, table names need to be precise.
- Click the arrow next to Click to Add, choose short text as the data type, type First Name and press Enter.
- Choose short text as the next data type, type Field of Interest, and press Enter. Continue to add the following fields and Data Types to the Table.
|
Field |
Data Type |
|
|
Short Text |
|
Graduation Year |
Short Text |
|
Faculty ID |
Number |
|
Scholarship |
Yes/No |
- On the Home tab, under Views, change the View of the table to Design view. When prompted, save the table as Students.
- In Design view, change the ID field to StudentID, and change the Data Type to Number.
- Verify that the Field Name and Data Type are entered exactly like this:
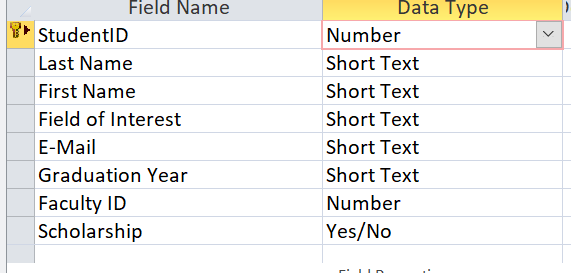
- Save and close the Students Table.
- Importing data into a table is a quick and easy way to populate a table with data. On the External Data tab, under the Import & Link group, select Excel. You may need to select New Data Source, from File, Excel. In the Get External Data—Excel Spreadsheet Dialog Box, under file Name, select Browse to locate the Import_Access_Practice2 Excel file. This should be saved on your flash drive, or where you save your data files.
- Ensure to Append a copy of the record to the table Students is selected and select OK.
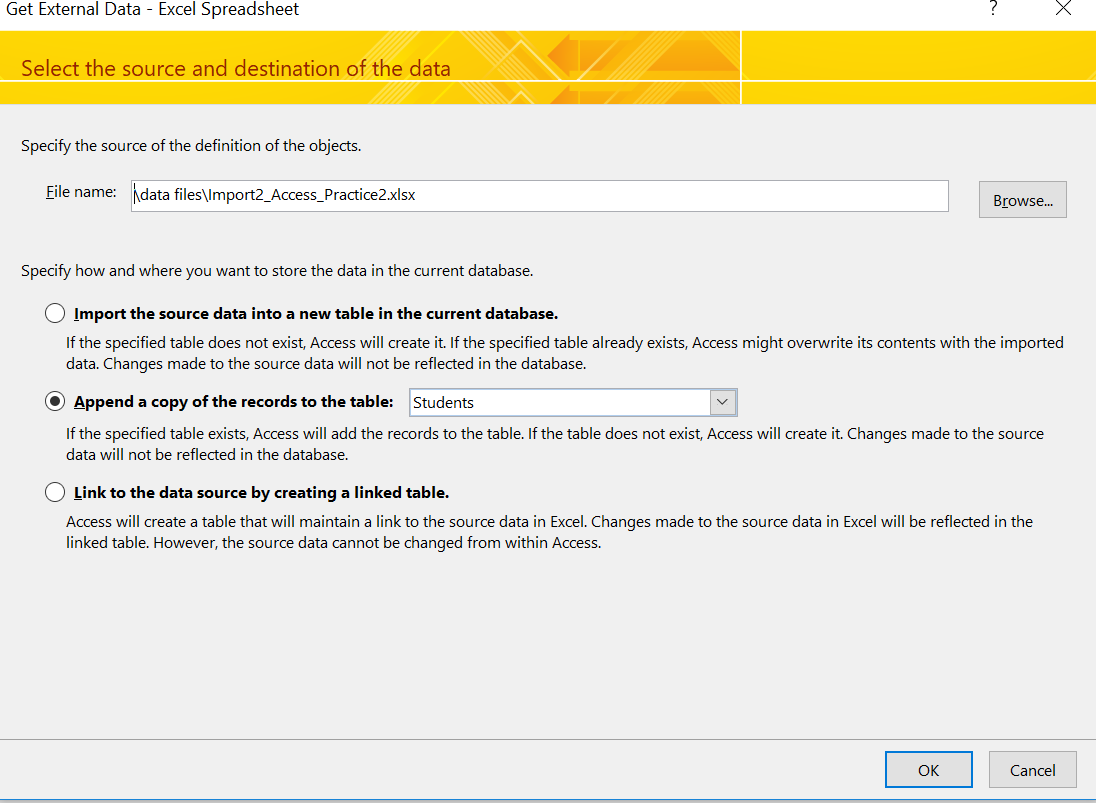
- The Import Spreadsheet Wizard should appear on your screen. If it does not, go back to your database window and ensure all database objects are closed. When running an import, tables and other database objects must be closed.
- On the Import Spreadsheet Wizard, select the checkbox next to First Row Contains Column Headings. If this is grayed out, ensure it is checked. Take a moment to preview the data that will be imported into the Students table. Then, select Next.
- On the next screen, ensure the Import to Table shows Students. Do not check the box next to “I would like a wizard to analyze my table after importing the data.” Once the import runs, it is not necessary to save the import steps, as we will not be running this import again.
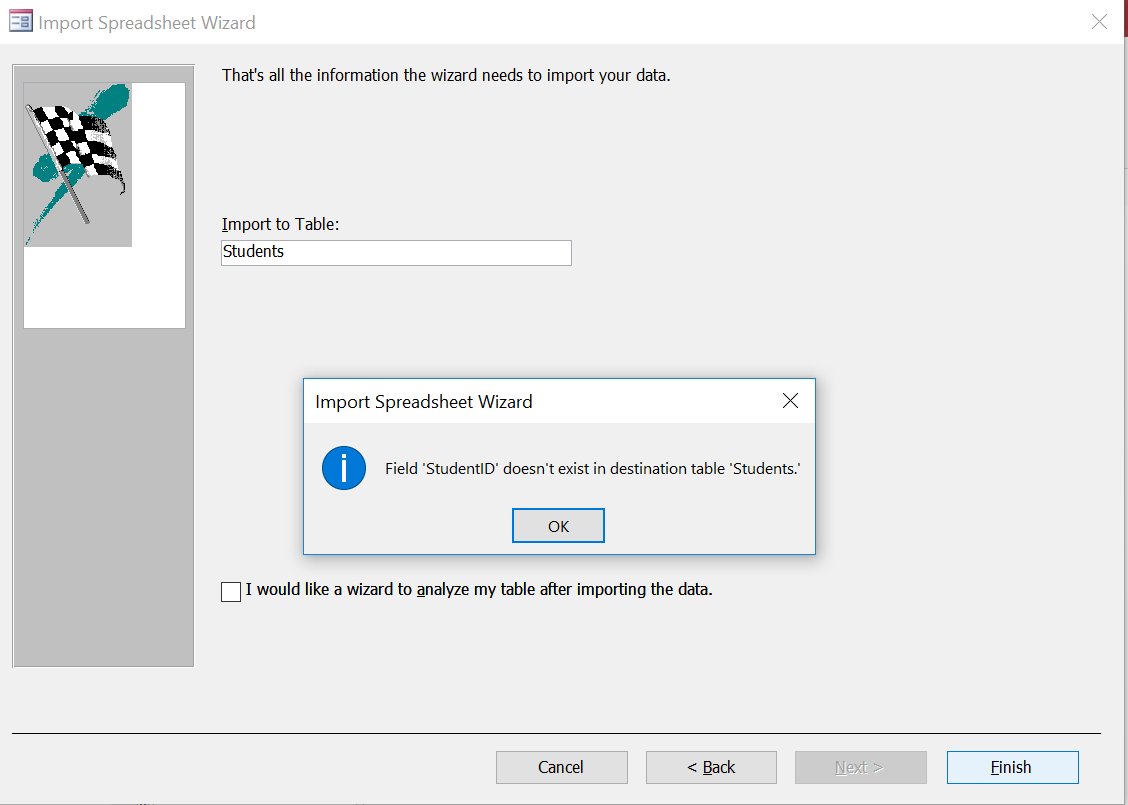
- If your import was successful, go to the next step. If you received errors, try the following:
- If you receive an error message, such as the image below, that says a field does not exist, close the import. Open your Students table, and compare your field names and data types to the image of Field Names and Data Types above. Your table fields must be in this order, and be spelled exactly the same. If your field names do not match the expected headers in your Excel import file, the import will fail.
- If you receive an error message that says the import cannot be completed, ensure all database objects are closed. Before an import can successfully run, all database objects must be closed.
- If you receive an error message that says your database is in use by another user, close the import. Ensure all database objects are closed. Save the database, and take note of where your database is saved. Close Access. If possible, restart your computer, and then open your database and try the import again.
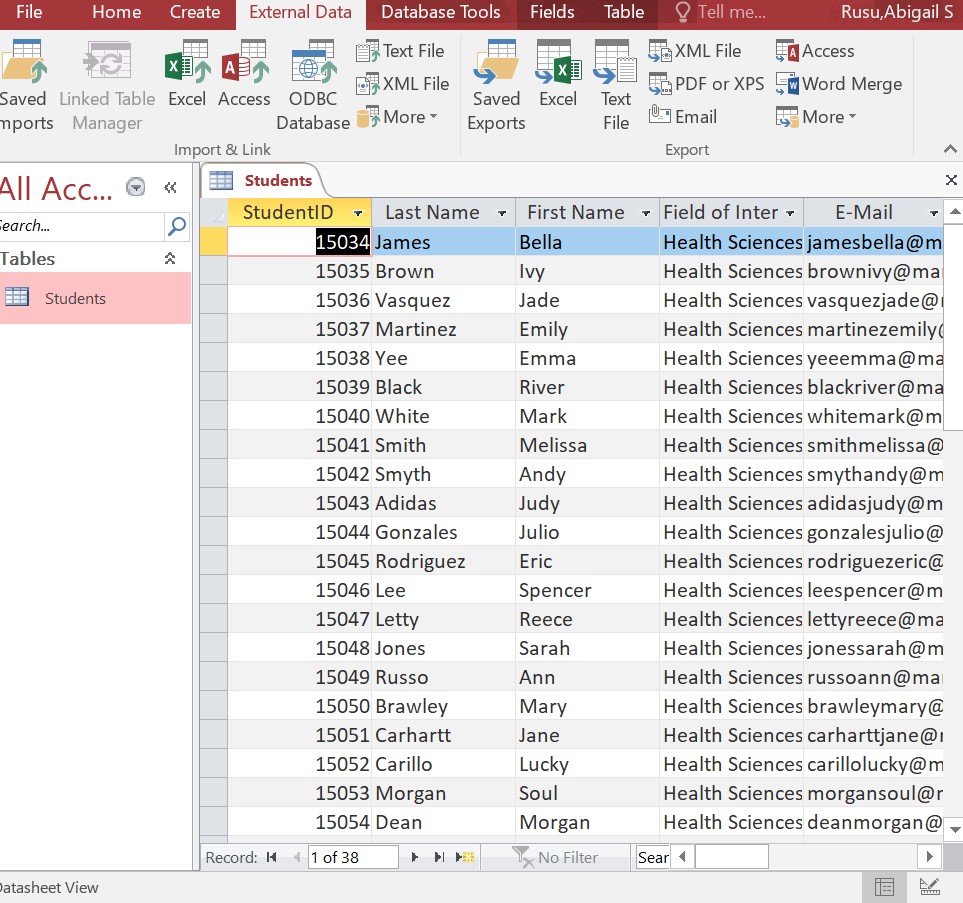
- To verify the import ran successfully, double-click the Students table to open it from the navigation pane. Verify there are 38 records in the table.
- Close the Students Table and ensure all database objects are closed.
- On the External Data tab, in the Import & Link group, select Excel.
- In the Get External Data—Excel Spreadsheet dialog box next to File name, browse to find the file Import2_Access_Practice2. This should be saved in your data files folder on your flash drive.
- Choose the first option, Import the source data into a new table in the current database, and then select OK.
- On the Import Spreadsheet Wizard, check the box next to First Row Contains Column Headings.
- Take a moment to preview the data that will be imported, but do not make any changes. Select Next.
- Take a moment to look at the next screen, but do not make any changes. Select Next.
- On the next screen, select Choose my own primary key and ensure Faculty ID displays here. Select Next.
- Under Import to Table, type Faculty for the table name, and then select Finish. Do not check the box next to “I would like a wizard to analyze my table after importing the data.” It is not necessary to save the import steps.
- In the navigation pane, right-click the Faculty table to open it in Design View. Select the Faculty ID field. Ensure the Data Type is set to Number. Under Field Properties, ensure the Field Size is set to Double.
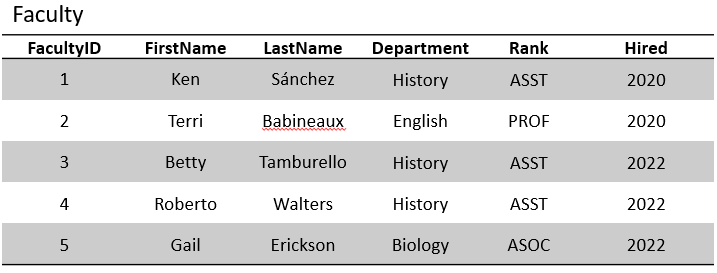
- With the Faculty table still open, select the Faculty ID field. Notice how there is a little key next to it, and on the Table Tools Design Tab, in the Tools group, Primary Key is selected. This indicates this field is the primary key. This is a required field in the table that uniquely identifies a record. Save and close the faculty table.
- Open the Students table in Design view. Notice that StudentID is the primary key. Select the Faculty ID field and ensure the Data Type is set to Number. Under Field Properties, ensure the Field Size is set to Double. Save and close the Students table.
- Ensure all database objects are closed. On the database tools tab, in the relationships group double-click Relationships. In the Show Table dialog box, on the Tables tab, double-click Faculty to add the table. Then double-click students to add the table. Close the Show table dialog box.
- In the Relationships window, ensure the Faculty table is first, and the Students table is second. You can resize and move the tables if you would like. This is helpful so that you can see all of the fields in the table.
- Notice on the Faculty table, the Faculty ID is the primary key. Click and hold the Faculty ID table on the Faculty table, and drag it to meet the Faculty ID table on the Students table. This will create a relationship between the two tables. This is what makes this Access database a relational database.
- In the Edit Relationships dialog box, ensure the Faculty ID from the Faculty table displays and Faculty ID from the Students table displays. Check all boxes including Enforce Referential Integrity, Cascade Update Related Fields, and Cascade Delete Related Records. Notice the relationship type is One-To-Many. Select Create to create the relationship.
- In the Relationships window, the line connecting the two tables is called the Join Line. Double-click the join line to view the Edit Relationships window. Select OK to close the window. Close the relationships window.
- In the navigation pane, ensure all database objects are displayed. You should see two tables, the Faculty table and the Students table. It is important that these tables are created, as we will use them in Practice 3.
- To exit out of the database, first close any database objects that are open. Select the File tab, and take note of where your database is saved. Then select close. Then, exit out of Access.
- Submit your entire database for grading per your instructor’s instructions.
DATABASE PRACTICE 3
Prefer to watch and learn? Check out this video tutorial:
Complete the following Practice Activity and submit your completed project.
For Practice 3, we will continue to work with the same database we started in Practice 2, which manages student and faculty data in the Honors program at South Puget Sound Community College. For this practice, we will focus on creating queries for the database. We will create queries that answer the following questions:
-
- How many students are enrolled in the honors program?
- How many students have declared Health Sciences as their Field of Interest and how many are undeclared?
- What students have been awarded a scholarship?
- What faculty teach in the honors program, and what students are they assigned to?
- Open Access, and under Open, select the database Lastname_Firstname_Access_Practice2. You may need to browse to your flash drive or other location that you saved this database to. In Backstage view, select Save As, and save the database as Lastname_Firstname_Access_Practice3. Ensure the database is saved on your flash drive or another safe location.
- If necessary, select Enable Content to show all of the database content.
- Open the Navigation pane, and verify there are two tables, Students and Faculty, with 38 records each.
- Close all open database objects. On the Create tab, in the queries group, select Query Wizard. We are going to use the Query Wizard to write a query that will answer the question: How many students are enrolled in the honors program?
- In the New Query Dialog Box, select Simple Query Wizard and then OK.
- In the Simple Query Wizard Dialog Box, under Tables/Queries ensure the Table: Students displays.
- Under Available Fields, Select the following fields. You can double-click the field name to add it to the Selected Fields, or use the >.
- StudentID
- Last Name
- First Name
- Select Next. Title the Query Honors Student List, and select the option to Open the query to view information. Select Finish.
- Notice how the query opened in Datasheet View. At the bottom of the page, view the record count, and take note that there are 38 records. Practice using the arrows to scroll through the records.
- Next to Last Name, select the arrow, and select sort A to Z. This will sort the query by Last Name in ascending order.
- On the Home Tab, in the Views Group, select Design view. Notice how the Students table displays in the top portion of the window, and the Fields display in the lower portion.
- Save and close the Honors Student List query. Notice how in the navigation pane, under Queries, the Honors Student List query displays.
- On the Create tab, in the Queries group, select Query Design. In the Show Table Dialog Box, on the Tables Tab, select Students and then Add. If necessary, close the Dialog Box.
- We will use the Students table to write a query that answers the questions: How many students have declared Health Sciences as their Field of Interest and how many are undeclared? If necessary, resize the Students table so that you can see all of the fields in the table. You can resize it by selecting the outer edge and dragging.
- In the Students table view, double-click StudentID to add it to the query grid. You can also drag and drop the StudentID field from the Students table into the query grid to add it.
- Add the following fields to the query grid:
- Last Name
- First Name
- Field of Interest
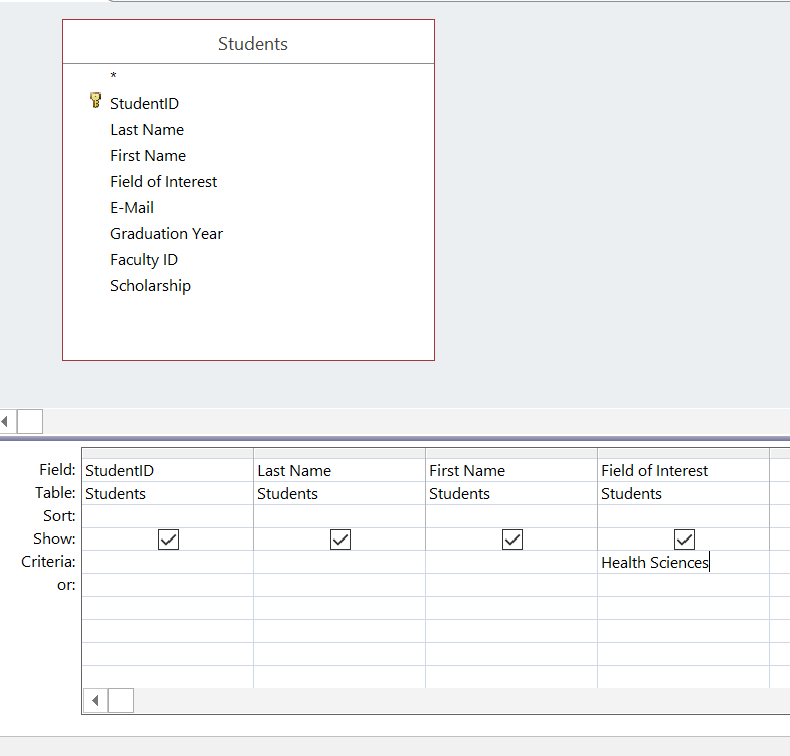
- In the query grid, under Field of Interest, in the Criteria row, we will add criteria to determine which students have declared Health Sciences as their Field of Interest. Type Health Sciences in the criteria row under Field of Interest.
- Notice the Check Marks in the Show row. This indicates whether the field will display when the query is in datasheet view. On the Query Tools Design Tab, in the Results group, select Run. Notice there are 22 students that have declared Health Sciences as their Field of Interest.
- Right-click on Query1 and select Save. In the Save As Dialog Box, save the Query Name as Health Sciences Students and then select OK.
- On the Home Tab, in the Views group, change the View to Design view. We will modify this query so that it answers the question: How many are undeclared?
- In the Query Grid, under Field of Interest, remove the criteria for Health Sciences and replace it with Is Null. This will tell us how many records have a blank or missing Field of Interest.
- Run the query. Notice that 7 students are missing a value for Field of Interest.
- Select the File tab, Save As, then select Save Object As. Then select Save As. In the Save As Dialog Box, change the name of the Query to Students Missing Field of Interest. Ensure it is saved as a query, and then select OK.
- In the navigation bar, notice how the query we just created displays. With the query still open, change the view to Design view. In the query grid, under Field of Interest, in the Show row, remove the checkbox. Save and run the query. Notice how the Field of Interest field no longer displays. Close the query.
- Using the Query Design, we will create a new query that answers the question: What students have been awarded a scholarship? Add the Students table to the Query Design view. Add the following fields to the query grid:
- Last Name
- First Name
- Scholarship
- Ensure all three fields are Shown. Under Last Name, sort ascending. To sort the Last Name Field in ascending order, ensure the query is in Design view, under the Last Name field. The sort should be set to ascending.
- Under Scholarship, in the Criteria row, enter Yes.
- Run the query. Notice there are 20 records, or 20 students that have been awarded a scholarship.
- Save and name the query Scholarships Awarded.
- Close the Scholarships awarded query.
- On the Create tab, in the Queries group, select Query Design. Add the Faculty and Students tables. Notice how the tables are automatically joined. This is because the relationship has already been established. If the tables are not joined, re-visit Practice 2.
- We will create a query that answers the question: What faculty teach in the Honors program, and what students are they assigned to? From the Faculty table, add the following fields to the query grid:
- Faculty ID
- Last Name
- First Name
- From the Students table, add the following fields:
- Student ID
- Last Name
- First Name
- Save the query as Honors Program Faculty and Students. Run the query. Close the query.
- Take a moment to verify you have the following tables and Queries in your database.
- Tables:
- Faculty
- Students
- Queries:
- Health Sciences Students
- Honors Program Faculty and Students
- Honors Student List
- Scholarships Awarded
- Students Missing Field of Interest
- Tables:
- To exit out of the database, first close any database objects that are open. Select the File tab, and take note of where your database is saved. Then select close. Then, exit out of Access.
- Submit your entire database for grading per your instructor’s instructions.
a data type that describes a unique sequential or random number assigned by Access as each record is entered and that is useful for data that has no distinct field that can be considered unique. This data type cannot be manually changed or typed in
a required field that uniquely identifies a record in a table
the process of copying data from another file, such as an Excel Spreadsheet, into a separate file, such as an Access table
the action of filling a database table with records
to add on to the end of an object, for example, adding records to the end of an existing table in a database
the most common type of database relationship between two tables where one record in the first table corresponds to many records in the second table
a database object that retrieves specific data from one or more database objects, either tables or queries, and displays the requested data in a datasheet
Microsoft Office’s built-in security feature
a step-by-step way to create four types of queries to use in accessing and modifying the data in your database
the bottom pane of the Query Design View window in which you specify the fields, sort order, and limiting criteria for the query
