Chromoplasts and Amyloplasts
Learning Objectives
After completing the lab, the student will be able to:
- Prepare wet mounts of carrot slices and observe chromoplasts.
- Prepare wet mounts of potato slices and observe before and after staining with iodine.
Activity 1: Pre-Assessment
- Why would pigments make visualizing subcellular structures easier under the light microscope?
- How could you tell the difference between a lipid-soluble pigment and a water-soluble pigment when viewed immersed in water on a slide under a light microscope?
- Discuss the answers to questions 1 and 2 with a partner (think, pair, and share) and then the class.
Activity 1: Chromoplasts and Amyloplasts
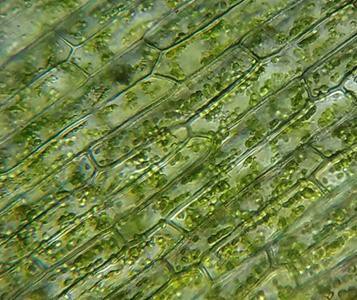
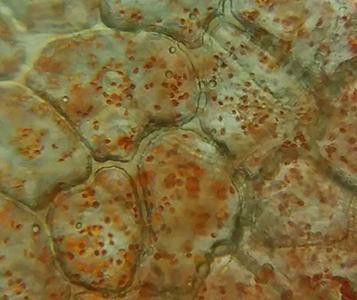
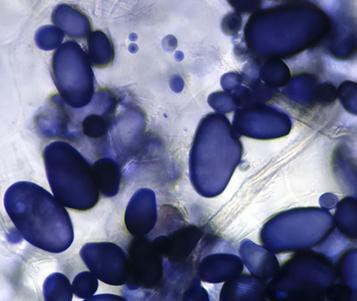
All plastids originate from proplastids that can differentiate into several mature types of plastids, as shown in Figure 5.1, similar to the idea of a stem cell. Chloroplasts (“green bodies”; Figure 5.2) are an example of a mature plastid that contains pigments, water insoluble lipid molecules that can be found in membranes and are capable of absorbing light energy. These start the process of photosynthesis. You will examine a few different types of plastids in this lab. The two plastids that are examined in this activity are chromoplasts and amyloplasts, shown in Figure 5.3 and Figure 5.4, respectively. Chromoplasts, or colored bodies, are mature plastids that are used primarily for the synthesis of pigments and their storage. Chromoplast pigments are found in many plant parts such as flowers, roots, and aging leaves. The purpose of these plastid pigments is to attract pollinators to the plant and to advertise to different animals that eat the fruit (such as mammals, birds, insects, and reptiles) and then disperse the seeds, generally with a bit of fertilizer. These pigments are also found in root vegetables such as carrots and yams. Amyloplasts, meaning starch bodies, are a type of leucoplast, or white body, that are colorless; these plastids synthesize glucose into starch, store starch, and help the plant detect gravity using statoliths.

Safety Precautions
- Be careful handling glass slides, the edges may be sharp.
- Cut away from your body. Sectioning of potato and carrots involves using a single-edged razor blade, use care to avoid cuts.
- Observe proper use of the microscope; avoid handling the electric cord with wet hands.
- Do not use the coarse adjustment knob of the microscope at higher magnifications.
- Inform your teacher immediately of any broken glassware, as it could cause injuries.
- Dispose of biological stains according to teacher instructions and local regulations.
- Wash your hands with soap and water after handling biological stains.
For this activity, you will need the following:
- Clean microscope slides and coverslips
- Single-edge razor blade
- Carrot and potato
- Iodine stain (or Lugol’s stain) in dropper bottle
- Paper towels
For this activity, you will work in pairs.
Structured Inquiry
Step 1: Make extremely thin slices of the carrot. The slice should be as transparent as possible. Place the carrot slice on a clean microscope slide with a coverslip. If the coverslip does not lie flat, the slice is too thick. Observe under middle (100×) and high power (400×) and draw and label what you observe in your notebook, and record the magnification. Note—you do not need to add a drop of water before placing the coverslip.
Step 2: Hypothesize/Predict: In your notebook predict (draw) what subcellular components you expect to see in the microscope with a potato slice. Will the addition of a biological stain (a dye that stains cellular structures) help visualize subcellular structures?
Step 3: Repeat Step 1 with the potato slice. Do not add iodine. Observe under high power (100×) and then draw and label what you observe in your notebook, recording the magnification.
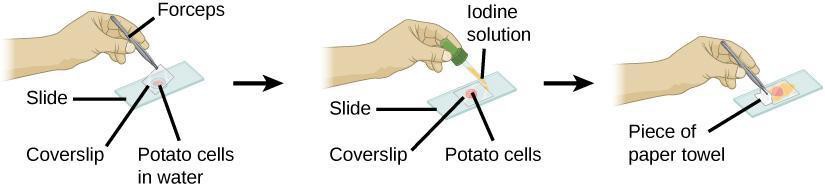
Step 4: Add a drop of iodine stain to the edge of the coverslip. Grasp a small piece of paper towel and dab it to the opposite side of the coverslip to draw the iodine through the potato slice, as illustrated in Figure 5.5. Observe the slice under high power and draw and label what you observe in your notebook, recording the magnification.
Step 5: Critical Analysis: Are the predictions you made in Step 2 supported by your data and observations? Why or why not? Are there any methods you could use to improve your results? Discuss with your partner and then write your answers in your notebook.
Assessments
- How do your drawings of the microscope slides compare to the internet images in Figure 5.2, Figure 5.3, and Figure 5.4?
- Iodine (or Lugol’s solution) is not a very water-soluble stain. What type of molecules do you think the iodine solution is staining in the potato slice (polar or nonpolar)?
- Based on the information provided above, what components of the cell are likely to have this characteristic?
