Paper Chromatography of Plant Pigments
Learning Objectives
After completing the lab, the student will be able to:
- Extract pigments from plant material.
- Separate pigments by paper chromatography.
- Measure Rf (retention factor) values for pigments.
Activity 2: Pre-Assessment
- The leaves of some plants change color in fall. Green foliage appears to turn to hues of yellow and brown. Does the yellow color appear because carotenoids replace the green chlorophylls? Explain your reasoning.
- Examine the molecular structures of photosynthetic pigments in Figure 10.1. Photosynthetic pigments are hydrophobic molecules located in thylakoid membranes. Will these pigments dissolve in water?
Activity 2: Paper Chromatography of Plant Pigments
Paper chromatography is an analytical method that separates compounds based on their solubility in a solvent.
The solvent is used to separate a mixture of molecules that have been applied to filter paper. The paper, made of cellulose, represents the stationary or immobile phase. The separation mixture moves up the paper by capillary action. It is called the mobile phase. The results of chromatography are recorded in a chromatogram. Here, the chromatogram is the piece of filter paper with the separated pigment that you will examine at the end of your experiment (see Figure 10.4).
We separate the compounds based on how quickly they move across the paper. Compounds that are soluble in the solvent mixture will be more concentrated in the mobile phase and move faster up the paper. Polar compounds will bind to the cellulose in the paper and trail behind the solvent front. As a result, the different compounds will separate according to their solubility in the mixture of organic solvents we use for chromatography.
This video demonstrates the principles and examples of chromatography. You will experiment with only paper chromatography in this lab; however, you will see that you are already familiar with some uses of thin layer chromatography.
Safety Precautions
- Work under a hood or in a well-ventilated space and avoid breathing solvents.
- Do not have any open flames when working with flammable solvents.
- Wear aprons and eye protection.
- Do not pour any organic solvent down the drain.
- Dispose of solvents per local regulations.
- Use forceps to handle chromatography paper that has been immersed in solvent and wash your hands after completing this activity.
For this activity, you will need the following:
- Plant material: intact leaves of spinach and Coleus (one leaf of each plant per pair of students)
- Filter or chromatography paper
- Ruler (one per group)
- Coins
- Pencils
- Colored pencils
- Beakers (400 mL) (Mason jars are an acceptable substitute)
- Aluminum foil
- Scissors
- Forceps
- Freshly prepared solvent mixture
- Petroleum ether: acetone: water in a 3:1:1 proportion
- If no hood or well-ventilated place is available, the mixture can be substituted with 95 percent isopropyl alcohol. Note that, if isopropyl alcohol is used, the pigment bands will smear. You may not be able to separate and identify the chlorophylls or carotene from xanthophyll.
For this activity, you will work in pairs.
Structured Inquiry
Step 1: Hypothesize/Predict: Discuss with your lab partner what color pigments will likely be present in the spinach leaves. Write your predictions in your lab notebook and draw a diagram of how you think the pigments will separate out on the chromatography paper.
Step 2: Student-led Planning: Read step 3 below. Discuss with your lab partner the setup of the experiment. Then agree upon the dimensions of the filter/chromatography paper that you will use. To allow good separation, the paper should not touch the walls of the container. The paper must fit inside the container while being long enough for maximum separation. Write all your calculations in your lab notebook.
Step 3: Follow the steps below to set up your filter paper and perform the chromatography experiment.
- Prepare the chromatogram by cutting a piece of filter paper. Transfer pigments from spinach leaves as in Activity 1. A heavy application line will yield stronger colors when the pigments separate, making it easier to read results. Allow the pigments to dry between applications. Wet extracts diffuse on the paper and yield blurry lines.
- Form a cylinder with the filter paper without overlapping the edges (to avoid edge effects). The sample should face the outside of the cylinder. Secure the top and bottom of the cylinder with staples.
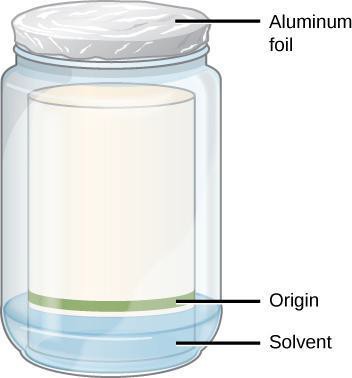
- Pour enough separation mixture to provide a mobile phase while staying below the origin line on the chromatogram. The exact volume is not critical if the origin, the start line where you applied the solvent, is above the solvent. See Figure 10.4.
- Label the beaker with a piece of tape with your initials and your partner’s initials.
- Lower the paper into the container with the band from the extraction in the lower section. The paper must touch the solvent, but not reach the band of pigment you applied. Why must the band be above the solvent line? Write your answer in your notebook.
- Cover the container tightly with a piece of aluminum foil.
- Track the rising of the solvent front. Can you see a separation of colors on the paper?
- When the solvent front is within 1 cm of the upper edge of the paper, remove the cylinder from the beaker using forceps. Trace the solvent front with a pencil before it evaporates and disappears! Draw the colored bands seen on your chromatography paper in your lab notebook immediately. The colors will fade upon drying. If no colored pencils are available, record the colors of the lines.
- Let the paper dry in a well-ventilated area before making measurements because the wet paper is fragile and may break when handled. This is also a precaution to avoid breathing fumes from the chromatogram.
- Discard solvent mixture per your instructor’s directions. Do not pour down the drain.
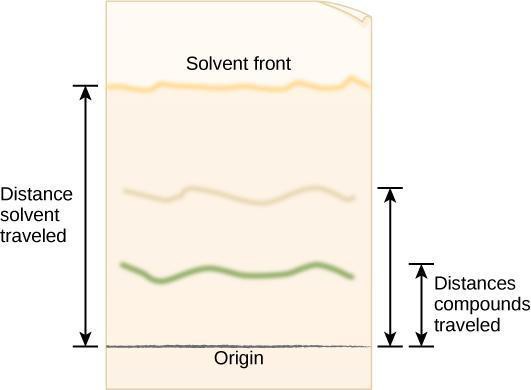
Step 4: Critical Analysis: Open the dried cylinder by removing the staples. Measure the distance from the first pencil line to the solvent front, as shown in Figure 10.5. This is the distance traveled by the solvent front. Measure the distance from the pencil line to the middle point of each color band and the original pencil line. Record your results in your notebook in a table modeled after Table 10.1. The retention factor (Rf) is the ratio of the distance traveled by a colored band to the distance traveled by the solvent front. Calculate Rf values for each pigment using the following equation:
R f=Distance traveled by colored band/Distance traveled by solvent front
Step 5: After determining the color of the band, tentatively identify each band. Did your results support your hypothesis about the color of each band? Discuss which aspects of the experiments may have yielded inconclusive results. How could you improve the experiment?
Guided Inquiry
Step 1: Hypothesize/Predict: What type of pigments are present in Coleus leaves and where are the different colors located? Can you make a hypothesis based on the coloration of the variegated leaves? Write your hypothesis down in your lab notebook. Would there be a difference if you performed chromatography on pigment composition from different colored regions of the leaves?
Step 2: Student-led Planning: Cut the chromatography/filter paper to the dimensions needed. Apply pigments from different parts of the Coleus leaves following the procedure described under Activity 1, keeping in mind that a darker line will yield stronger colors when the pigments are separated, which will make it easier to read the results. Allow the pigments to dry between applications. Wet extracts diffuse on the paper and yield blurry lines.
Step 3: When the solvent front reaches 1 cm from the top of the filter paper, stop the procedure. Draw the pigment bands you see on the filter paper in your lab notebook. Clearly indicate the color you observed for each band.
Step 4: Let the cylinder dry and measure the distance the front traveled from the origin and the distances traveled by each of the pigments. If the bands broadened during separation, take measurements to the middle of each band.
Step 5: Critical Analysis: Calculate Rf for each of the bands and record them in a table in your notebook. Compare the Rf you obtained with those of other groups. Are the Rf values similar? What may have altered Rf values?
Assessments
- Carotenoids and chlorophylls are hydrophobic molecules that dissolve in organic solvents. Where would you find these molecules in the cell? What would happen if you ran the chromatography in this lab with water as the solvent?
- All chlorophyll molecules contain a complexed magnesium ion. Your houseplant is developing yellow leaves. What may cause this, and how can you restore your plant’s health?
- Seeds that grow under dim light are said to be etiolated, which describes their pale and spindly appearance. They soon waste away after exhausting their food reserves. Can you explain this observation?
