Parts of a Microscope
Learning Objectives
After completing the lab, the student will be able to:
- Explain or describe the parts of a light compound microscope.
- Determine the total magnification of each objective lens.
Activity 1: Pre-Assessment
- A microscope has two sets of lenses. What do you think is the purpose of each lens?
- Why do you think scientists use microscopes? Think of useful functions for the microscope and discuss your ideas with your partner.
The Use of a Microscope
The hidden world becomes visible with the aid of a microscope. A microscope is used to see items and structures that the human eye cannot visualize. Microbes, cell structures, and minute particulate materials are examples of such objects. The microscopic examination of one-celled organisms as well as the cells and tissues of multicellular organisms are all part of biological research. To properly utilize the microscope, you must first learn the operational modes of each part. In this laboratory exercise, you will learn to use and identify the parts of a compound light microscope.
Activity 1: Parts of a Microscope
A microscope magnifies the image of an object through a series of lenses. The condenser lens focuses the light from the microscope’s lamp onto the specimen. The light then passes through the object and is refracted by the objective lens. The objective lens is the more powerful lens of a microscope and is closest to the object. The light then travels to the ocular lens, which focuses the image onto the user’s eye. Usually, the power of the ocular lens is fixed for a given microscope.
Different microscopes can magnify objects hundreds, thousands, or even millions of times. Magnification refers to how much larger the image is compared to the original object. As magnification increases, the image becomes larger. The total magnification is the power of the objective multiplied by the power of the ocular lenses. Resolution refers to the ability of a microscope to distinguish two points on the image. As resolution increases, objects that are closer together appear as separate points. Contrast refers to the ability of a microscope to distinguish an object from its background. The higher the contrast, the greater the difference in intensity between an object and the background.
Safety Precautions
- Handle microscopes and lenses with care.
- Do not drop or crush slides. Alert your teacher immediately to any broken glass so it can be properly disposed.
For this activity, you will need the following:
- Compound microscope
- Slide with the letter e; if you do not have premade slides, cuttings from a newspaper can be taped to a slide.
For this activity, you will work in pairs.
Structured Inquiry
Step 1: When moving a microscope, grasp the neck firmly with one hand and place your other hand under the microscope’s base. Do not bang the microscope on the desk. Once you have set down your microscope, turn the revolving nosepiece so that the lowest power objective is pointed at the stage.
Step 2: Throughout this lab, handle slides by their edges and do not touch the specimen area to avoid smudges. Place the slide with the letter e on the stage. Make sure it is oriented so that you can read the letter e correctly with the naked eye while standing at the microscope.
Step 3: You will now observe the slide containing the letter e. Center the specimen on the stage and look through the ocular lens. Adjust the coarse and fine focus knobs until the letter comes into focus. Be careful while focusing so that the slide does not touch the lenses.
Step 4: Hypothesize/Predict: From your observations of the letter e, what do you think is the function of each part of the microscope? Write the function of each in your notebook.
Step 5: Student-Led Planning: Using your textbook and other resources, research each part of the microscope. Identify each part of the microscope in Figure 2.1. Label each part of the microscope in Table 2.1. Write the function of each part in Table 2.1. Parts and Function of a Light Compound Microscope.
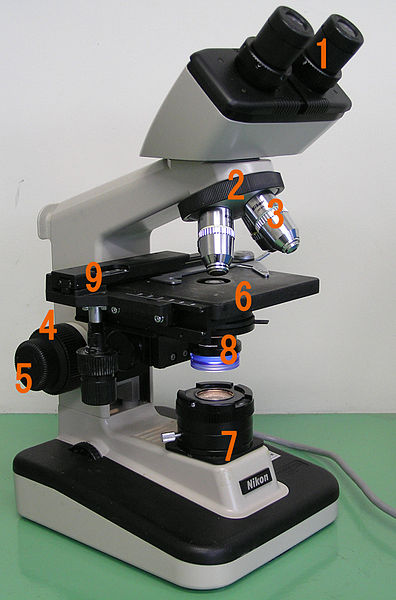
Table 2.1: Parts and Function of a Light Compound Microscope
| Part | Function |
|---|---|
| 1. Ocular lens (eyepiece) | |
| 2. Revolving nosepiece | |
| 3. Objective lens | |
| 4. Coarse adjustment knob | |
| 5. Fine adjustment knob | |
| 6. Stage | |
| 7. Lamp | |
| 8. Condenser | |
| 9. Mechanical stage |
Learn the parts of the microscope (activity)
- Visit the BioNetwork’s Virtual Microscope
- Click on “Explore”
- Click on parts “?” to learn their name and function
Step 6: Critical Analysis: You place a sample on the stage of a microscope, and you look through the ocular lens. All you see is black in the field of view. What would you adjust to fix this problem?
Step 7: Microscope Care and Maintenance: When you are finished using a microscope, make sure the lowest power objective is in place and take the slide off the stage. Use only lens paper to wipe the lenses if they are dirty. Support the microscope by the base when carrying it as described in Step 1. If you are continuing with the other activities in this lab, keep the microscope out.
Guided Inquiry
Step 1: Find the light source on the microscope. Turn on the light source and trace the path of light from the source to the ocular lens.
Step 2: Hypothesize/Predict: Knowing the function of each part of the microscope, draw how the light path of the microscope bends and changes as it travels from the light source to the observer on Figure 2.1.
Step 3: Student-Led Planning: Using your textbook and other resources, research how light travels through the microscope. Use a piece of paper to block the light path through each component of the microscope to confirm that it is part of the light path.
Step 4: Critical Analysis: Sometimes, scientists want to study living cells that are kept in dishes. The dishes are very deep and filled with media. The cells are on the bottom of the plate. In order to see these cells on the microscope, the microscope has to be inverted so that the objective lens is below the sample instead of above it. Draw a diagram of how you would design the light path of an inverted microscope.
Magnification[1]
Magnification is the process of enlarging the appearance of an object. We calculate the magnification of an object by indicating the fold change in size. So, if something appears to be doubled the size of the real item, then it is obviously magnified 2x. Because there is a magnification by the eyepiece (ocular lens), as well as the objective lenses, our final magnification of an item is the product of those two lenses.
The lowest magnification objective lens (usually 4x or 5x) is referred to as a scanning lens. There is also usually a low-power lens at 10x and a higher magnification lens at 40x. There may be a higher magnification lens at 100x, but these usually require oil to function properly and are often reserved for microbiology labs.
What is the power of the ocular lens?
We can calculate that as:
Magnificationtotal = Magnificationobjective x Magnificationocular
With this in mind, fill in the following table:
| Objective Magnification | Ocular Magnification | Total Magnification | |
|---|---|---|---|
| Scanning | |||
| Low Power | |||
| High Power | |||
| Oil Immersion | 100X |
Assessments
- What are three precautions you must take to prevent damage to the microscope?
- A scientist uses a 40× objective to observe his specimen. He has a 10× ocular lens. What is the total magnification of the object?
- A magnifying glass is also used to magnify objects. How is a compound microscope different from a magnifying glass?
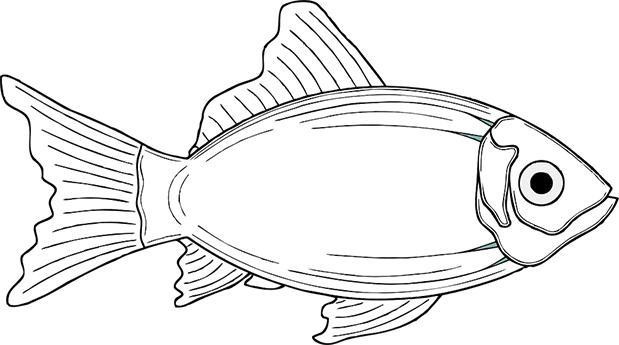
- Draw how Figure 2.3 would appear under a compound microscope.
- The Magnification activity is adapted from Microscopy in Biology OER, a site sponsored by the Ursula Schwerin Library to select and curate resources for use in General Biology 1 and originally authored and curated by Jeremy Seto, Department of Biological Sciences – New York City College of Technology. It is licensed CC-BY-NC-SA. ↵
