Measurement of Transpiration as Water Loss under Selected Conditions
Learning Objectives
After completing the lab, the student will be able to:
- Measure the rate of transpiration.
- Test and predict the way in which an environmental change affects the rate of transpiration.
Activity 1: Pre-Assessment
- What environmental conditions do you think will most likely cause stomata to open? Which will most likely cause stomata to close? Explain your answer.
- Why do you think the suction caused by transpiration is considered a negative-feedback mechanism?
- Discuss the answers to questions 1 and 2 with the class.
Activity 1: Measurement of Transpiration as Water Loss under Selected Conditions
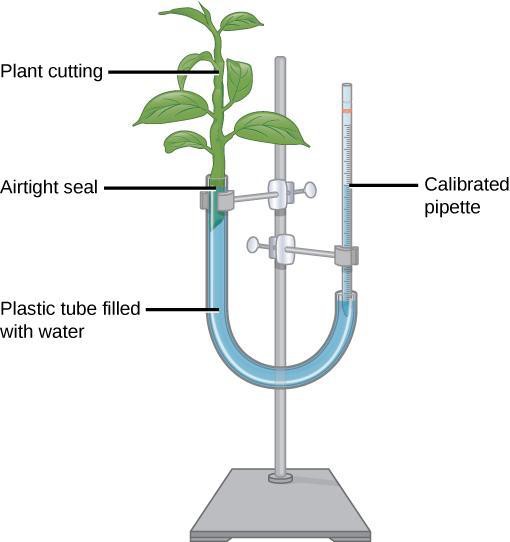
You will conduct this first activity in three parts. First, you will assemble an apparatus called a potometer, illustrated in Figure 19.1. A potometer consists of a plant cutting stuck into one end of a U-shaped tube and a graduated cylinder stuck into the other end. This device creates water potential, which will allow you to measure transpiration. In the second part, you will collect data for transpiration under a set of control conditions. In the third part, you will choose from a list of variables to change the conditions for the plant, and then you will collect transpiration data again using the modified apparatus.
Safety Precautions
- Use care with all glassware.
- Clean up any spilled water immediately to avoid slippage.
- Insert the pipette carefully to avoid breaking the tip.
- Do not allow electric cords to get wet.
- Be careful when handling hot lamps.
For this activity, you will need the following:
- Ring stand
- Plant stalk with leaves
- Incandescent lamp
- Clamps
- Plastic tubing
- Basin half-filled with water
- Calibrated 1.0-mL pipette
- Basin
- Syringe
- Petroleum jelly
- Fluorescent light or water tank with incandescent light
- Fan
- Water sprayer
- Plastic bag
- Timer
For this activity, you will work in pairs.
Structured Inquiry
Step 1: Set up the potometer, using Figure 19.1 as a guide. To reduce the formation of bubbles, cut the twig and insert it into the water-filled plastic tubing while underwater. Add the pipette and adjust water level as necessary so the starting point is high enough to allow for readable decreases during the experiment. If there are any air bubbles, you can use the syringe to remove them. Use clamps to attach the potometer to the ring stand, making sure the heights of the plant relative to the pipette are similar to those in Figure 19.1.
Step 5: Critical Analysis: Discuss with your partner how the first trial worked and if any adjustments need to be made to the setup to ensure more accurate results. Are the predictions made in Step 2 supported by the data? Can your results be improved? After the data collection, you will need to calculate a rate of transpiration per minute. To do this, you will take a water level reading every five minutes for 20 minutes for each part of the experiment. Then, you can graph the water measurements by time to estimate the rate of transpiration per minute. After this, you will need to determine the area of leaf surface measured. Since there are multiple leaves of different sizes, you will trace each leaf on graph paper and add up the total area. The final result of the experiments should show the rate of transpiration. Discuss with your partner and write your answers in your notebook.
Guided Inquiry
Step 1: Hypothesize/Predict: Choose from the following list of variables to alter the conditions for the plant:
- Use fluorescent light (if only an incandescent light is available, place a tank of water between the plant and the light source to absorb heat).
- Apply wind using a fan.
- Apply high moisture by spraying the plant with water and then enclosing it in a plastic bag.
How do you think your chosen variable will affect the rate of transpiration? Does the adjustment accurately mimic conditions in a natural environment? Why or why not?
Step 6: Critical Analysis: How did the typical conditions compare with the altered conditions in terms of the rate of transpiration? Was the difference significant? Discuss your answers with your partner and write them in your notebook.
Assessments
- One cutting has more leaves than another. Given this information, can you predict how the rate of transpiration would compare between the cuttings?
- Explain whether your prediction in the Guided Inquiry was accurate. Include a reason based on how the variable affected transpiration.
- How might drought or flooding induced by climate change affect transpiration of plants, and how, in turn, would this affect the ecosystem? Give an example.
