Depth of Field and Wet Mount of Specimens
Learning Objectives
After completing the lab, the student will be able to:
- Explain or describe the depth of field.
- Construct a temporary wet mount when given a slide, coverslip, and specimen.
Activity 3: Pre-Assessment
- When you focused the slides in the previous activities, what part of the microscope was moving? Why do you think this changes the focus?
- Review the definition of life. What are characteristics found in all living things?
- Discuss the answers to questions 1 and 2 with the class.
Activity 3: Depth of Field and Wet Mount of Specimens
As you work with a microscope, you will notice that even when an object is in focus, you can continue to adjust the focus and see new things in the lenses. This is because most specimens are very thick. As you move up and down with the stage, different planes of the object come into focus. The depth of field refers to how thick each plane is. It tells you how much of a specimen is in focus at any given time. Although you may think that a higher depth of field is more useful because it allows you to see more objects, most scientists try to make the depth of field as narrow as possible. This prevents light from other focal planes from interfering with the observations.
Depth of field[1]
- Examine the slide of colored threads under scanning power so the cross-point of the threads is at the center of the field (Figure 2.5)
- Raise the magnification to the low-power objective
- What do we notice about the threads and the focus?
- How can we explain this observation with respect to the threads?
- Close the diaphragm to allow a pinpoint of light through the slide. What effect does this have on the image?
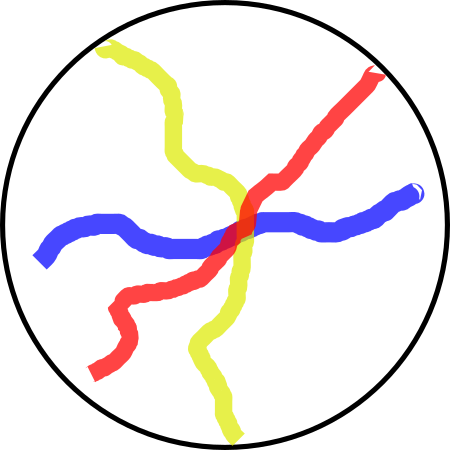
Figure 2.5: Colored threads with cross-points at the center of the field of view. Licensed CC-BY-NC-SA by Jeremy Seto in Biology OER
Examining Cells
The specimens you use on your microscope can either be wet-mounted or dry-mounted. A wet-mount refers to living tissues that are placed on a slide with an aqueous solution to keep them wet. Usually, a coverslip is placed on top of the specimen to flatten the specimen onto the slide. A dry-mount refers to preserved tissue that has been fixed and stained on a slide. This technique allows you to preserve specimens for a long time, and it also allows you to add chemicals to increase the contrast of a specimen from its background.
Safety Precautions
- Handle glass slides with care.
- Dispose of specimens as necessary.
- Dispose of coverslips in a broken-glass container.
For this activity, you will need the following:
- Compound microscope
- Slides with crossed colored fibers or crossed strands of hair
- Clean slides
- Coverslips
- Elodea, onion skin, pond water, or other samples
For this activity, you will work in pairs.
Structured Inquiry
Step 1: Hypothesize/Predict: Look at the slide with crossed fibers or hair. How do you think you can use the microscope to determine which fiber is closest to the top of the slide and which fiber is closest to the bottom?
Step 2: Place the slide with crossed fibers or hair on the stage. Center the slide and focus it.
Step 3: Student-Led Planning: Turn the fine focus knob up and down. With your partner, decide how to determine which fiber is on top and which fiber is on the bottom of the slide. Record your results in your notebook.
Step 4: Critical Analysis: Take a look at the slide again without the microscope. With your naked eye, do you think the results of your analysis make sense?
Guided Inquiry
Step 1: Hypothesize/Predict: Based on the microscopy you have performed so far, what would be the challenges of viewing living organisms under the microscope?
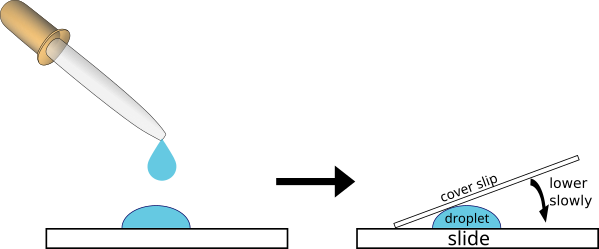
Step 2: Student-Led Planning: You will now observe pond water or samples of living organisms provided by your teacher. Place a small drop of water from near the bottom of the sample jar on a slide. Place a cover slip at an angle so that one edge touches the drop. Slowly lower the coverslip onto the specimen. Avoid trapping air bubbles under the coverslip.
Record drawings of your observations in your lab notebook. Make sure to record the magnification for each drawing.
Step 3: Critical Analysis: What were some of the differences you observed between your specimens? What were some of the challenges in viewing living organisms that move under the microscope? Be prepared to present your findings to the class.
Procedure
- Choose a prepared slide of a Protist (Euglena, Amoeba, Paramecium)
- Prepare a wet mount of a drop of pond water and place a cover slip over the drop (Figure 2.6)
- Swab the inside of your cheek
- Roll the swab across a slide
- Drop some methylene blue onto the slide
- Place a coverslip over the drop
- Visualize and draw your cheek cells
- Document your observations by drawing the cells and by using your phone to snap an image (Figure 2.7).

Assessments
- A microscope can focus on many fields of different depths. However, thick samples have to be sliced into very thin slices in order to be viewed under the microscope. Why do you suppose this is the case?
- Elodea plants appear as solid green objects to the naked eye, but appear mostly clear under a microscope. Explain this phenomenon.
- A scientist takes a sample from a pond and examines it under their microscope. He thoroughly examines the wet mount and finds no living thing on the slide. He concludes that the pond is unable to support life. Is this a valid conclusion? Why or why not?
- Before the cell theory was developed, two previous theories were prevalent as different historical theories. Explain how the invention of the microscope would lead to the replacement of both of these theories with the cell theory:
- The Miasma Theory, where diseases were thought to be spread by miasma, a poisonous, foul-smelling vapor that can travel through the air.
- The Theory of Spontaneous Generation, where living things could be generated from non-living matter, such as how maggots seem to appear spontaneously on meat left out in the open.
- The Depth of field activity is adapted from Microscopy in Biology OER, a site sponsored by the Ursula Schwerin Library to select and curate resources for use in General Biology 1 and originally authored and curated by Jeremy Seto, Department of Biological Sciences – New York City College of Technology. It is licensed CC-BY-NC-SA. ↵
